Message Thread:
Stain issues
3/16/18

I�m having some stain issues. I�ve switched to Mohawks line of wiping stains which are top of the line stains. Previously I was using their dye stains but due to light transparency making the colors look dark and light I decided to go to their wiping stains. This stain is their cinnamon color, I done on with it and it turned out pretty good, I did have to go back and mist a littl dye in a few places to darken them up to match. So I just started to stain the next kitchen this morning and it just looks horrible. It�s not as dark and as you can see from the pics it�s blotched bad. So far this is all I�ve stained. The only thing I can think of that was done different on this kitchen was that we switched to 120 grit Mirka Abranet on this one where we used 120 grit indasa rhino on the last one which we have used for years. Could the difference in the sanding do this? At this point I�m thinking I�m going to have to resand everything with indasa rhino or try to use a dye first to make it blend. Do you guys have any thoughts? Thanks

View higher quality, full size image (1536 X 2048)

View higher quality, full size image (1536 X 2048)
3/16/18 #2: Stain issues ...
I'm wondering if 120 grit might have been too course for stain grade. Did you incorporate any type of stain controller on the raw wood prior to using the stain?
Unless the entire project is supposed to be as dark as the 3rd board on the right, Id say you either have to sand it down or try scrubbing the wood with Paint Thinner and a Scotch Brite to remove some of the stain color.
Did your completed sample board come out as dark as this door did? Good luck.
3/16/18 #3: Stain issues ...
Show us a pic of a previous door that you did successfully with the wiping stain.
120 grit paper regardless of manufacturer is too coarse for staining.
Our sanding schedule:
clear/paint: 60/100/150/240/320
stain: 60/100/180/240/320
Obviously we don't use 60 much. We glue up doors well enough that we take one 100 grit pass thru the widebelt then 150grit ro.
My experience/thinking is that you get best adhesion least grain raise at 150. 240 grit between different products(primer/topcoat) 320 grit between coats.
We go up to 180 grit for staining because it evens out absorption & minimizes grain raise. We don't want to sand off the stain so a light scuff with 240.
I would think that the stain would highlight 120 grit scratches.
3/16/18 #4: Stain issues ...
I can see several issues with the door. On the back side, you can see long linear scratches, that look like scratches out of the thickness sander. On the front view, the end grain looks rough and cross grain scratching. Also see a piece of the rail broken off, but certainly not a sanding issue. I would also recommend finer sanding grit, but I would also shop for a new stain line. That looks like a dye stain to me as well. Hardly any pigment left in the pores. I don't envy you trying to work this out. That door will certainly be a remake, no salvaging that one!
3/16/18 #5: Stain issues ...
Thanks for the responses. The reason I�ve used 120 grit is so that the wood will soak up more stain, and I still have some parts that almost want to repel it. Maybe the 150 grit would even things out. Let me ask another question. If one door was sanded and another door was sanded a week later, and then both stained together would the one freshly sanded be darker?
3/16/18 #6: Stain issues ...
I think I see a couple things going on, 1st the sanding looks pretty rough. It could be the photo, but it looks like ROS swirls everywhere on that door? In my shop everything is finished with a hand block after ROS sanding to eliminate the swirls. I also agree with the others that 120 is coarse for stain grade. It will absorb more color, but it also shows scratches a lot more than going up one more grit to 150.
On the end grain for solid wood panels I'll usually bump up one additional grit as it soaks more stain.
Now for certain woods like maple, birch etc. I find using a sealer coat a necessity or else it turns out just like what you have in the pic. I'll spray on a nice wet coat of stain base, let it dry a bit and then wipe it down. Let it dry fully then apply the stain, it makes a much more even coat.
You mention that your previous kitchen was done the same way, with the same wood and came out better? Do you have any pics? I find getting a really dark color on a really light wood can be a PITA. I've not been successful in doing a single step stain for these situations and usually have to use a couple steps.... spray dye followed by stain, or stain followed by shading lacquer etc..
What is the wood your using? Some woods as mentioned can be difficult with dark stains.
As for your last question, sorry but I'm not sure. Doesn't seem like it should make a difference..... but I wouldn't hazard an answer.
good luck,
JeffD
3/17/18 #7: Stain issues ...
You use a wood that's prone to blotching. That's ok, but you have to introduce a step to control the blotching.
First, begin your finish sanding with 120 grit. Then go to 180 grit. Use the orbital sander for all your surfaces, and use sheet sandpaper to get into the corners, the shapes & profiles, and the edges.
To control the blotching, spray a spitcoat. That will be any clear finish diluted to 3% - 5% solids, lay down one medium-wet coat and scuff that very lightly by hand with 320.
Then do your wiping stain. Seal it. If you need more color, there are different ways of doing that and all of them will give you a smart and professional look.
You can tone on more color. The toner can be pigmented or dye based, the differences are in aesthetics, only. You can use your existing wipe stain to make a toner, let it down in lacquer thinner and then add that let-down stain/lacquer thinner mix to your clearcoat material, but thin that down also.
Or, you can do a glaze coat. If you are going to do a powder glaze, that has to set on top of a precatalyzed or a catalyzed coating, or else it will bite into your finish (which you don't want).
The bottom line for you is the uneven sanding and also dealing with blotchy woods, both of which you can control with ease. Your choice of sandpaper brands is fine. But your cutting sequences need fixing. You have to get rid of the widebelt sanding marks and any planer marks. Again, 120 grit, followed by 180 grit. Use 320 grit - only and always - in between coats.
3/18/18 #8: Stain issues ...
For blotching problems, a common technique that has been used to minimize that is to use a 'clear stain base' as your first coat. Apply liberally, remove excess, wait twenty minutes, then apply your stain.
This technique works well with ML Campbell stains, don't know why it would not work with Mohawk's too!
Otherwise, follow 'DanShaf' instructions.
3/18/18 #9: Stain issues ...
I appreciate the responses.
I�ve got a new guy that worked on these doors so there was a few mistakes and yes a couple remakes.
I�ve been doing this for years so I guess it seems like a rookie to ask these questions, but I think that no matter how much we know that we still don�t know it all and can always learn more. I�m always looking to tweak my techniques to get a better product. In the 20 years that I�ve been doing this I�ve always felt like there were ways to get better colors and finishes, but I�ve never had a dissatisfied customer either.
As far as these different steps. I�ve never used a clear stain base. I have used a wash coat before of 1part vinyl sealer and 2 parts lac thinner, but it was to get a lighter color than my sample that the customer picked out. That ratio might need to be 1-4. I�ve purchased some Mirka Gold, 80-150-180 grits to try. I�m going g to play with these grits and stain and see what I can come up with. I was hoping to go through less steps but it might end up being more steps if you have to add wash coats. But Jeff is right, it is a pain trying to get the dark colors.
As for this job, I now have about half the doors stained and was able to use dye to fix the color issue, they actually look good.
3/18/18 #10: Stain issues ...
Hi Mike, kudos for getting on the right track and for sticking with it. In lieu of a stain blocker, Ive often sprayed on a light but thorough coat of Paint Thinner to woods that tend to blotch when using an oil based stain.
While the item is still wet with Thinner, I apply the oil based stain as usual and then wipe off the excess.This is extremely helpful on end grain and prevents a total absorption of the stain.
A bit of experimentation might be in order to see if you like this procedure.
3/18/18 #11: Stain issues ...
Hmm, interesting Robert. I�ll have to try that sometime. Thanks for the tip. I�ve did that before on painted work before applying glaze to give it more open time. Never with a stain though.
3/18/18 #12: Stain issues ...
You guys that are doing a wash coat, or spit coat, after it dries do you scuff any or go straight to stain?
3/18/18 #13: Stain issues ...
Depending on the wood using Sealcoat shellac on the end grain helps to control absorption.
3/18/18 #14: Stain issues ...
Mike, Look into a product put out by Daly's called Benite. Far superior to paint thinner or washcoat and also easier- rare combo of better results and better handling.
3/19/18 #15: Stain issues ...
I get a kick out of statements like " the best " and " far superior " and better results " and my favorites... " rare combo " and " far superior ".
The MSDS sheet tells the truth...the whole truth and nothing but the truth.
3/19/18 #16: Stain issues ...
I have a couple concerns with the methods or techniques I�m hearing,
1. With a washcoat it seems that it would be hard to achieve a darker color, dye would be a must to make up the difference I would think. Plus sanding to 150 or 180 closes up the grain even more.
2. By sanding to a higher grit, and washcoat I�m wondering if there are going to be any adhesion issues since the pours of the wood are more closed off?
3/19/18 #17: Stain issues ...
Use a darker stain
Add a little to your seal and topcoats and tone if needed.
3/19/18 #18: Stain issues ...
Robert,
When was the last time you used Benite? I've used both mineral spirits and wash coats with vinyl sealer and will stick by my claim that Benite is far superior. I'm pretty sure it's a regional thing, but Benite is the standard in the Pacific Northwest.
3/19/18 #19: Stain issues ...
A read through of the MSDS will indicate why I don't use the stuff; same holds true for store bought/ pre-mixed stains.
3/20/18 #20: Stain issues ...
issues I see are prep and application technique. sometimes there is just no way around using soft maple and eventually we all have to deal with staining it. your sanding needs to be improved... no amount of finishing magic is going to fix a not so good prepped product on an unforgiving wood. We run into cherry splotching like this if its poorly prepped... Try spending more time going through the grits up to 150-180 very evenly and it will be less prone to being inconsistent. Try as others have suggested using a clear base first. Have you ever tried taking your wiping stain and reducing it and applying with a gun to bring the color up? to get that wiping stain to pop the grain we generally use 4oz. of our wipe stain in 28 oz of vm&p naptha and spray the color like we would an NGR... just enough to pop the grain and wet enough that the air pressure is not flooding the stain around in puddles... you should see the tails flashing off on your passes. Use a control sample in your hand to bring each door up to color and carry on to the next door beside it... then come back and adjust them all to be consistent. Once your nail this technique its much faster than wiping to get consistent colors.
3/20/18 #21: Stain issues ...
There are various methods talked about here of controlling the wild and random absorption of stain on botch-prone woods. Generally, we are "sizing" the wood.
Benite: it works, no question. And it works well. But with a 12 - 24 hour dry time, it's not production-friendly. At close to $60 a gallon, that's a whammy. It's hand-applied, and that in itself is not as quick as a washcoat, but, then again, using clear stain base is also hand applied.
The great advantage of the clear stain base over the Benite - or any linseed oil type material - is the ready time. After 20 minutes, the clear stain base is ready for your next step in finishing, namely applying your wiping stain.
For me, though mineral spirits will flood into the woods and minimize blotching, waiting for the wiping stain to be ready enough to spray is an issue. Or is it? I never tried this, so I don't know if it slows down the finishing process or not, whereas applying clear stain base would not, other than the time to apply and the twenty minutes after waiting for it to dry.
My favorite go-to method is the one that I enjoy, and that will be spraying on a spitcoat (a washcoat) to size the wood.
There is an absolute aesthetic difference between using a washcoat first and then a wiping stain, versus using a wiping stain on bare wood. It's a "cleaner" look, and I say that as a "so-to-speak". If you want to step away from the stain & topcoat look and get more of that furniture look, then you do have to build your colors, to develop your look. Step finishing results in "that look". To me, it's more about matching a look, and coming up with this color and that color is part of how I describe the game.
3/20/18 #22: Stain issues ...
Here's a great video from Behlen on using dye stains to achieve a dark and even color:
https://youtu.be/2ABI-r4hsgA
Achieving a Dark and Even Color
3/20/18 #23: Stain issues ...
Here is a real simple schedule using very few steps, just a dye stain, sealer or washcoat, glaze, and topcoat. The color is rich and even, with great clarity.
Stain & Glaze Finish
3/20/18 #24: Stain issues ...
There�s some good tips and techniques here. I plan to do some test pieces and see what I can come up with. Different tests as far as sanding to 150 and 180, washcoats, and toners, I already have a lot of experience with dyes so I know what to expect with those.
Dan, what do you think is a correct ratio for a washcoat using vinyl sealer and lac thinner? I was thinking 1 sealer to 2 thinner? I�ve used this ratio before for a washcoat but it wasn�t so much to get and even color but rather where a client wanted a color to not be so dark.
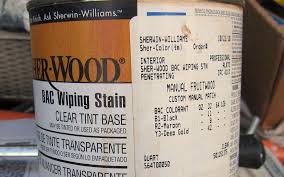
3/23/18 #25: Stain issues ...
I'm really surprised no one has mentioned Sherwin Williams wiping stain. It will stain anything evenly and doesn't blotch...Maple, poplar, birch, doesn't matter. My suggestion is to sand to at least 150 or 180 and get some SW wiping stain. I was amazed when I first started using it a few years ago. No need for wash coats, sealer coats, ect. You do have to be particular with sanding as it will show cross grains and swirls more that other stains.
3/24/18 #26: Stain issues ...
JeffM I noticed this too with SW stains. And I just recently switched from using SW for all my finish product needs to ML Campbell solely because the customer service and knowledge base of the Campbell sales rep was far superior to the store clerk at the local SW store.
I did notice a similar thing with SW vs Campbell stains being blotchy vs not blotchy.
3/24/18 #27: Stain issues ...
Jeff, now that you mention it I�ve used SW stain a couple times in the past and I don�t remember them blotching either. I think I might still have some to try it. If I remember right they have two different lines of stain? Maybe something like �wood classics� and another kind that I pretty much sprayed and let it dry. It was like water. Which are you referring to?
Jacob, I know exactly what you�re talking about, the clerks just can�t help you much. And one even told me that he didn�t know much about their stains and finishes as they were more of a paint store. Personally for stains and paints I like to have a good knowledgeable rep.
3/24/18 #28: Stain issues ...
If you want more stain brand recommendations, try Wood Song by ML Campbell. That stuff really bites into the wood!
3/24/18 #29: Stain issues ...
Mike. I'm talking about the wiping stain. The Wood Classics is crap like Minwax. The wiping stain is fairly thick and if you were spraying it I would think you would need a paint tip. My SW people are really good at my local store.
3/25/18 #30: Stain issues ...
SW 'BAC' stains are muddy. IMHO. Tried them once, went back to Woodsong and Mohawk, and ICA dyes.
3/25/18 #31: Stain issues ...
Jeff, I think I was thinning them with toluene and using them as a toner more or less. I had some adhesion issues doing it that way.
Going back to the original post, i used a dye before and after the stain and they look fine. I�ve switched back and forth on different things but the dye seems like a go to product for evening things out.
3/26/18 #32: Stain issues ...
if you guys want to go the Sherwin route.. Which I highly recommend... Switch over to their SB stain colorant system and use their aurora program to build/store your formulas. they have several clear bases to work with depending on you application type.. wipe..spray no wipe... spray wipe... Based on about 17 different tints you can create any match right in your own hands and use the aurora system to store your formula and add notes about the process... recall and print the formula and weigh it out for any size batch you want from 4oz to 400 gallons... I also do a good bit of their waterborne stain dispersions for going under my UV coatings so I also have that whole tint line and the raw ingredients loaded into aurora for formulating... you could do this without the whole mixing station. I find most of my mixes contain the following tints with the concentrated clear base for wipe and naptha
Black,White,Burnt Umber, Raw umber,Burnt Sienna,Yellow Oxide,Bright Red,Blue R/S,Van Dyke Brite Yellow.....
you can hit just about any color for wipe or spray with those colors....
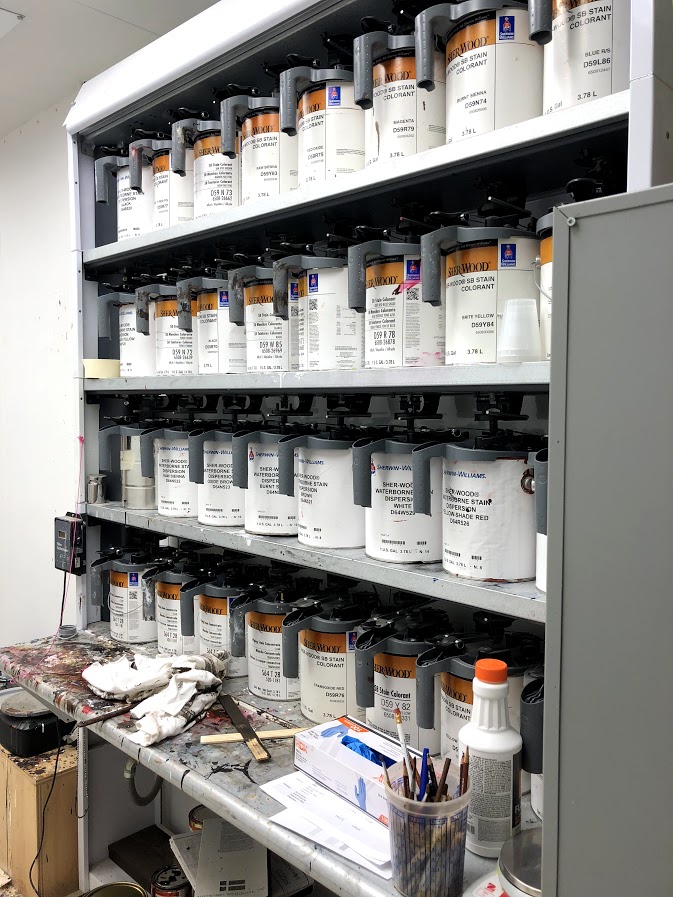
View higher quality, full size image (673 X 897)
3/26/18 #33: Stain issues ...
Hey Mike, I've been in the game about the same amount of time as you and I don't consider these rookie questions at all. Finishing is a specialty all on it's own and many of us are trying to wear too many hats in our shops. I don't have nearly enough knowledge to call myself a finisher, but I manage to finish my own products in a way that looks good enough that I have other guys asking me how I do it. Oh and don't even get me going on how difficult it is to train someone to sand a door properly!!!
I've haven't tried using the thinned down finish technique myself so can't comment on that. And I'm also trying to avoid extra steps, but sometimes you just have to do a little extra to get it to look right. So I'm doing a light birch project right now. Even with it being a light color I have to seal it first. I spray everything with a liberal coat of sealer.... just ML Campbell Woodsong stain base without color added. Let that dry for several minutes and then quickly wipe any wet spots left over. After 1/2 hour or so I spray the stain coat. I'll usually try to do that at the end of the day as I do one side and let dry overnight before spraying the second side. I find if I don't leave enough time I sometimes get marks where the door was supported on the finish rack. After half hour your good to spray topcoat.
I find this to be an easy extra step with no additional scuffing or sanding in between which makes a big difference in the outcome. It's still not perfect, but I'm still learning as well!
good luck,
JeffD
3/26/18 #34: Stain issues ...
JeffD, I�m always trying new things to make a better product, and/or make things easier. I use a lot of dyes to get the darker colors and have always came out with pretty good results but always felt like they good be better if that makes sense. I guess I�m my own worst critic, but striving for perfection I think is what keeps us getting better and better even though we might not get to that perfection point.
You mention that after your clear base that you spray a stain base and let it dry over night, wondering if you�re spraying straight stain? I worry about adhesion with a lot of pigment just laying on the surface, any issues with your method?
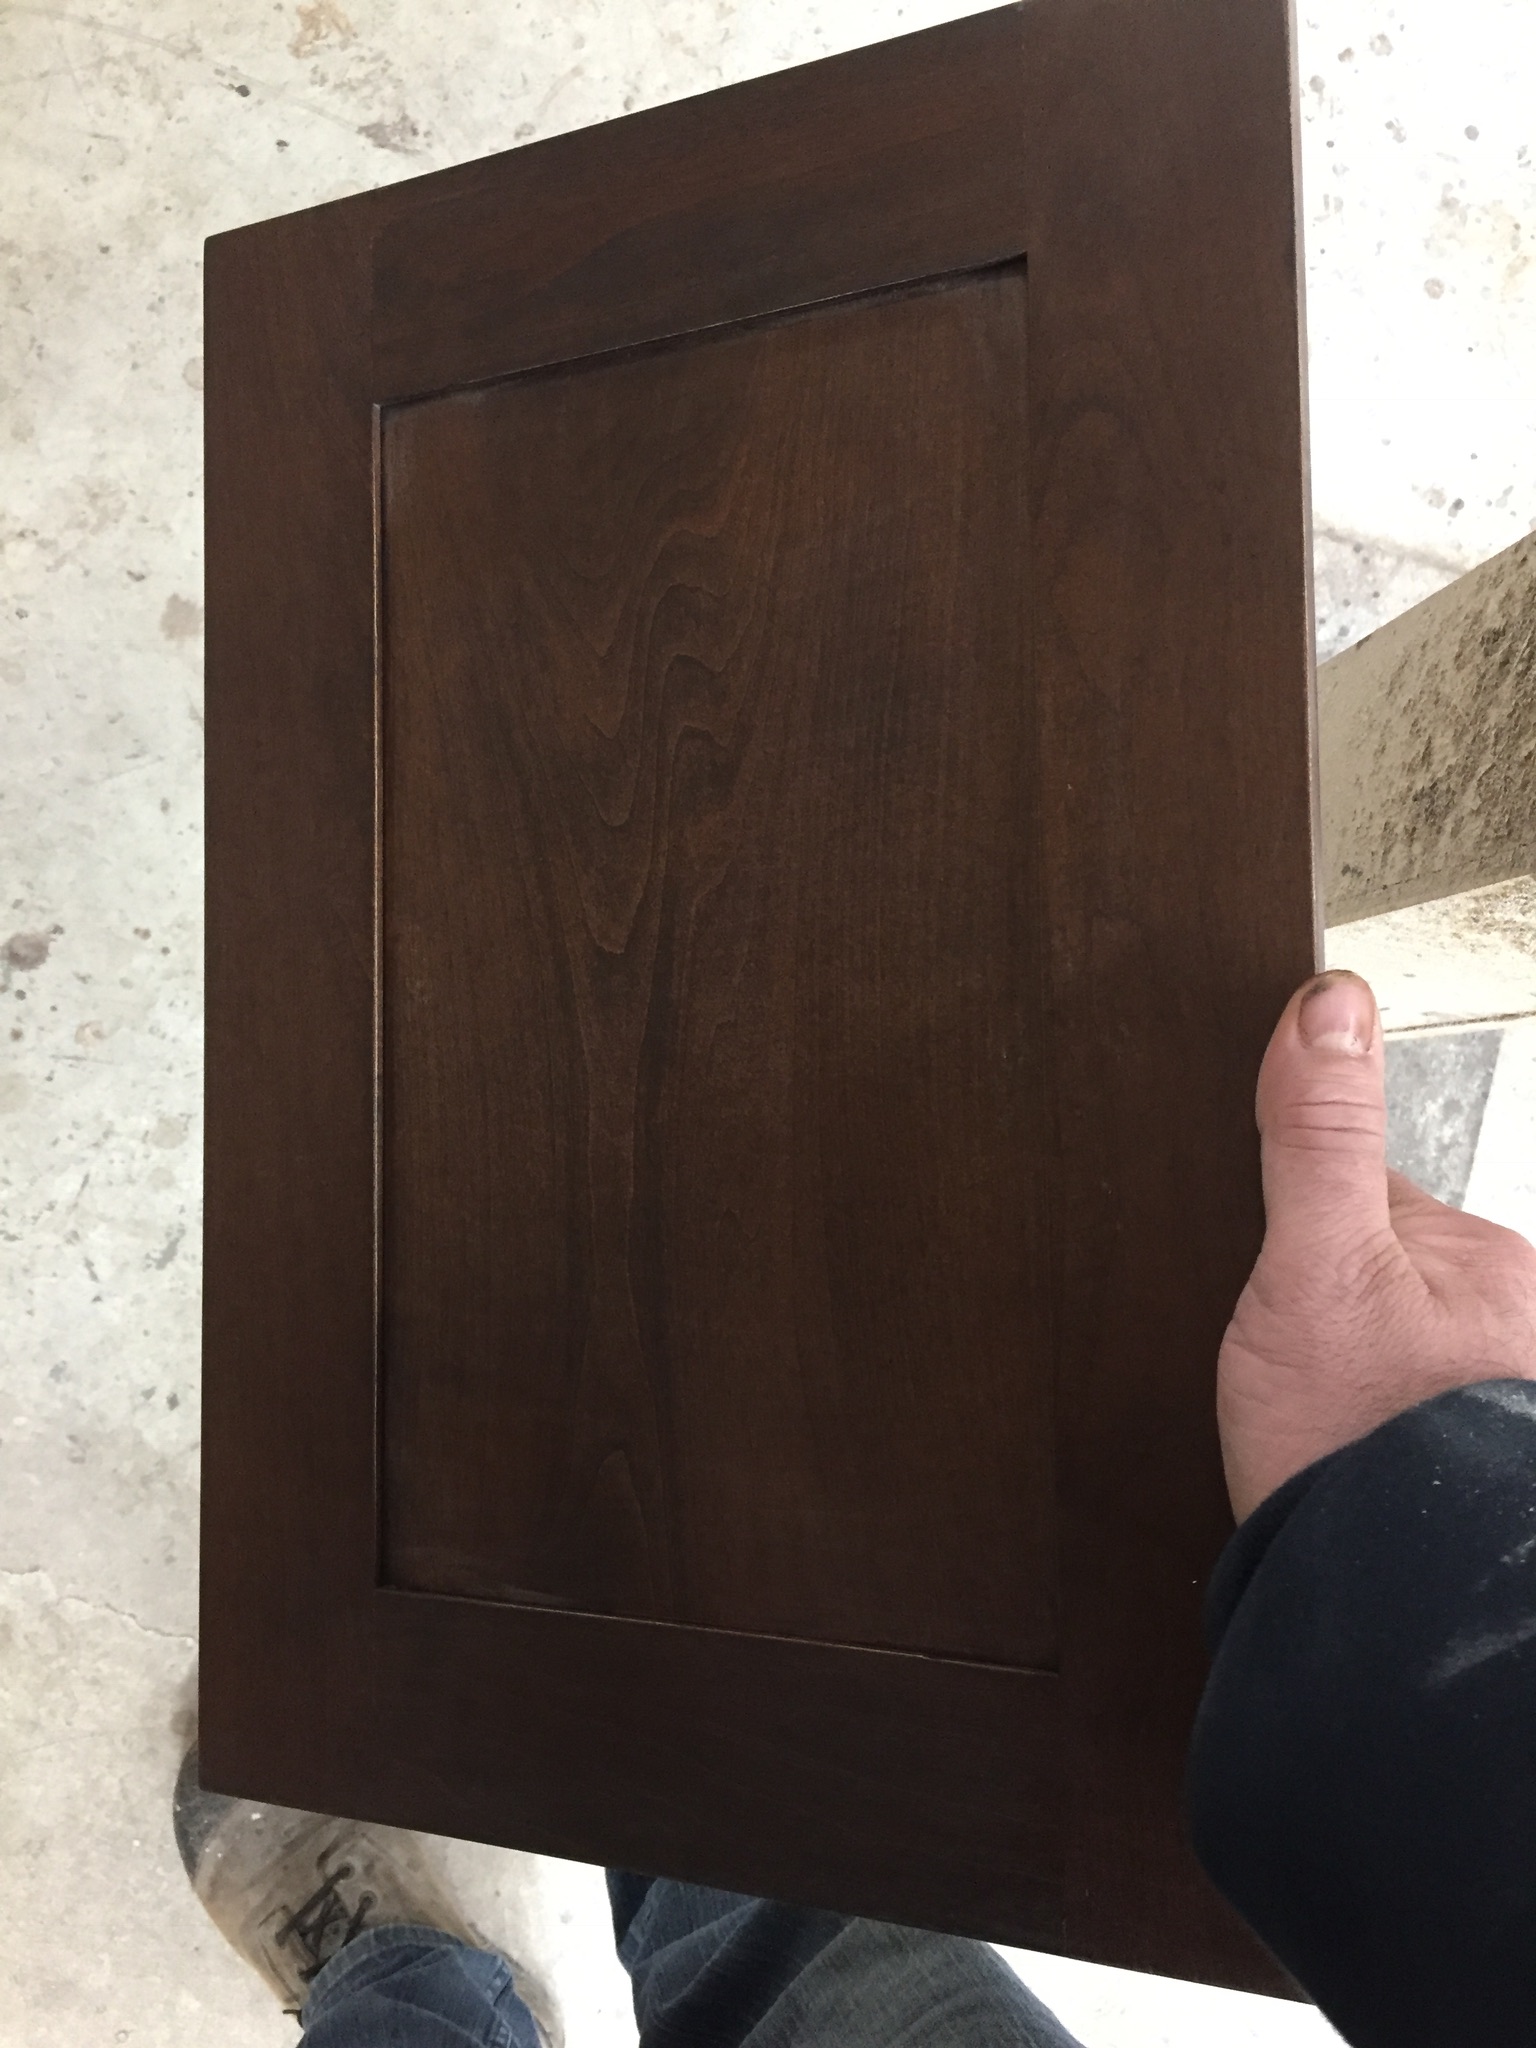
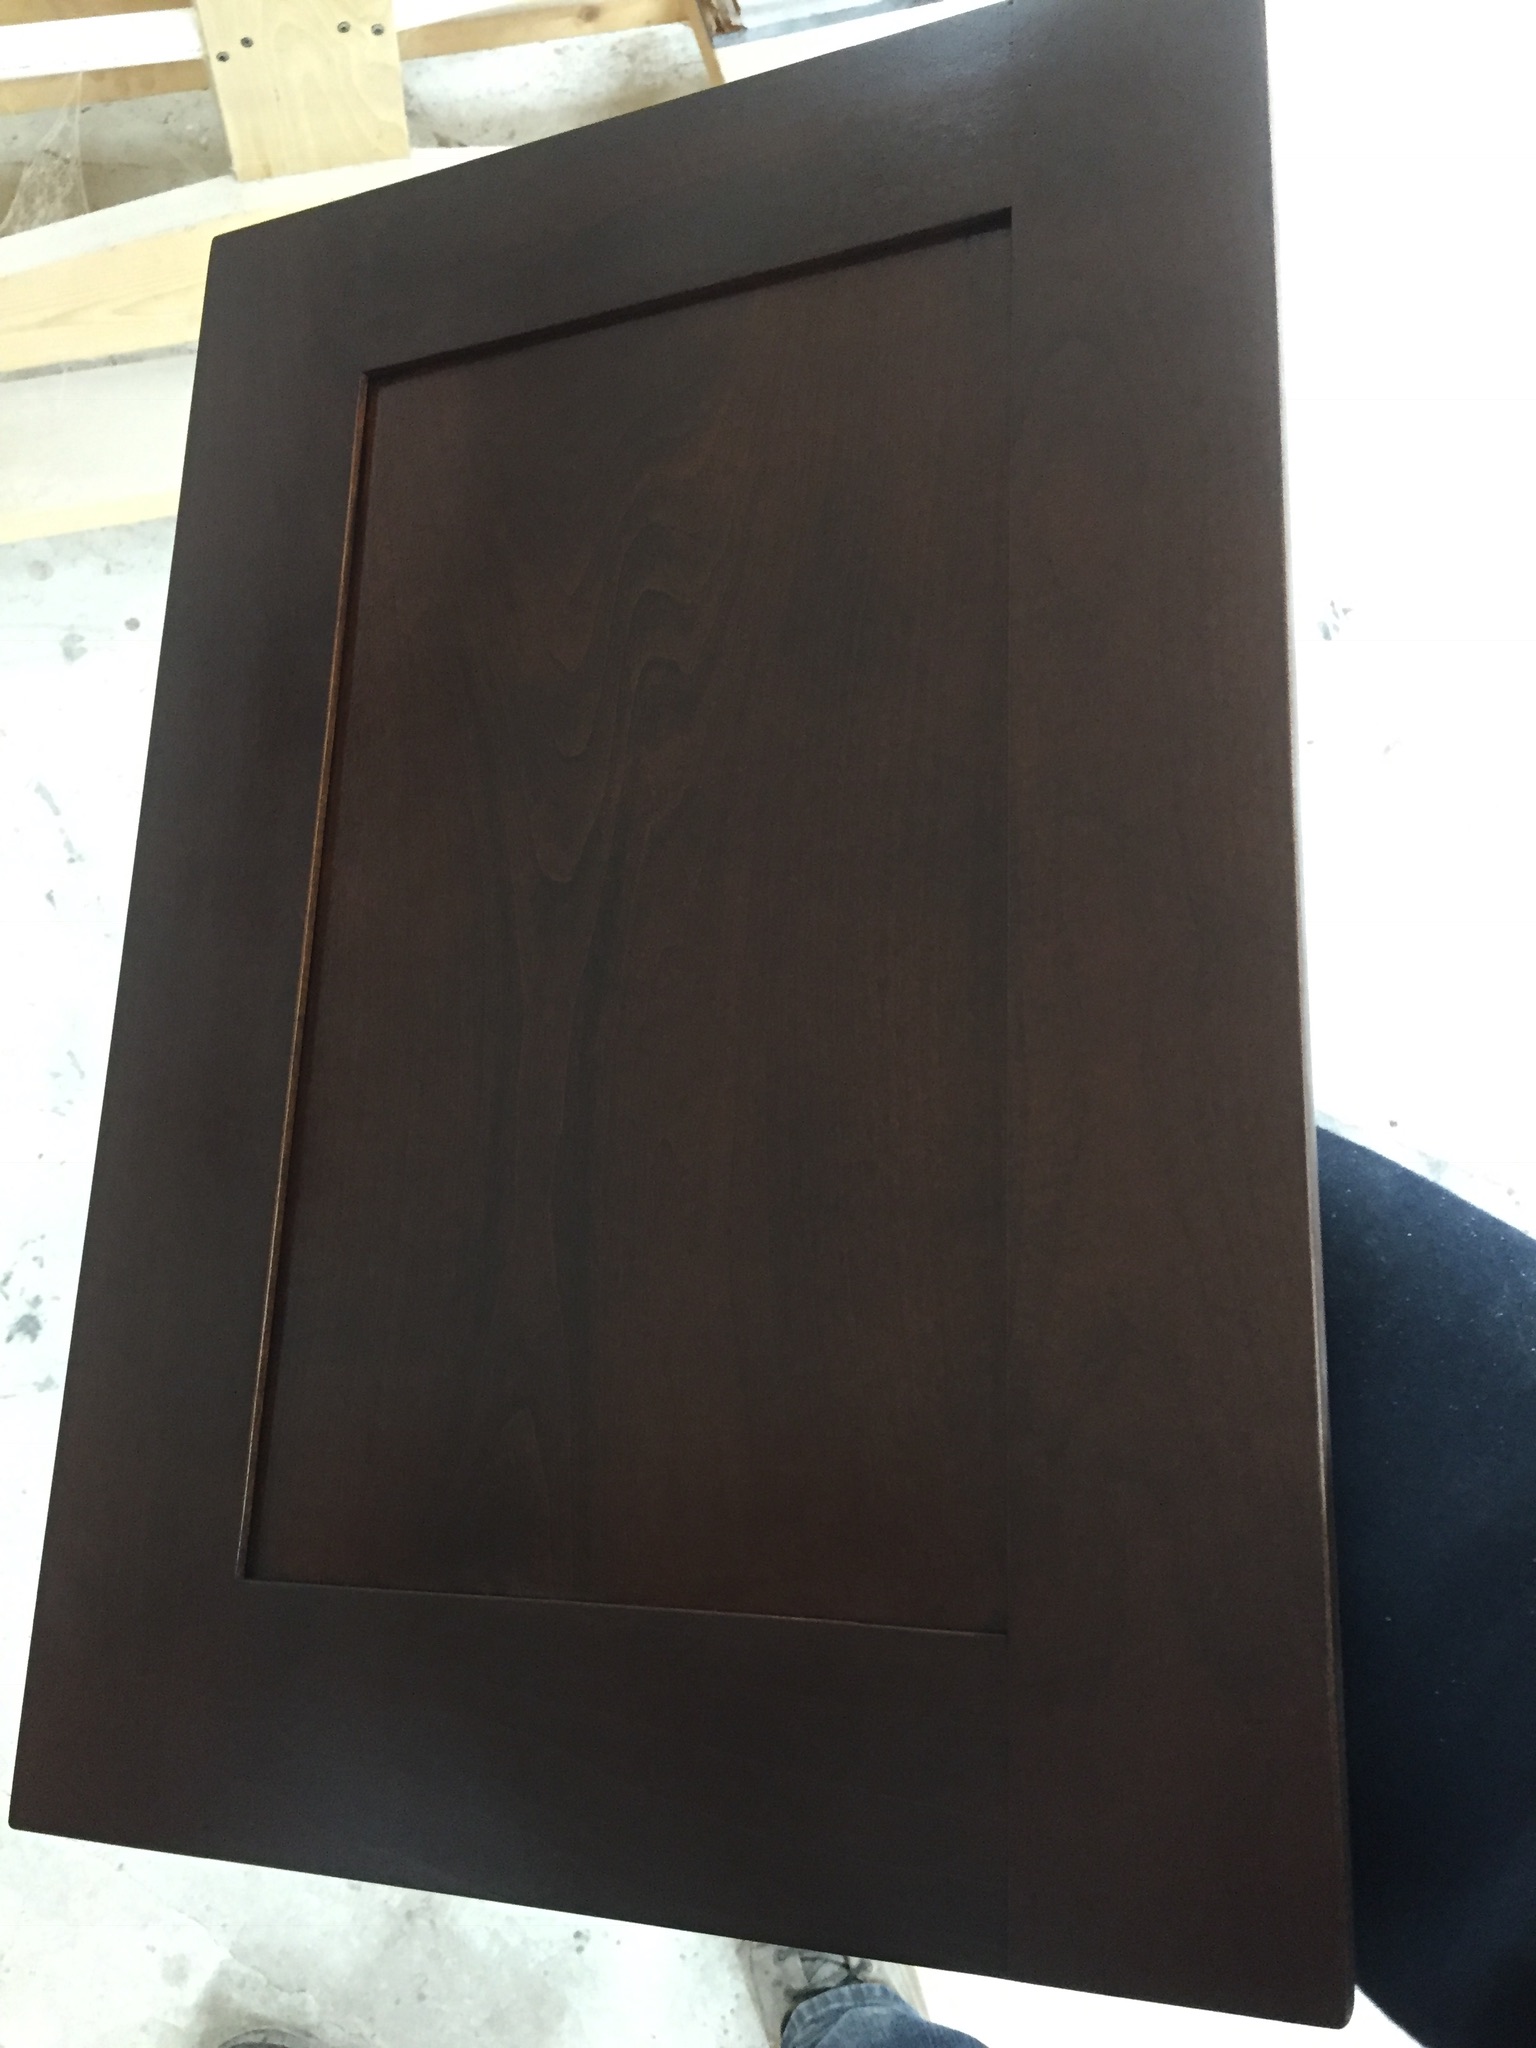
I spent last Friday evening doing some testing based upon the responses that I�ve been getting, mainly from Dan. What I�ve done is mix 2oz of the wiping stain into 16oz of thinner and then mix that into 16oz of vinyl sealer. I couldn�t believe how rich of a toner that made, so rich that I think I would only use 1oz of the stain. Like I said, I�ve been using dye before this stain to get the darkness but then I hit the back of this door with the toner and I liked the result. First pic is dye, stain, sealed. Second pic is the same door with light coat of the toner. This is a sample door that I was just experimenting on.
View higher quality, full size image (1536 X 2048)
View higher quality, full size image (1536 X 2048)
3/26/18 #35: Stain issues ...
I get nervous about making home brews. Are you sure all of those play well together with adhesion to the CV? What thinner are you using?
"mix 2oz of the wiping stain into 16oz of thinner and then mix that into 16oz of vinyl sealer."
3/27/18 #36: Stain issues ...
Hey Mike, yes specifically I use ML Campbell Woodsong 2 stain base with no color to "seal" or pretreat or whatever you want to call it. Then the same stain, (or sometimes Mohawk wiping stains as I have a bunch in the cabinet), with the color applied normally, so no issues with adhesion at all.
The door you sprayed looks pretty evenly colored in the pic, but I'm not sure I understand your new method fully. Did you stain the door first and then add the dye to your sealer and spray as a toner coat? Or is that just a single shot of the stain mixed with the thinner and sealer on raw wood? If so that's really pretty good color for that mixture? Also you say you added the wiping stain to the thinner? Was it wiping stain or the more concentrated dyes? Because that's a LOT of color for a wiping stain. I'm curious as I want to try it out myself!
I've used dyes before but usually just added to the stain to get a darker color, or as an additional toner coat. Never tried it the way your describing so may be a good opportunity for experimenting!
JeffD
3/27/18 #37: Stain issues ...
Jeff,
I used Mohawk vandyke brown dye on the raw door, I didn�t drench it. Then I used Mohawk van dyke brown wiping stain, then the door was sealed with vinyl sealer with no color added. Then scuffed. That gets it to the point it is in the first pic.
The second pic is when I gave it the light coat of the 50/50 thinner and vinyl sealer with the 2oz of the same wiping stain added to it.
3/28/18 #38: Stain issues ...
Ok, that makes more sense to me, when I first read your post it almost sounded like you sprayed on a coat of the stain/thinner/sealer concoction and got that color. Which would have been an amazing feat and certainly had my attention. I just re-read it and realize it was me just not reading correctly!
I don't use the dyes on their own too often.... for fear I'm not going to get it on evenly. Are you just spraying it straight or doing what I've done in the past mix a couple ounces of dye into some thinner and shade it on gradually?
Oh and those last pics certainly look a heck of a lot better than the first ones!
JeffD
3/28/18 #39: Stain issues ...
Jeff,
I use the dyes straight. The key to getting it even is to turn the pressure way low. When I spray it�s almost like a drizzle of rain. I use one coat. For some time I used dye as the only color. Plenty fast enough and easy to get it dark. Couple reasons that I quit using it as a stand alone color. One it�s to transparent by itself, I�ve got a door right now in my office that standing upright the rails are darker than the stiles, flip it 90 degrees and the stiles are darker than the rails. Second, if your doing pieces that have a lot of crevices then it�s really hard to get it in those places without getting the rest of it to dark.
5/19/18 #40: Stain issues ...
Website: http://www.rhodeshardwoodflooring.com
Some stains work better on maple than others. Ive found that stains with a heavy amount of pigment work best. My preferred stains for staining maple are general finishes, varthane, and sherwin Williams. I think the issue you're having is mostly due to the stain product.
|

