Message Thread:
Variety of Joints
11/30/14

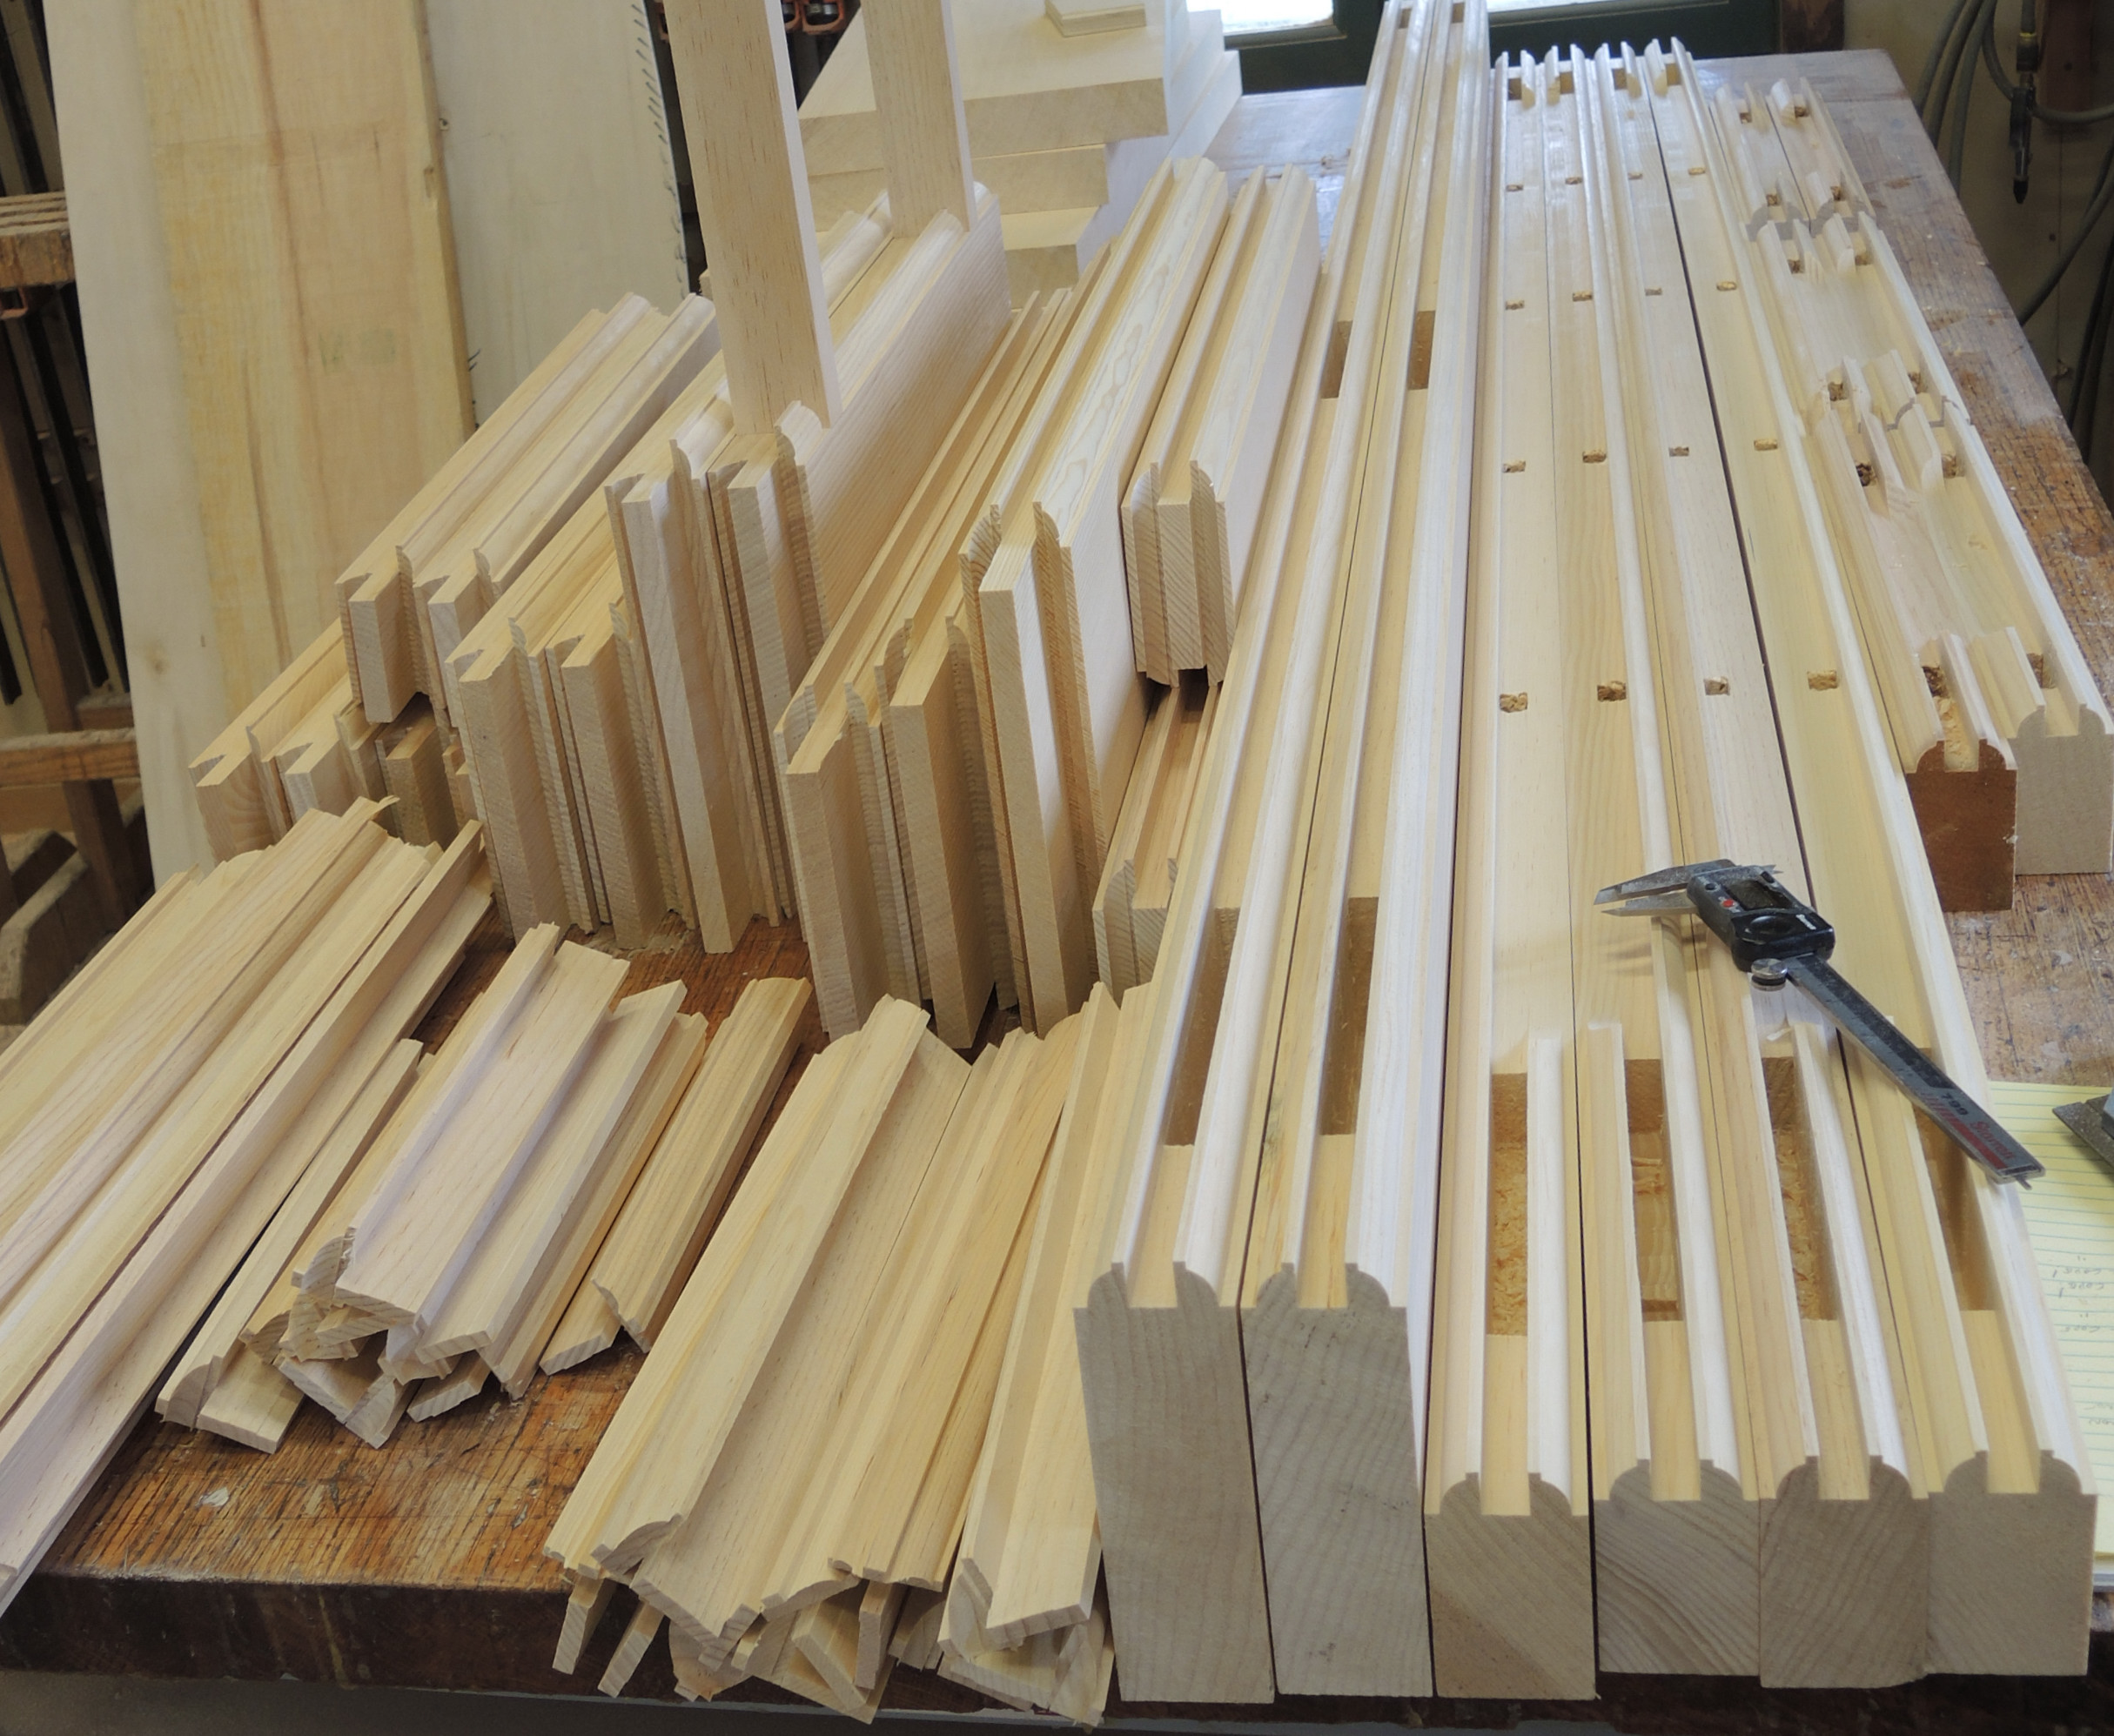
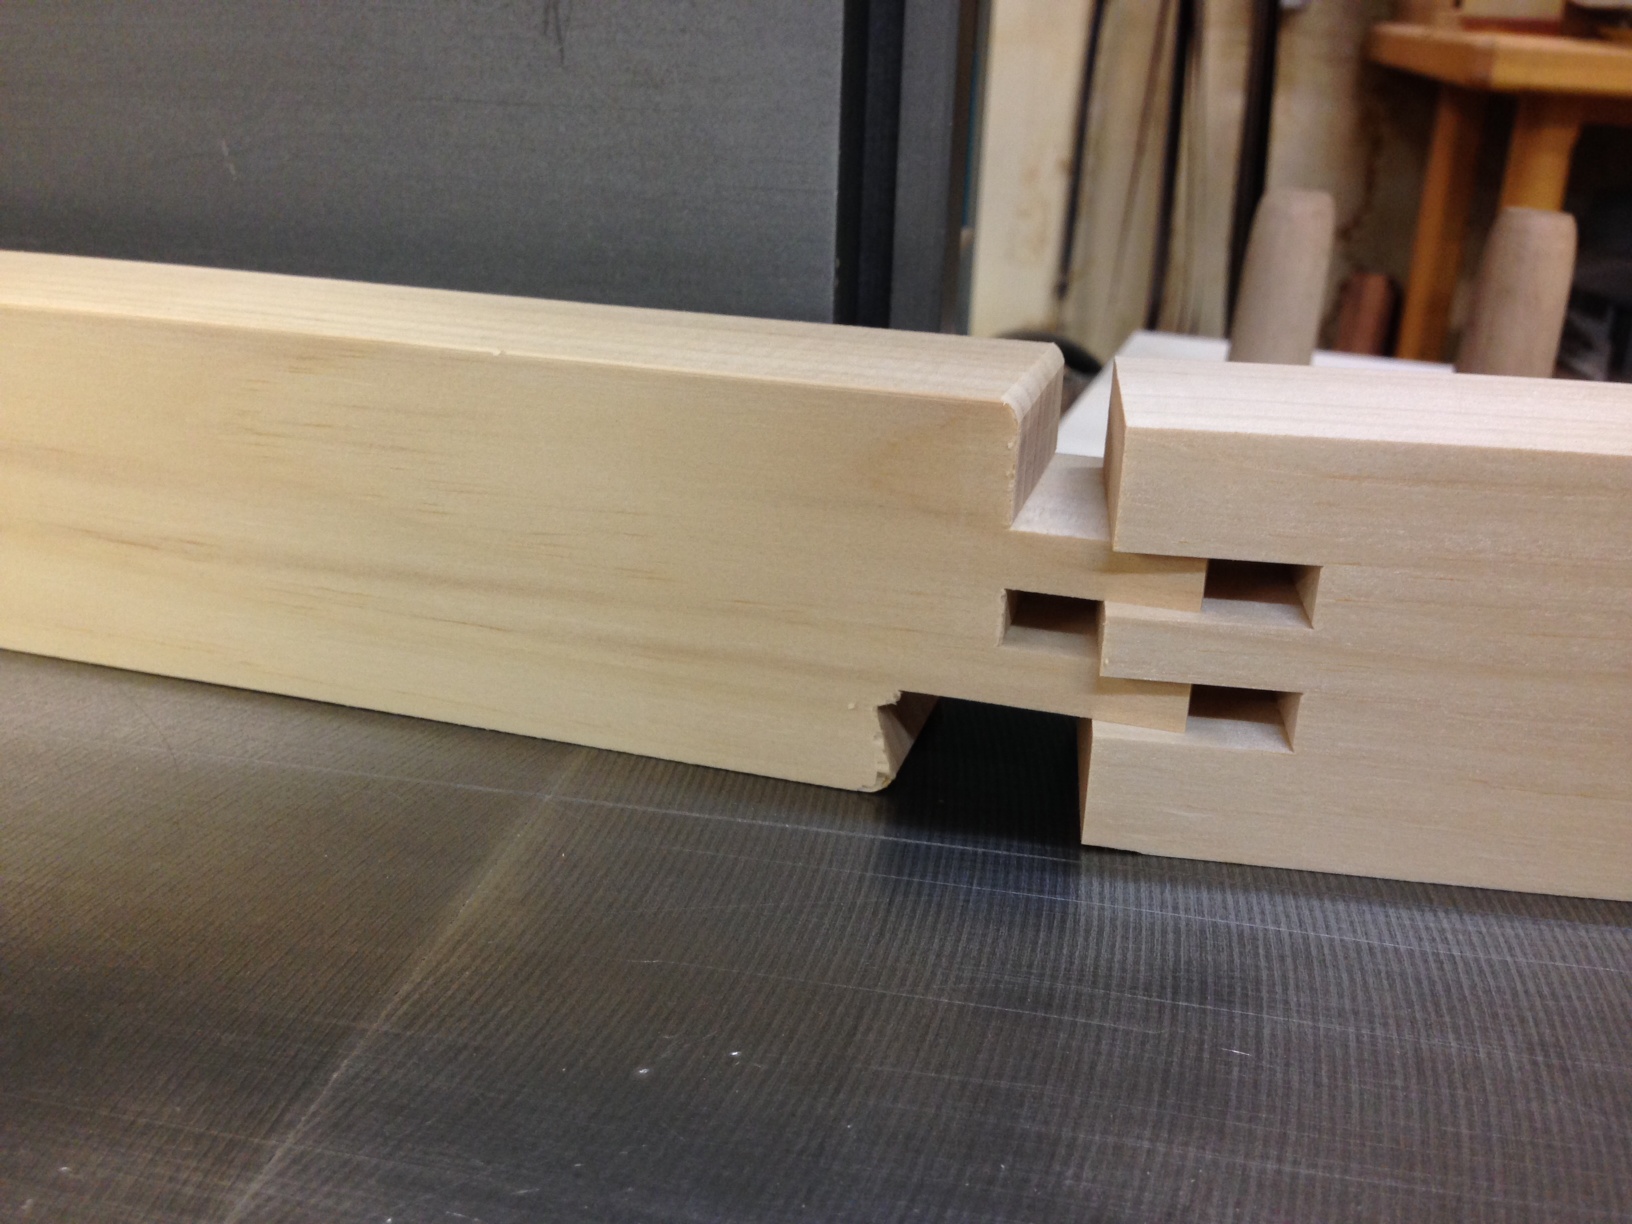
The photo shows a variety of mortise and tenon joints that go into the parts to make a 4 panel door, a pair of divided light sidelights and three transoms above. Rails and muntins are to the left, stiles to the right. No frame parts are in this group, just the sash.
Long and short and stub tenons, single and double copes, all depending upon upon where they go in the sash. It is a task to keep them all straight and put the proper joint on the correct group in a logical sequence thru 3 set-ups on the tenoner, and 5 cope set ups on the shaper, and then 2 sticking set ups on the shaper.
View higher quality, full size image (2429 X 1995)
11/30/14 #2: Variety of Joints ...
Nice machining! The Shaper can be one of the most interesting machines to set up and operate. And it is very satisfying to have a set of carefully machined parts, ready for glue up.
12/1/14 #3: Variety of Joints ...
I sure wish we had access to material like that around here (not that your likely having large quantities shipped).
Really nice image for sure. Im about to have a go at 4 very small window sash (about 16" square), swinging/hinged, muntins, but getting small quantities of decent material is proving a challenge.
12/1/14 #4: Variety of Joints ...
Yes, that is the reason I posted this photo. That bench represents a few nice hours getting all those parts to that point. Lots of satisfaction from this type of work, simple as it is (though complex). One reason I posted this is to illustrate how many different types of the same joint are required to make some simple divided light sash.
At one time, this kind of work was so common that no one ever noticed.
The Pine is C&btr Sugar Pine from a firm in Cincinnati that has handled W Pine for over 100 years. They used to sell a lot for the patternmakers. I like it more than Ponderosa with its more even texture and color. Light, fragrant, easy to saw and handle - it just doesn't get any better than this.
Old guy stuff: Back when I was a kid (22 in 1972), the shop I worked in used mostly this Sugar Pine. We had almost all 16' lengths, and from 8" to 24" random widths, with a rarely a knot or pitch pocket. They always bought it in the rough, from 4/4 to 8/4, a few m/bf at a time. We made louvers, shutters mantels, complex door trims, a few signs and some went to stair parts and curved stairs.
12/1/14 #5: Variety of Joints ...
Do you use an end tenoner for the deep
coped tenons ? And a mortiser ?
12/1/14 #6: Variety of Joints ...
David,
Do you mind me asking what material of that quality, in small quantities, may run per bf? I have a feeling I am going to have to go with something else but these sash are so small Im considering all my options. Its not a money making job but one at my GF's house so kind of a fun one (which is rare). I have a local yard about 4 hrs away that may have some suitable material.
12/1/14 #7: Variety of Joints ...
Website: http://www.acornwoodworks.com
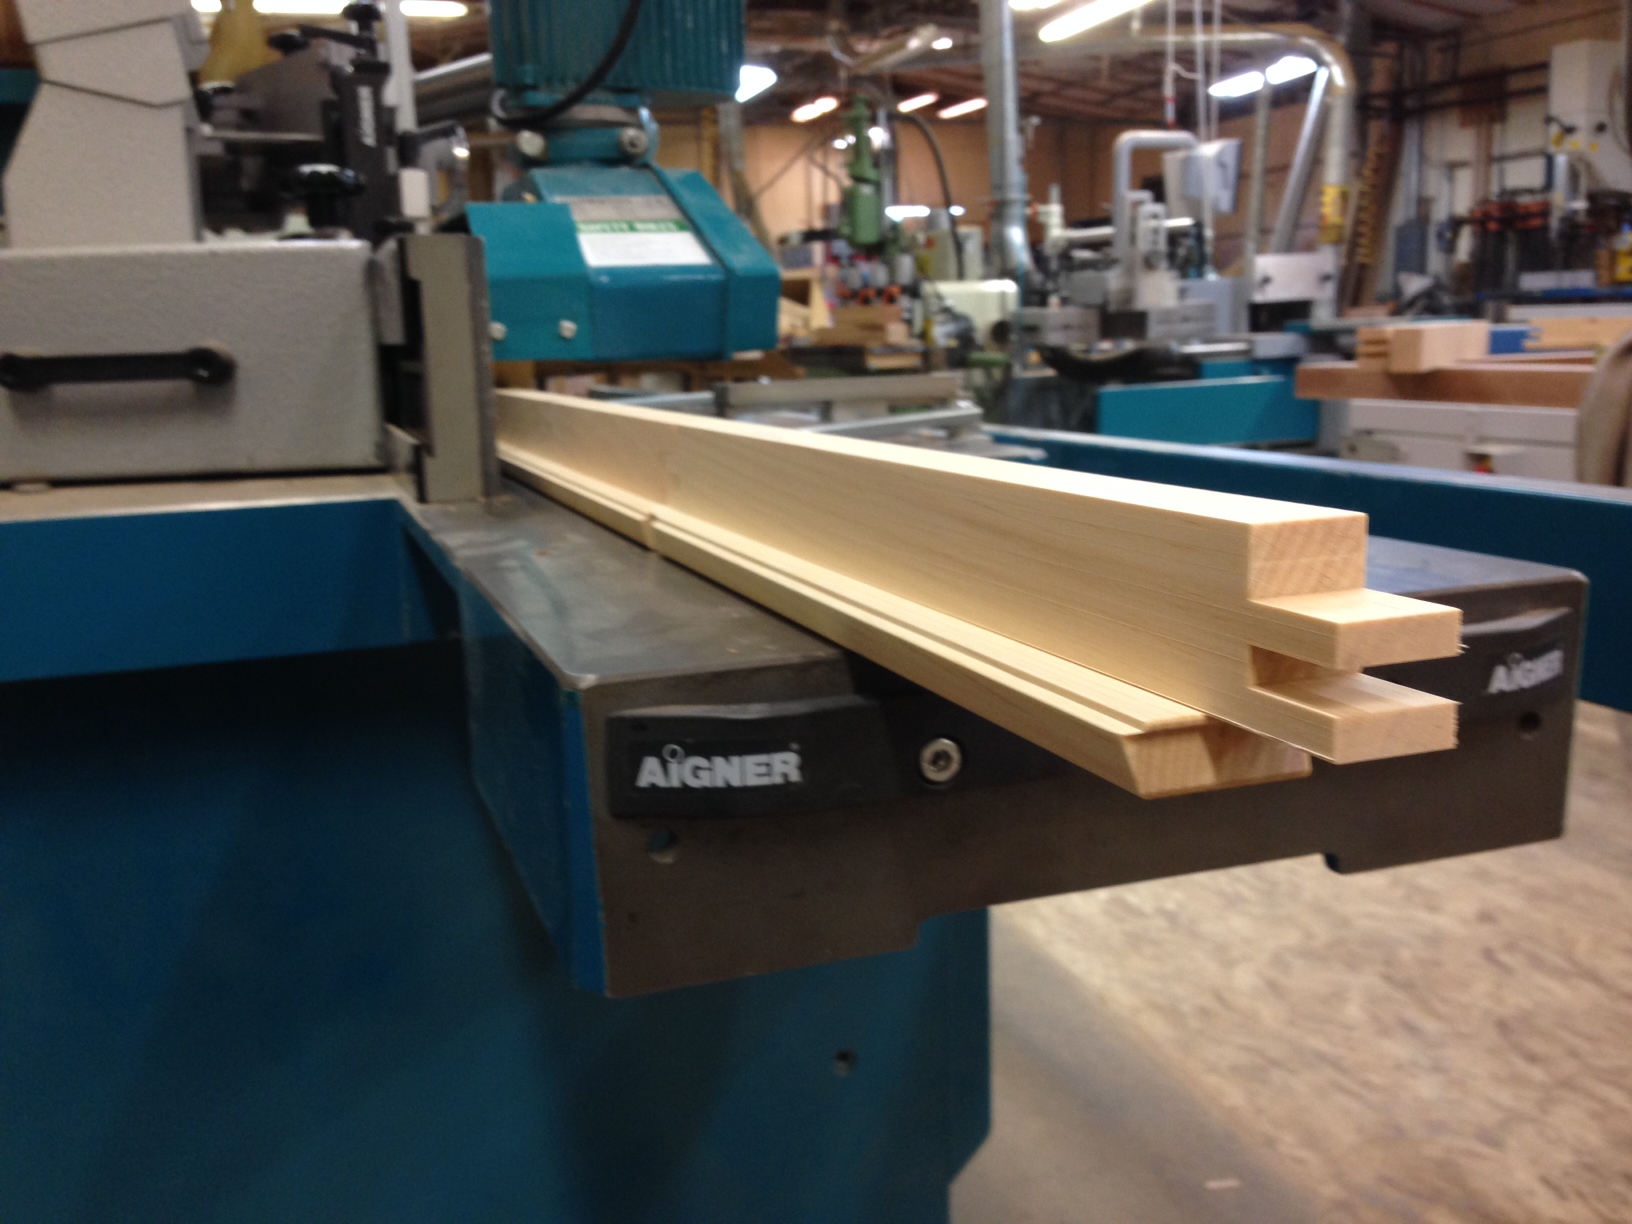
We use an updated Powermatic tenoner to rough out the tenons - remove most of the wood. With digital readouts and super accuracy, it sets up in 1-1/2 minutes and hogs lots of wood out quickly and accurately. We leave the tenons 1/8" short and 1/8" thicker than finish.
Then the tenon discs are put on the shaper and do the cope and final sizing of the tenons, with an aluminum tenon jig with pneumatic hold downs like the tenoner.
Mortises are courtesy of an old Maka oscillating chisel machine - it is labeled "Made in West Germany" for the larger mortises, and a Powermatic 750 for the muntins.
View higher quality, full size image (640 X 480)
View higher quality, full size image (480 X 640)
12/1/14 #8: Variety of Joints ...
Woodweb needs to add a "like" button on posts like this. Very nice.
12/1/14 #9: Variety of Joints ...
David,
What is the reason for cutting the coped tenons in two operations? Since you have tenoning discs for the shaper, would it not make sense to do it all with that machine?
12/1/14 #10: Variety of Joints ...
David,
You must of known that you'd get asked a million questions, That said, at what point are you able to order glass? Thanks for posting.
12/2/14 #11: Variety of Joints ...
The tenoner we have does not have the cope capability - some did, some did not. It is great at square edge tenons and half laps - super fast, accurate and clean. I have used this machine since 1972, and it has never run better than now, since we have replaced all the bearings and added the pneumatic holdowns. Previous upgrades include two digital readouts for the heads, improved end stops, and insert cutterheads.
The shaper is a 9hp SCMI, and the tenon discs are a real job to use alone. We do a lot of 2-1/4" thick doors, so we can remove 1-1/2" of thickness, by up to 2-1/2" deep by whatever the rail width is - that is a lot of wood. The shaper struggles and it just doesn't feel right. The knives dull quickly (probably from the heat of a slow pass) and a lot of feed pressure is required.
Breaking it into two operations does complicate things by adding a whole 'nother step - something I normally would eliminate without question - but it makes the cope operation easy and quick, removing the uneasy feeling one gets from forcing those parts into those big discs. Much more comfortable and that counts for something.
Also, we sometimes have short or narrow parts that are a bit hard to hold adequately in the tenon jig. Doing the tenons first on the tenoner makes it much easier to hold with the subsequent light cut. Having done it this way for a good long while, it is just second nature for me.
I would love to have a single end tenoner that is designed to do all this in one go. The photo shows stub tenons with double cope, long and short tenons with double copes, short tenons with a single cope and single cope no tenons: so the shaper requires changes for each variety. This would be difficult to do on a Powermatic tenoner with cope heads, and even most single end equipment would require extensive changeovers, or lots and lots of tooling and space, eating up that expensive spindle space on those machines.
I can order glass before construction if there is a time crunch, all glass is rectangular, and I feel lucky. I just make sure I don't make any 'adjustments' along the way. Otherwise, I wait until things are built, curves are set, etc. My glass people all want hard templates on curves, and that makes for the best fit. I hate to wait on glass, but if we get sash ready first, by the time we get everything else done, the glass has arrived and is ready to fit. Glass doors are much easier to fit and hang without glass anyway.
12/2/14 #12: Variety of Joints ...
David,
Thanks for the response. Makes sense. And thanks for posting the photos. I always learn something when you contribute to these forums.
12/3/14 #13: Variety of Joints ...
What is your strategy for sticking the short narrow muntins ? I've tried clamping them to a straight pattern is the best method but it takes yet another shaper setup. I've also gang fastened them to a longer piece and run them through with power feed. Don't really like either one.
12/4/14 #14: Variety of Joints ...
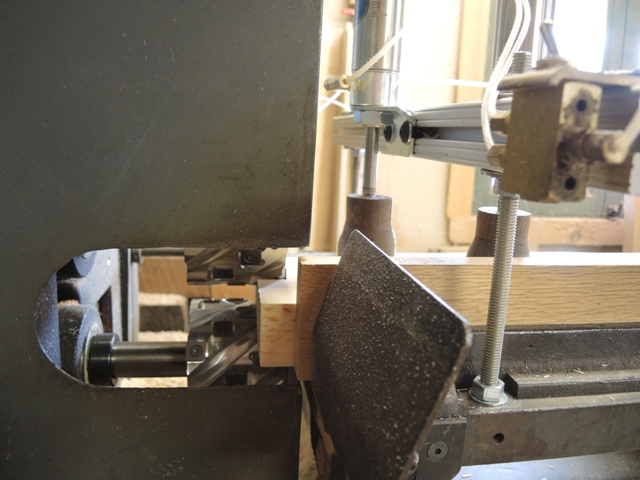
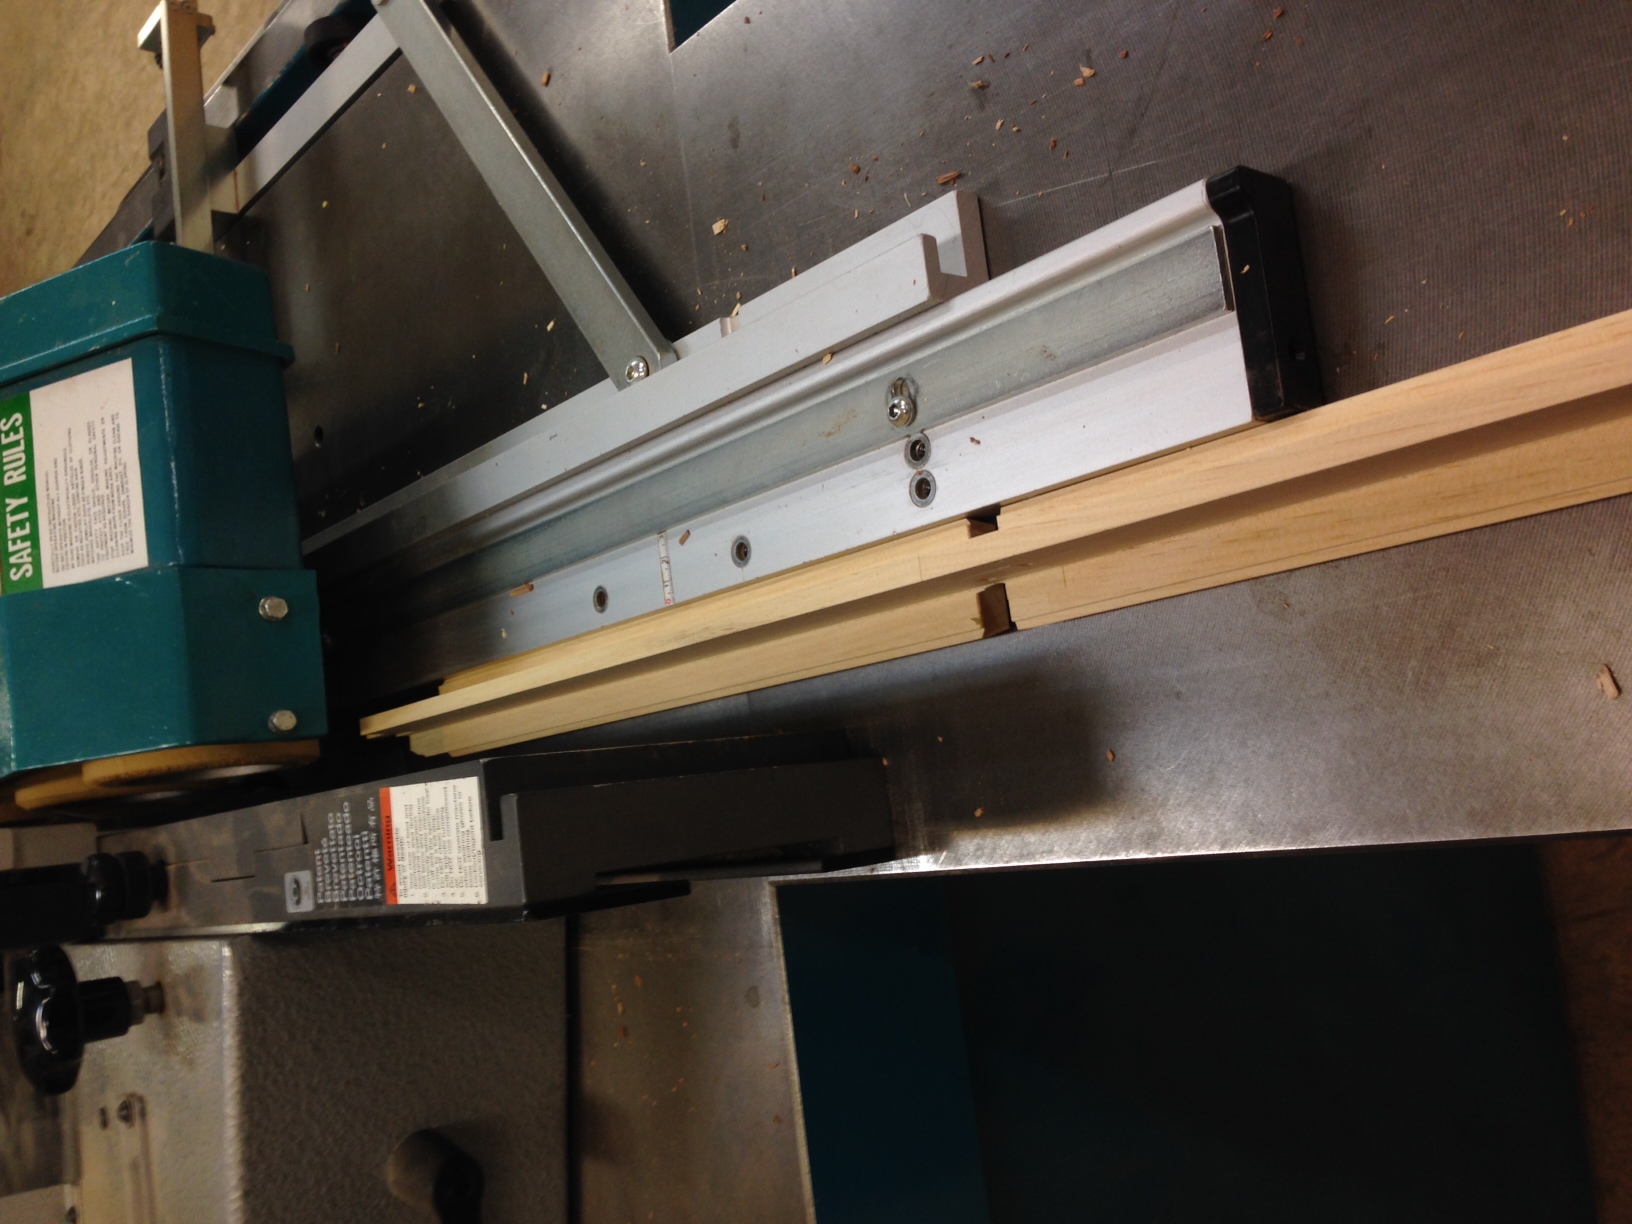
First, a 4 wheel stock feeder is used, to keep these fingers where they belong.
The short muntin stock - in fact all muntin stock - is profiled on each edge for the Ovolo and a 1/4" x depth square cutter just below the profile to establish the glass ledge at the proper exact depth, and another 1/4" x depth cutter at the opposite face of the muntin, also to establish the center that is left once the part is rabbetted. This leaves a meaty pat of the muntin to be removed at a later step. This meaty part allows a continuous fence strip to be tacked to the shaper fence to prevent the stock from diving into the cutters - it is a hefty cut, one that could easily destroy all sorts of things - so the strip fence controls all that. I then set up feather boards on the table saw and saw off the waste, using those surfaces machined by the 1/4" cutters as guides.
I tried for years to machine the whole glass rabbet and profile in one go, but had nothing but trouble and unpredictable results. These have to be just so, and so this two step process is now the norm, is safe and predictable.
The bonus is that the strips that are sawn off can be used as spacers during glue-up to help keep all the muntins spaced properly in a multi opening sash like the 10 light sidelights in the photo.
If you are still following me, you know you have to cut to length and cope before profiling because of the inevitable cope blowout, but even if you could run the stuff in lengths and somehow cope after, it would still be very difficult to remove all that wood in one pass and still hold the parts reliably.
12/4/14 #15: Variety of Joints ...
Website: http://www.rscaffecabinetmaker.com
A model thread for this site.
Thanks for posting.
12/4/14 #16: Variety of Joints ...
Website: http://www.acornwoodworks.com
Regarding the last entry on short muntin stock profiling, I forgot to add a recent innovation. My ever-so-capable co-worker came up with the addition of a 'carrier block' - a 3"-5" wide block a bit longer than the longest muntin, but the same thickness. A small block or hook is added at the tail end of one edge of the block and the hook is used to help push the muntin thru the profiling cuts on the shaper. The block helps get traction from the feeder wheels, and it also helps absorb some of the cutting pressures, making for a smoother cut. This really does help - sorta like making the cut on a large piece of wood instead of that little piece of wood heading towards those big cutters. Along with the continuous fence strip, it takes a lot of the feeling of chance out of this operation.
Another bonus is that even if the stock creeps away from the fence, you can easily just run it again - you can't overcut it.
12/4/14 #17: Variety of Joints ...
Website: http://www.rscaffecabinetmaker.com
David
Would you mind sharing the name of your supplier of white pine?
I am a furniture maker in Kingsport TN and love it for drawer bodies but it is hard to find tight grain high quality wood.
Thanks
Rob
12/4/14 #18: Variety of Joints ...
David,
I am having a hard time figuring out your muntin profile process. So, this is what I think you are doing, First pass on shaper is with profile cutter on the bottom (this assuming that you are running face down counter clockwise) with one 1/4" groover stacked above, I like this idea because the smaller amount of material being removed and having the material above the 1/4" groove to ride on the fence. I also like the idea of the push block idea of your co-worker. But, if you have only removed the profile and 1/4" of the glass rebate where do you have room to add a stripe to the shaper fence? When I do muntins for TDL units I have been doing it all in one pass and tacking a strip on the out-feed fence only. I agree this method has a fair amount of poor quality parts so, I always make extra. Clearly I am missing something in understanding your method. So, once you are at the table saw you are sawing off the remainder of the glass rebate. How do you support the muntin on the second pass?
Thank you for starting this post.
12/4/14 #19: Variety of Joints ...
David, I use a similar "carrier block" for the final muntin profile, though with one change that you might like. It's long enough to hold two or three muntins at a time. Thanks for sharing.
12/5/14 #20: Variety of Joints ...
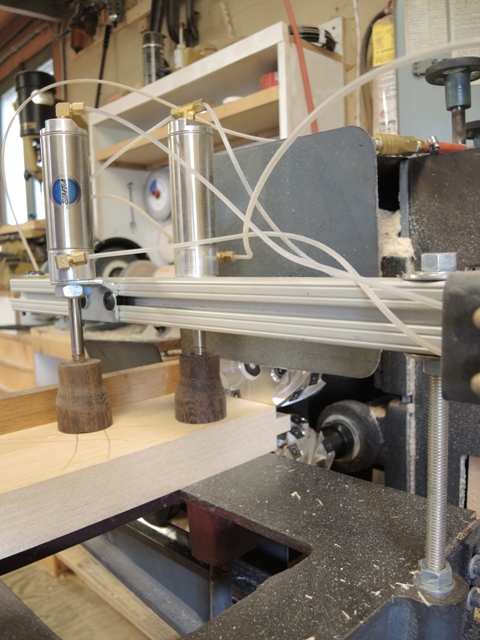
Geoff - You have it right with one additional bit- there is a second 1/4" x depth cutter on the upper edge establishing the proper depth. You are right - profile down on the table, 1/4" cutter, then some 'meat', then that second 1/4" cutter. On 1-3/4" thick parts like above, this gives me about a 5/8" wide/tall piece to saw off to the proper depth. It is this 5/8" or meat that rides on the continuous fence. The sticking in the above profile is 9/16" deep.
The last step shows the scrap ripping off the part and being trapped between the fence and blade - not a good practice. First, this is anything but a free hand operation - a featherboard comes in from the left, about 8" wide, so the part is held tightly against the fence before, during, and after the cut. A springboard comes in from above to hold the part tightly to the table. Lastly, and most important in the self preservation department, is to do a continuous feed of the muntins into the saw so that the next muntin prevents the previous scrap from shooting back while it is being fed into the setup. The last piece is pushed thru with a scrap of the correct size. This removes any danger, and keeps things accurate and predictable.
A further evolution of this would be a hardwood - or aluminum - sub fence that would support the muntin at the bottom of the established depth with two < 1/4" blades, and ripping off the waste to the left of the center muntin blade/remainder.
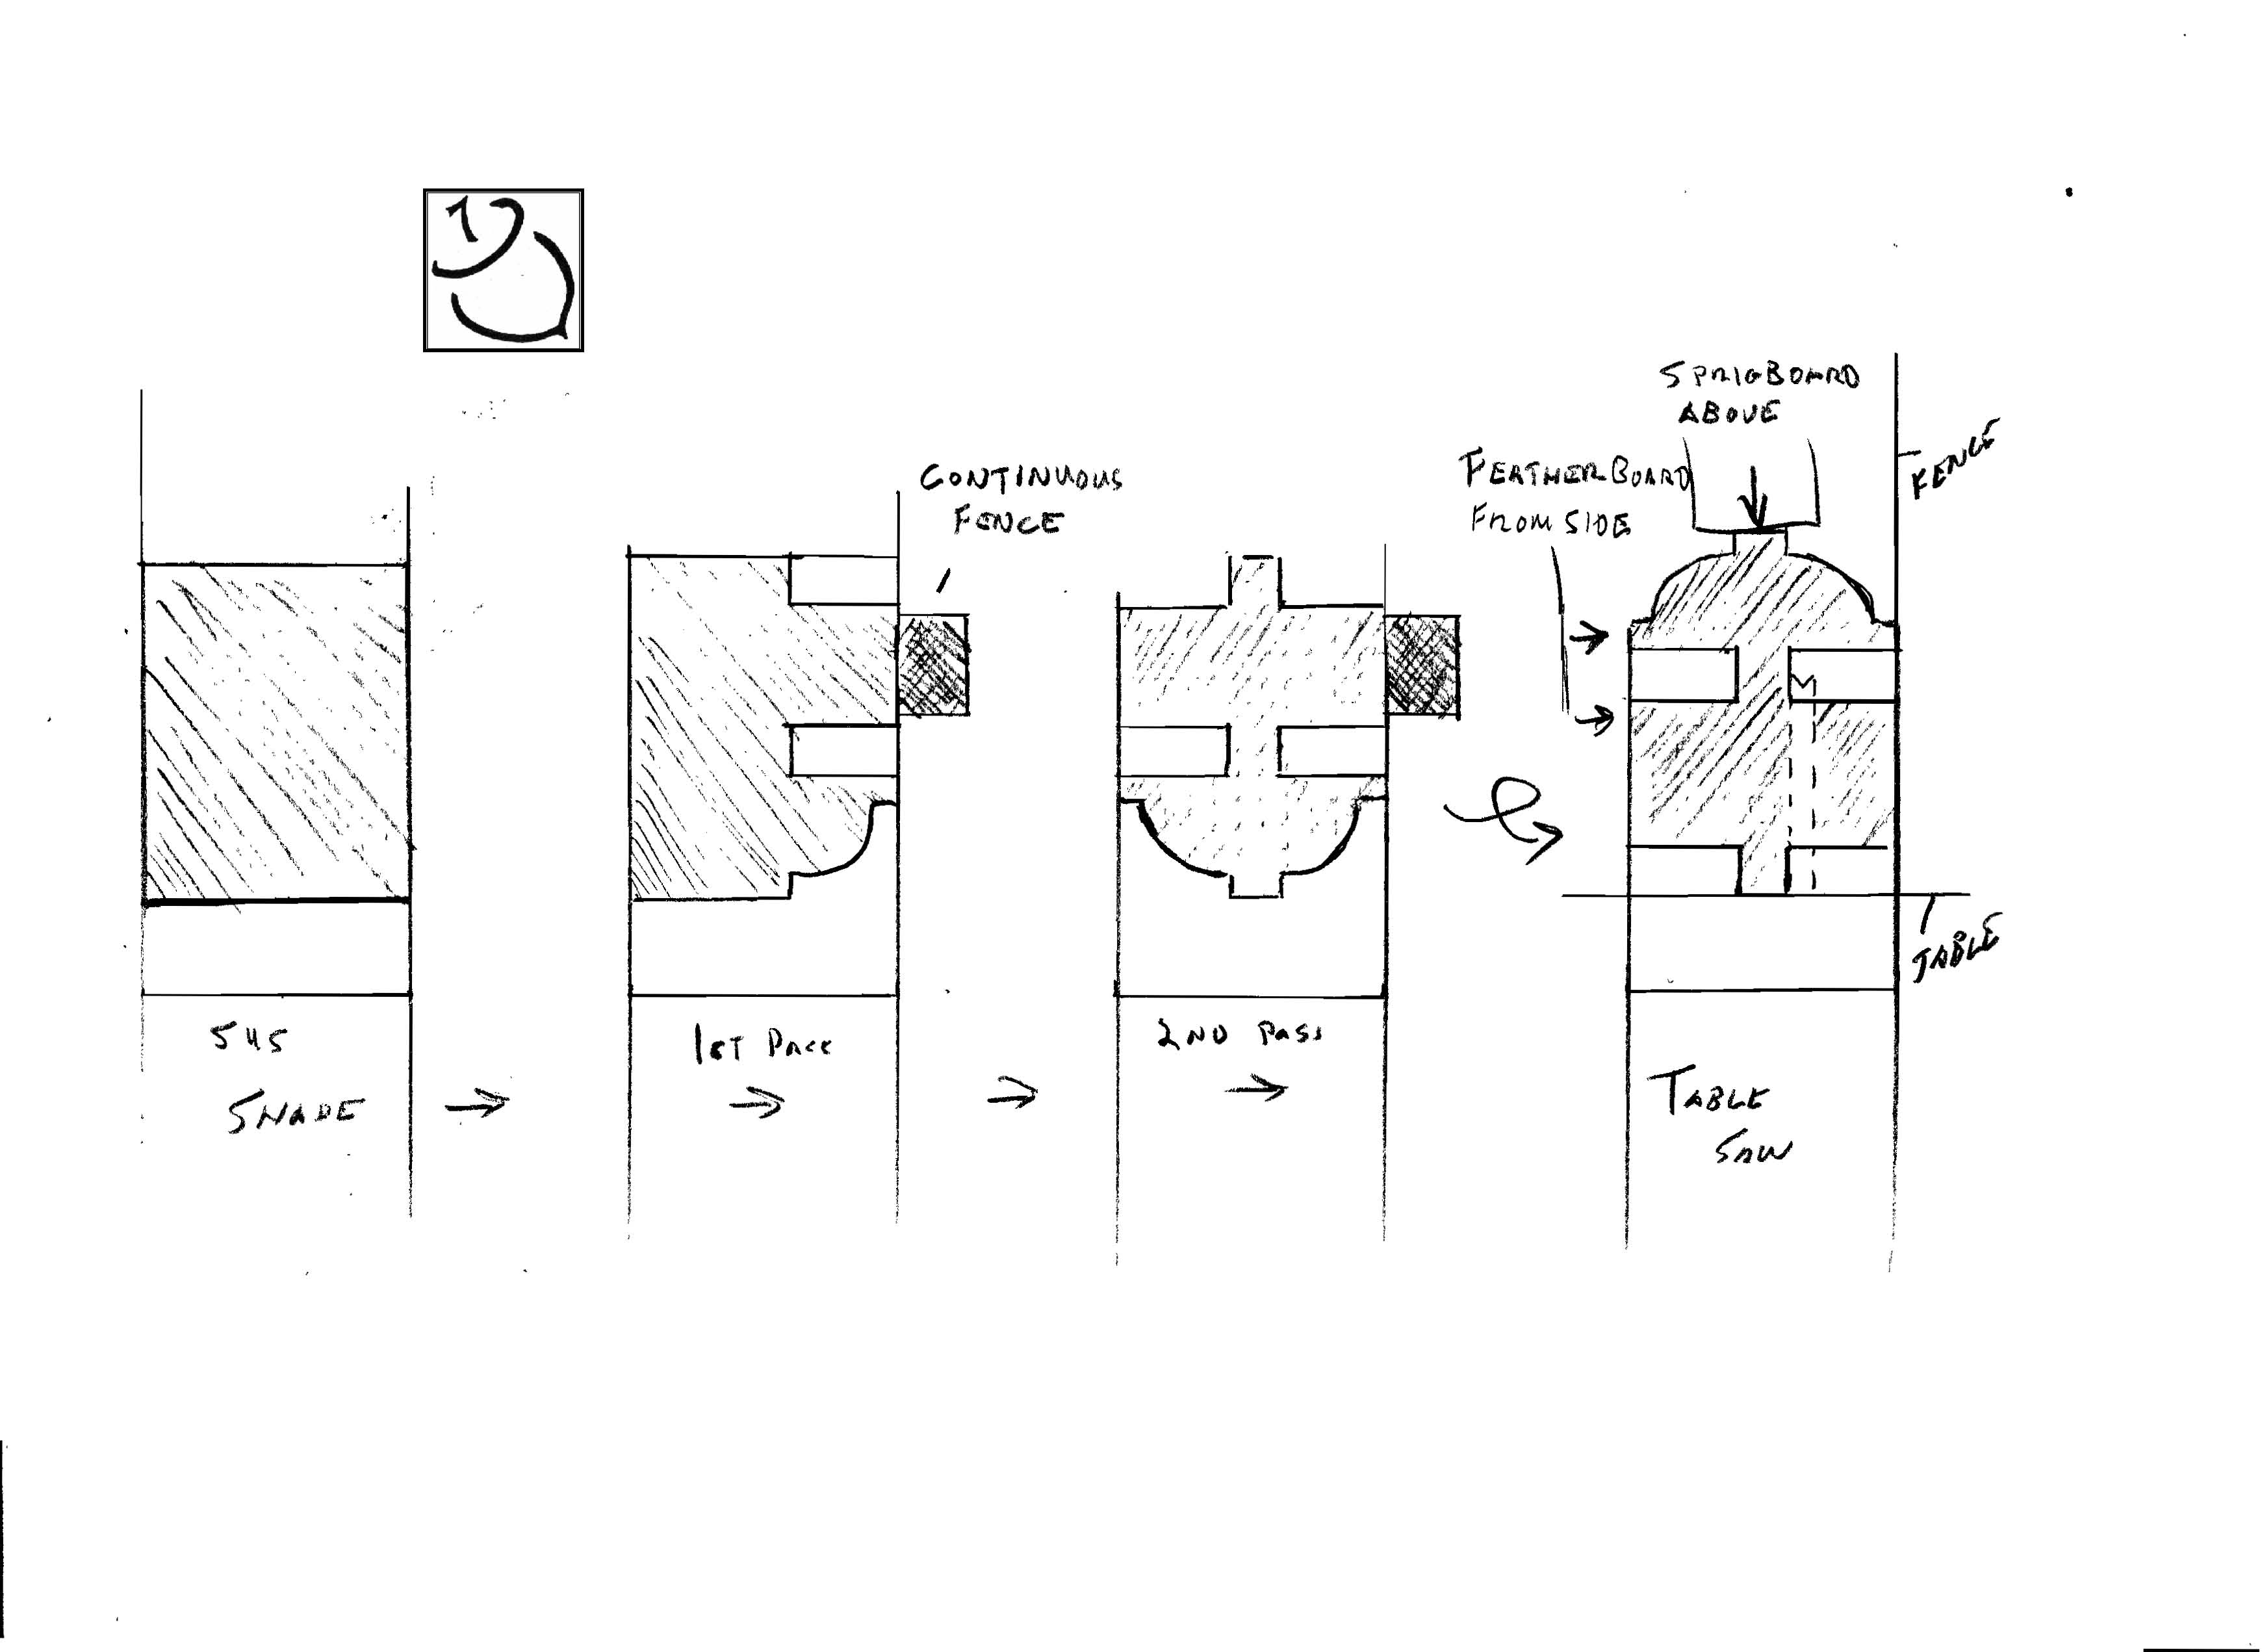
I'll attach a quick drawing showing the sequence I now use.
I have thought of a multiple muntin pusher, but have kept it simple for the most part.
It is nice to hear from other muntin pushers out there.....
View higher quality, full size image (3481 X 2542)
12/5/14 #21: Variety of Joints ...
Sizing and placing a catch or support fence to do the whole profile is, I think, the way most shops deal with this cut. For me, the depth is hard to set, and even then, snipes seem to be part of it. The better setups have the outfeed support being cut on the fly by moving the outfeed fence back into the running head for close support. You only get one chance at profiling with this setup.
I buy this beautiful Sugar Pine from Charles Shiels Lumber in Cincinnati, OH. Nice people that have dealt in W Pine and other woods for many years. Very knowledgeable, and they like to see their customers do well.
White Pine
12/5/14 #22: Variety of Joints ...
David,
It looks like you must have to put a rebate on the back of your applied/glass stops. From the picture, it looks like when saw off remainder of the glass rebate material you are a little proud of two 1/4" rebates you made on the shaper. Also, I just noticed ( I had been looking at the picture of all the parts on a lap top that one of my sons rolled over...) on a better picture that you profile both sides of your stiles and then cut one off for the glass opening. I can only imagine that you are doing this with hand held router. Correct?
Thanks again for starting and staying with this post.
12/6/14 #23: Variety of Joints ...
Geoff - Yes, there is a bit of width variance I unintentionally introduced when sizing the muntins. They were ripped instead of planed to their final width. This sets up for variability in the ripping off the waste, and whether the saw cut is flush to the more accurate shaper cut. I clean this up with a lick or two of a handplane, but is something I prefer to avoid, but I don't like to over cut either. It is all about where you choose to reference from, and the accuracy used to get to that point.
This is an ever-evolving sequence, and it has changed a lot over the years, but still has a few rough spots. I enjoy using the plane, so I'm pretty happy with the method as described, but a fence on the saw (or shaper?) that allowed the muntins to ride on the bottom of those plows/rebates would be a fine next step. Then I'd have to come up with another place to use the handplanes...
The glass rabbets on the stiles are done on the shaper. In the cutter set (brazed, custom made by C G G Schmidt) I designed, I also had bearings made so all this cope and stick can be done on curves, or mated with any cutter for subsequent cuts. I set up a tension fence to hold the stock down on the table and pivot the front of the stile into the cutter with a bearing to make a flush cut. Push until I hit my mark and stop and withdraw. For short parts, like the transom stiles, I set a tail block on the shaper to start my cut and the push to the mark, back up a bit and withdraw. This keeps the smaller parts from sudden over feeds and kicks. A router can be used, but is slow and noisy and dusty. A moments inattention, and you can ruin a part. The shaper prevents an overcut, for the most part. Once the sash is assembled, the corners are squared up with a chisel, though my co-worker likes to use a bearing over a flush bit in a router for all but the last 15% of the cut. I think it better to have one method for that operation instead of going over everything twice, but then, I'm also picking up the handplane elsewhere. Different strokes.
While we have to be slaves to the dimensions, the safety, the accuracy, the budget, the tools and machines at hand, we can find little areas to strike out into and enjoy a bit of creativity, or just do some pleasurable handwork.
If the sash is all glass work, it is possible to set up with sticking on only one side/face of the sash, and then run all the parts with single copes and single stick. But the double cope does add glue surface, and makes the joint fit up so much nicer, that we almost always do the double copes/sticks and then rabbet.
If you ever want to sell your work, make up a cope and stick, mortise and tenon joint and cut the two parts to about 4-6" long and hand it to your prospective customer and let them fit it together and pull it apart. If that doesn't sell them, then nothing will.
12/6/14 #24: Variety of Joints ...
Website: http://www.rscaffecabinetmaker.com
I had the opportunity to reproduce many historic windows in Charleston SC years ago, and had good results cutting the entire profile on one pass with the following method:
Regarding the tooling, I used a relatively small cutterhead, typically clamp collars with bevel edge steel, although small corrugated heads are available for the shaper as well. Bottom line, the smaller the cutting circle the better.
I also used a SCM shaper for all operations.
I first adjusted the wooden fences as close to the cutter as possible, just clearing it. Then tacked on a thin hardwood or plywood strip the length of both fences and spanning the tool opening. Positioned the fence as close to the blade as possible locked down one side, turned on the spindle and levered the fence assembly into the cutterhead stopping just a hair beyond where the minimum radius of the knife peeked through the hardwood strip. When then, the fence was aligned to the minimum radius of the tool, but for a few thousandths a zero clearance opening was created. The fence was then relieved slightly above the tool with a chisel to avoid rubbing and heat buildup.
A length of wood the dimension of the rabbet was tacked to the outfeed side, a stout wide feather board was clamped to hold the mutins firmly against the fence, and a power feeder above completed the setup. The pieces were fed butt to butt then flipped around and sent through a second time to complete both sides.
It worked for me, but lots of good ways here to skin this cat.
Thanks again for starting this conversation and the name of your pine supplier.
12/6/14 #25: Variety of Joints ...
I don't see much about Maka morticers any more. I've still got mine. We also used to make sash in Sugar pine, nice stuff! And the beautiful curls that come off with a hand plane just feels right. I don't think any of my employees know how to use a hand tool. They can't find the start switch.
We still use shapers extensively. One of the most versatile tools in the shop, especially the heavy tilt variety. We recently completed some ornate exterior work on a big old Victorian that was all done in Cypress. It ran beautifully on the shapers & molder. Figuring out how to run some of the interesting work is the best part of woodworking.
12/6/14 #26: Variety of Joints ...
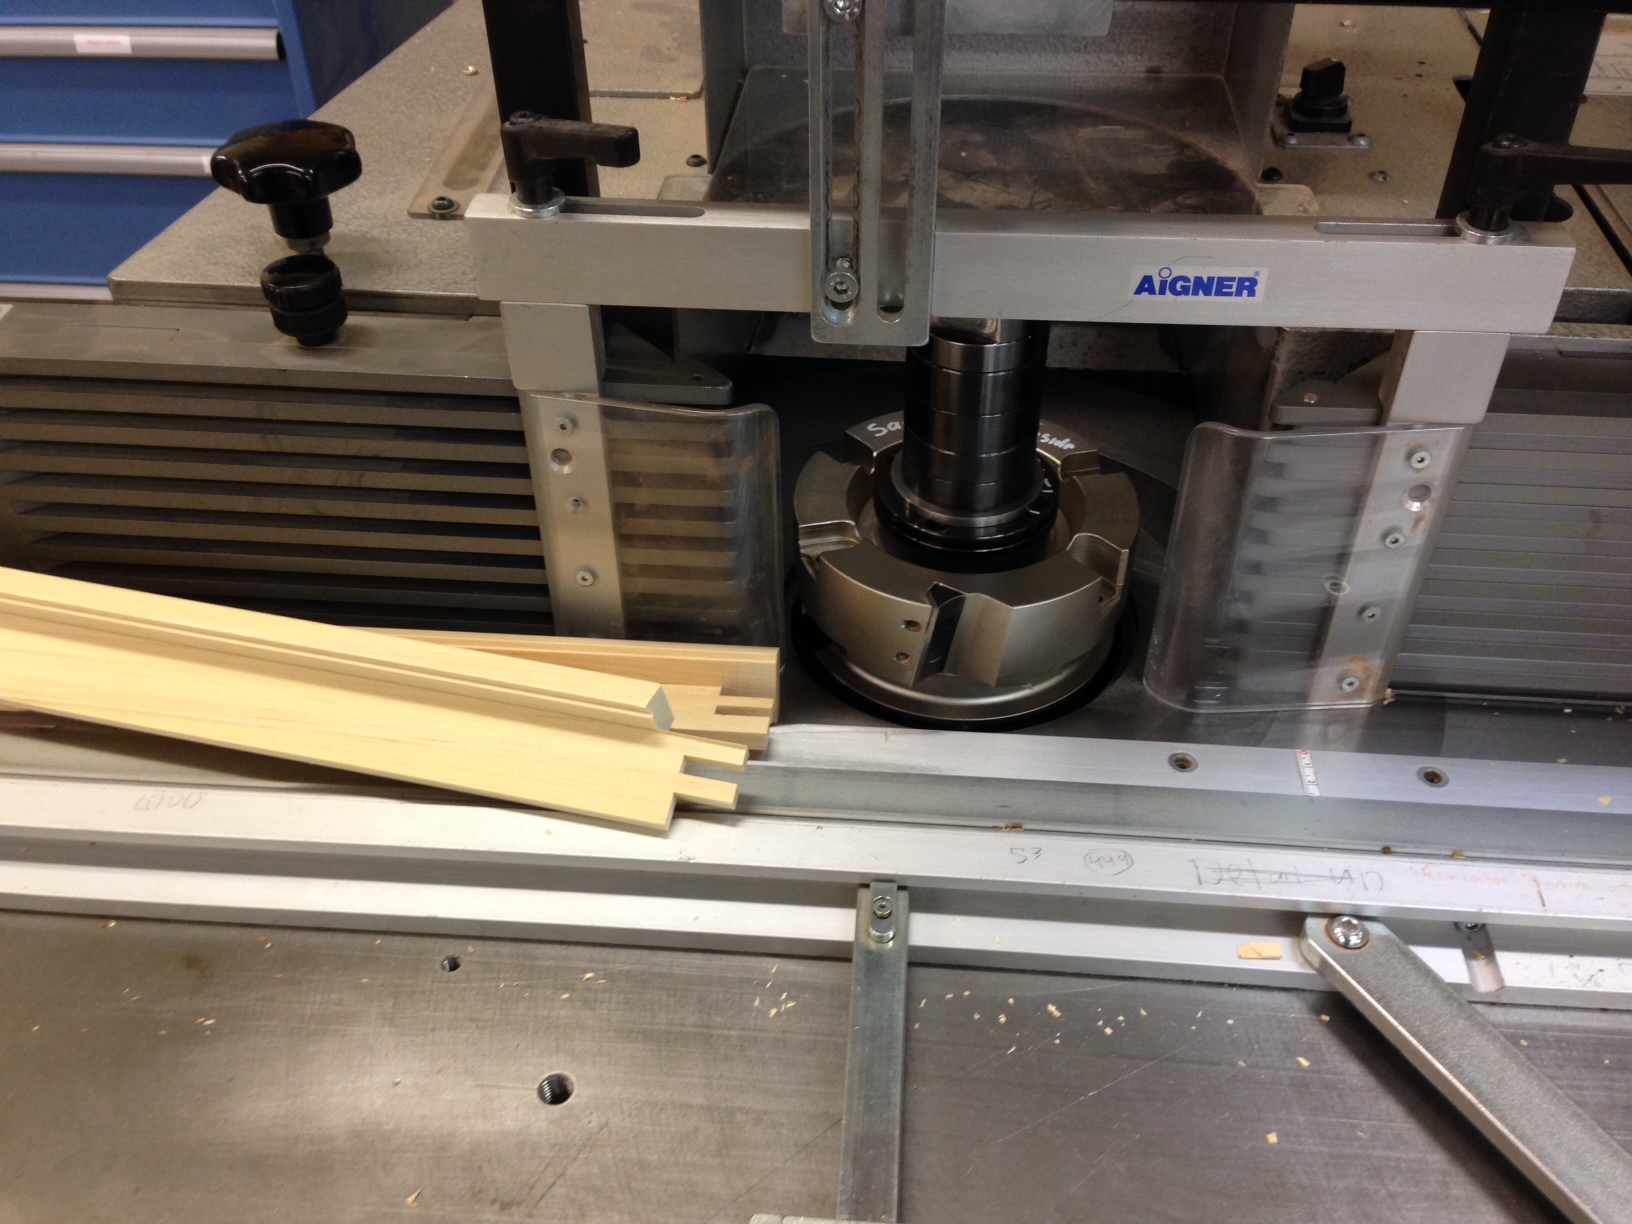
There are many ways to skin this cat. Our process for this has evolved over the years and I still have ideas for improvement.
TDL work is pretty easy at the historic putty glaze 1 3/8� sash thickness with �� or less rebate. We do a little of this with some basic brazed cutters but most work calls for insulated glass in 2 �� thick doors. The cuts get heavy at this size with the deeper glass pocket and call for special technic. Shaper work on oversize pieces and small pieces can be a challenge to get proper support of the work piece.
The downfall of insulated glass is the requirement of a deeper glass pocket that takes away from true historic proportions. For this reason we end up doing more SDL work unless it is a full on restoration with single glass and storms. SDL, the way we do them are more labor intense than TDL. I do know of some east coast shops doing a 5/16� or less glass pocket and making their own IG in house to achieve a more accurate historic look. I think custom door and window makers need to be good at both types.
I prefer the outside fence for this type work but a inside zero clearance fence with a rebate ledge as Rob describes would work well also. One trick we use is to make a train by butting slotted workpieces to the tenoned parts to make one long piece. Doweled parts can also work the same way. The train method works also for running short door and window rails with either type fence.
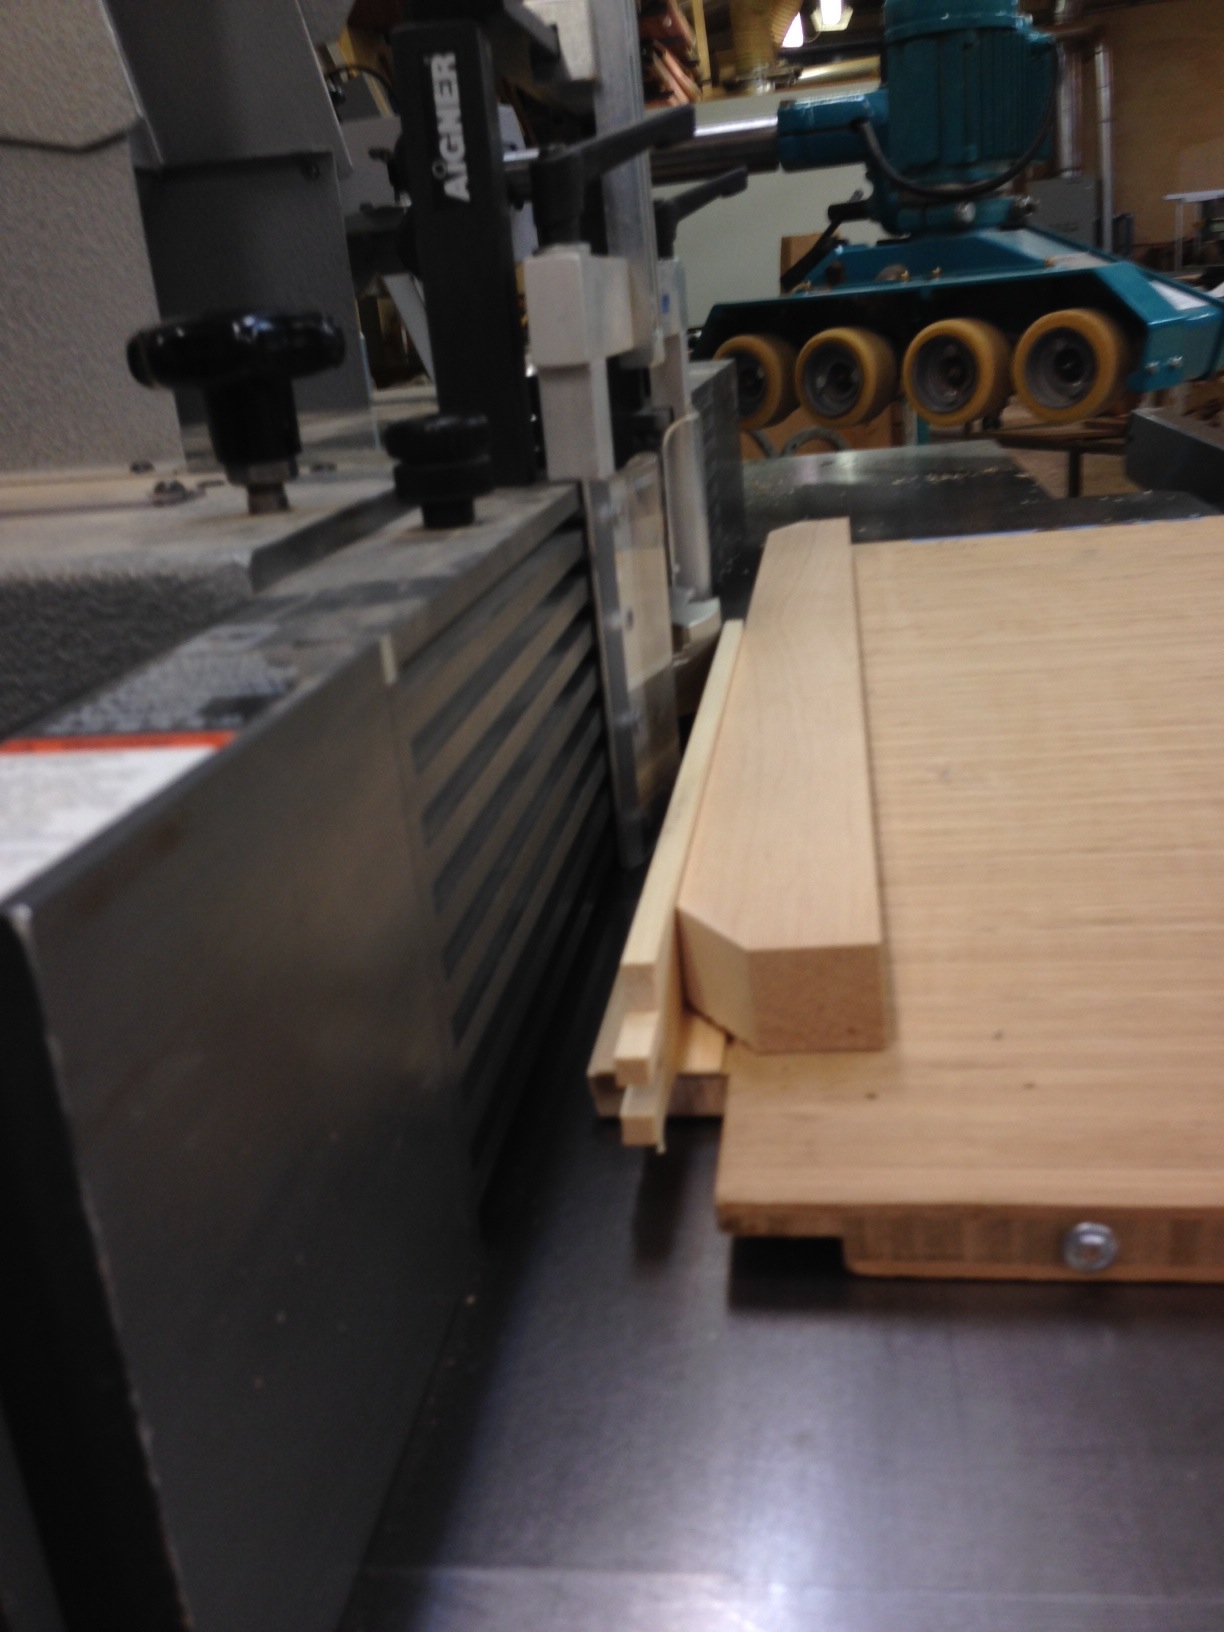
Following are some pictures of a 2 �� thick TDL going through the process. We use the pricy Aigner outboard fence but for seldom users shopbuilt fences can work.
Joe
View higher quality, full size image (1632 X 1224)
View higher quality, full size image (1632 X 1224)
View higher quality, full size image (1632 X 1224)
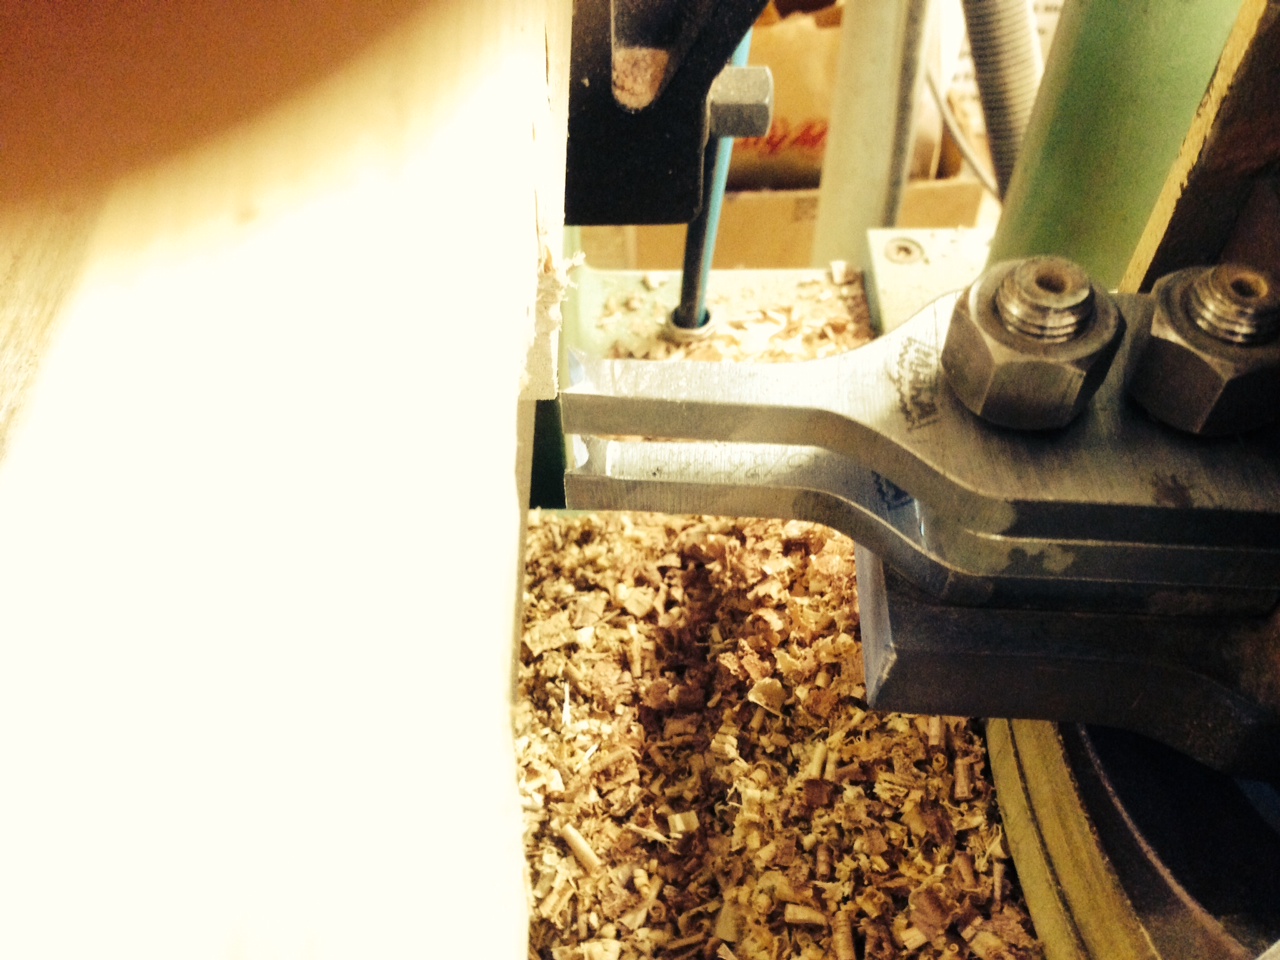
12/6/14 #27: Variety of Joints ...
In the above pictures the first pass is easy and can be done in one pass. The second cut I did in two passages. The last cut can be done in one pass if blocked up solid like this photo.
Joe
View higher quality, full size image (1224 X 1632)
View higher quality, full size image (1632 X 1224)

View higher quality, full size image (1224 X 1632)
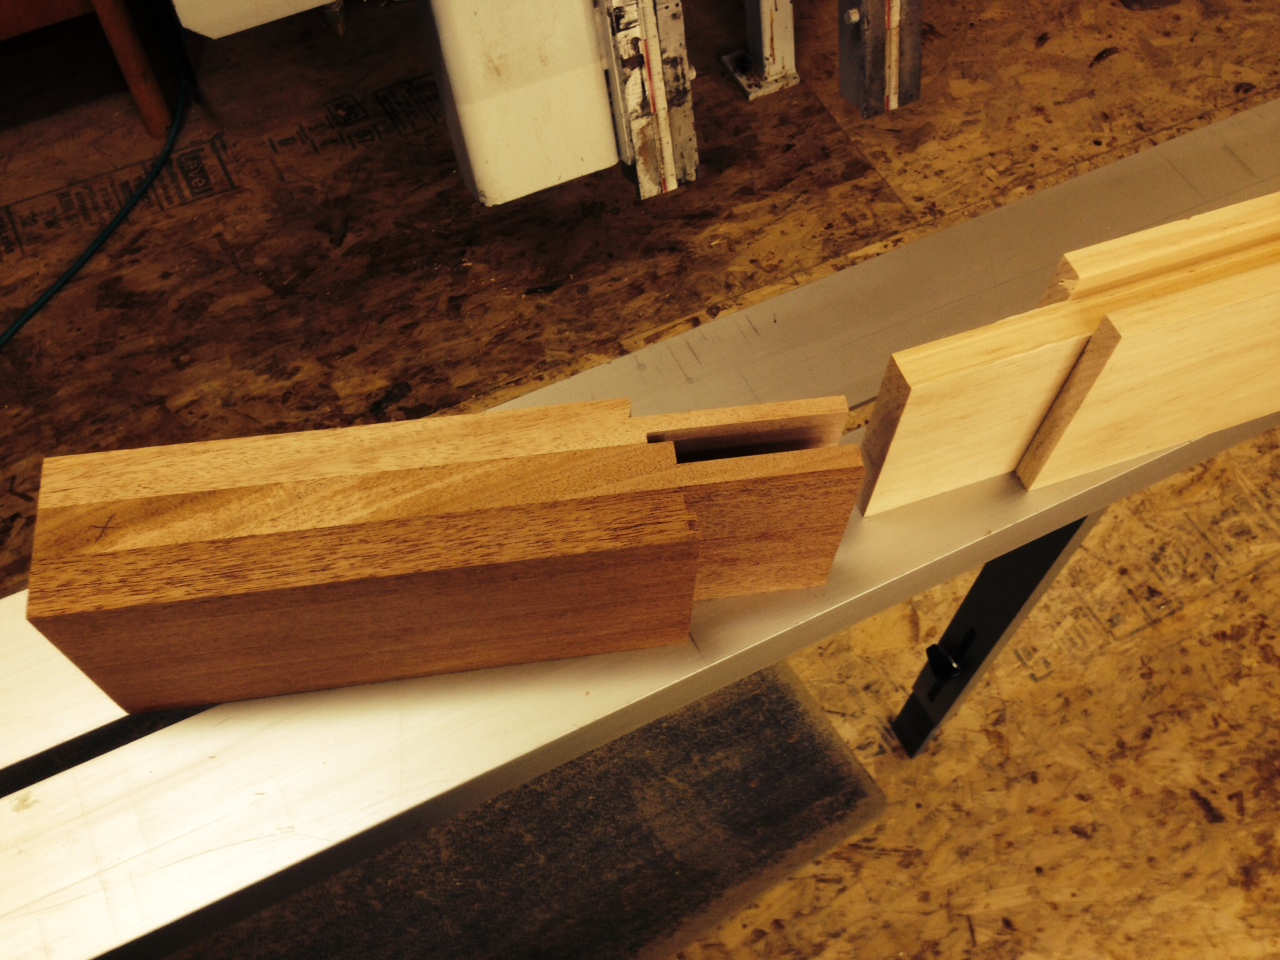
12/6/14 #28: Variety of Joints ...
Larry,
we have a Maka and we just set it up for double mortises. I have a cheap bench top HC for the muntin mortising but on the lookout for a old iron HC.
I agree, pushing shapers to the limit on historic work is my favorite.
Joe
View higher quality, full size image (1280 X 960)

View higher quality, full size image (1280 X 960)
View higher quality, full size image (1280 X 960)
12/7/14 #29: Variety of Joints ...
"I do know of some east coast shops doing a 5/16� or less glass pocket and making their own IG in house to achieve a more accurate historic look."
For those who are interested in this approach let me put in a plug for this outfit- small, high quality, specializing in narrow sightline IGU's:
greenmountaininsulatedglass.com/about.html
12/7/14 #30: Variety of Joints ...
I will second the nod to Green Mountain Glass for narrow sightline IG and excellent quality product and service.
This thread has helped me see room for improvement and will help it evolve in a more orderly fashion. Rob's cut-on-the-fly fence is what we used to do, but got away from for some reason. And Joe's muntin train and secondary supports add to the search for solutions.
Sadly, Maka no longer makes their mortisers. I understand Dankaert - the US service arm - still has some parts and service. There is a Canadian company - Solidwood, link below, that has some used machines and parts and does service. The mortising head on mine is due for a rebuild, but I am slow to tear it down for fear it may be judged beyond hope.
Solidwood Machinery
12/7/14 #31: Variety of Joints ...
Website: http://www.rscaffecabinetmaker.com
I never got around to trying it, but thought possibly, two opposing, offset routers mounted in a table with a light duty feeder would be an efficient way to run the narrow muntins. Captured between two fences, both sides could be shaped and dimensioned in one pass- just some food for thought.
It is a shame no one is still making a Maka style mortiser. Such a solid efficient machine....
12/8/14 #32: Variety of Joints ...
I agree - The Maka is a great machine. Lari & Lari is imported by Solidwood, and there are a couple of others still making them. A friend has a Northfield oscillating chisel machine that is like a tank, but it is an older machine also.
Same with the Powermatic 2A tenoners. Once they are brought up to date, the make a great dedicated machine for even small shops. Why these are not reproduced by even the Chinese, I don't know. I guess that loose tenons, and dowels - even biscuits - have replaced the need for efficient, accurate tenons.
1/31/19 #33: Variety of Joints ...
Thanks for the suggestions. I am going to get the POWERTEC if I pull the trigger but space is going to be an issue. I have a decent storage area of the garage/workshop I could put it but don't want to fill that space.
I have looked into other options as well. There is a woodcraft franchise that has a shop you can become a member of about 45 minutes away. Not sure if it would be worth it to become a member and pay monthly dues but I could buy blocks of time ($75 for 5 hours) and have access to any machine they have - and they have a lot. I would just need to use the jointer and they have an 8 inch.
I have 14 boards of cherry, all 8'-12' in length, approx 1" thick, and range in widths from 4"-14". The wood I normally get is already milled on three sides so once the cherry is done I probably wont use the jointer nearly as much (the wood was an awesome score - got it free from my neighbor). It may be worth it to just rent time at the woodworkers club and save up for an 8" model when I have more money and hopefully space. I have a planer so a 5 or 10 hour block could last me a long time.
picking guide of modern benchtop jointer
|

