Hello all.
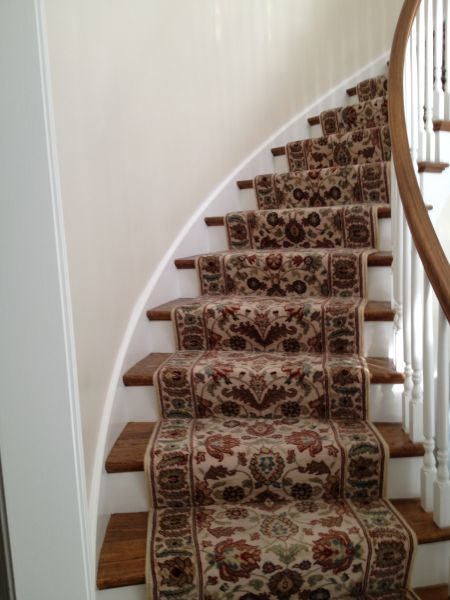
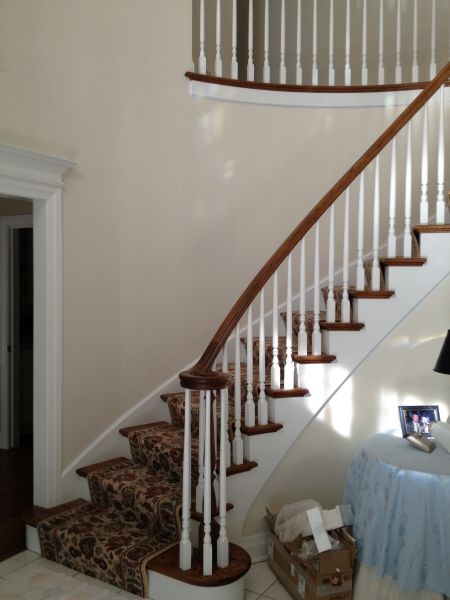
My mother-in-law has a curved hellical staircase and she wants me to put basically picture molding as you go up in rectangles. Few questions...
In regard to a steam bending machine... Can I take moldings that the profile is already formed and put the molding in a steam box and bend it to the shape of the wall? How do I template the wall? Would I make a jig? Whats the best way?
I was just going to use Flex Molding and take trammel points and draw my lines on the wall to follow, but I thrive for a challange and would love some guidance.
Any perticular steam bending machines you like? What kind? Have any pics of your steam box? Maybe one in action too?
Please help!
From contributor Ke
For steam bending to really work, you need end to end compression, to get the cells to slip when the lignin gets soft. What you are describing, would only require a little twist, if I understand the question. That would not induce a new memory in the structure, even though it would be soft at the time, so it would spring back to its old memory when it dried.
And no, asymmetrical shapes do not behave well while bending.
I think I would use epoxy and some thick veneers in a vacuum bag to produce the helical stock. If you need say 2.5" wide, I would use veneers 9" or 12" wide, so I could rip out extra parts, if for some reason you have defects in the molding, you won't be back to square one.
All you have to do, is figure out how to hold this bag of slippery veneers against the wall at the pitch they will run, until you can draw the vacuum. Then you just leave it there until the epoxy cures. You might be able to spring thin battens off the balusters, or something simple like that.
After it cures, take it out of the bag, straighten an edge, then rip and jig up guides for shaping, and or mitering.
From contributor Da
If I picture this right, you need to make a helical twist in the 'horizontal' molds with no twist or curve in the verticals. Steam bending would not be good choice for several reasons - as Keith mentions, plus the added moisture will distort dimensions, and the probable unevenness of the curve.
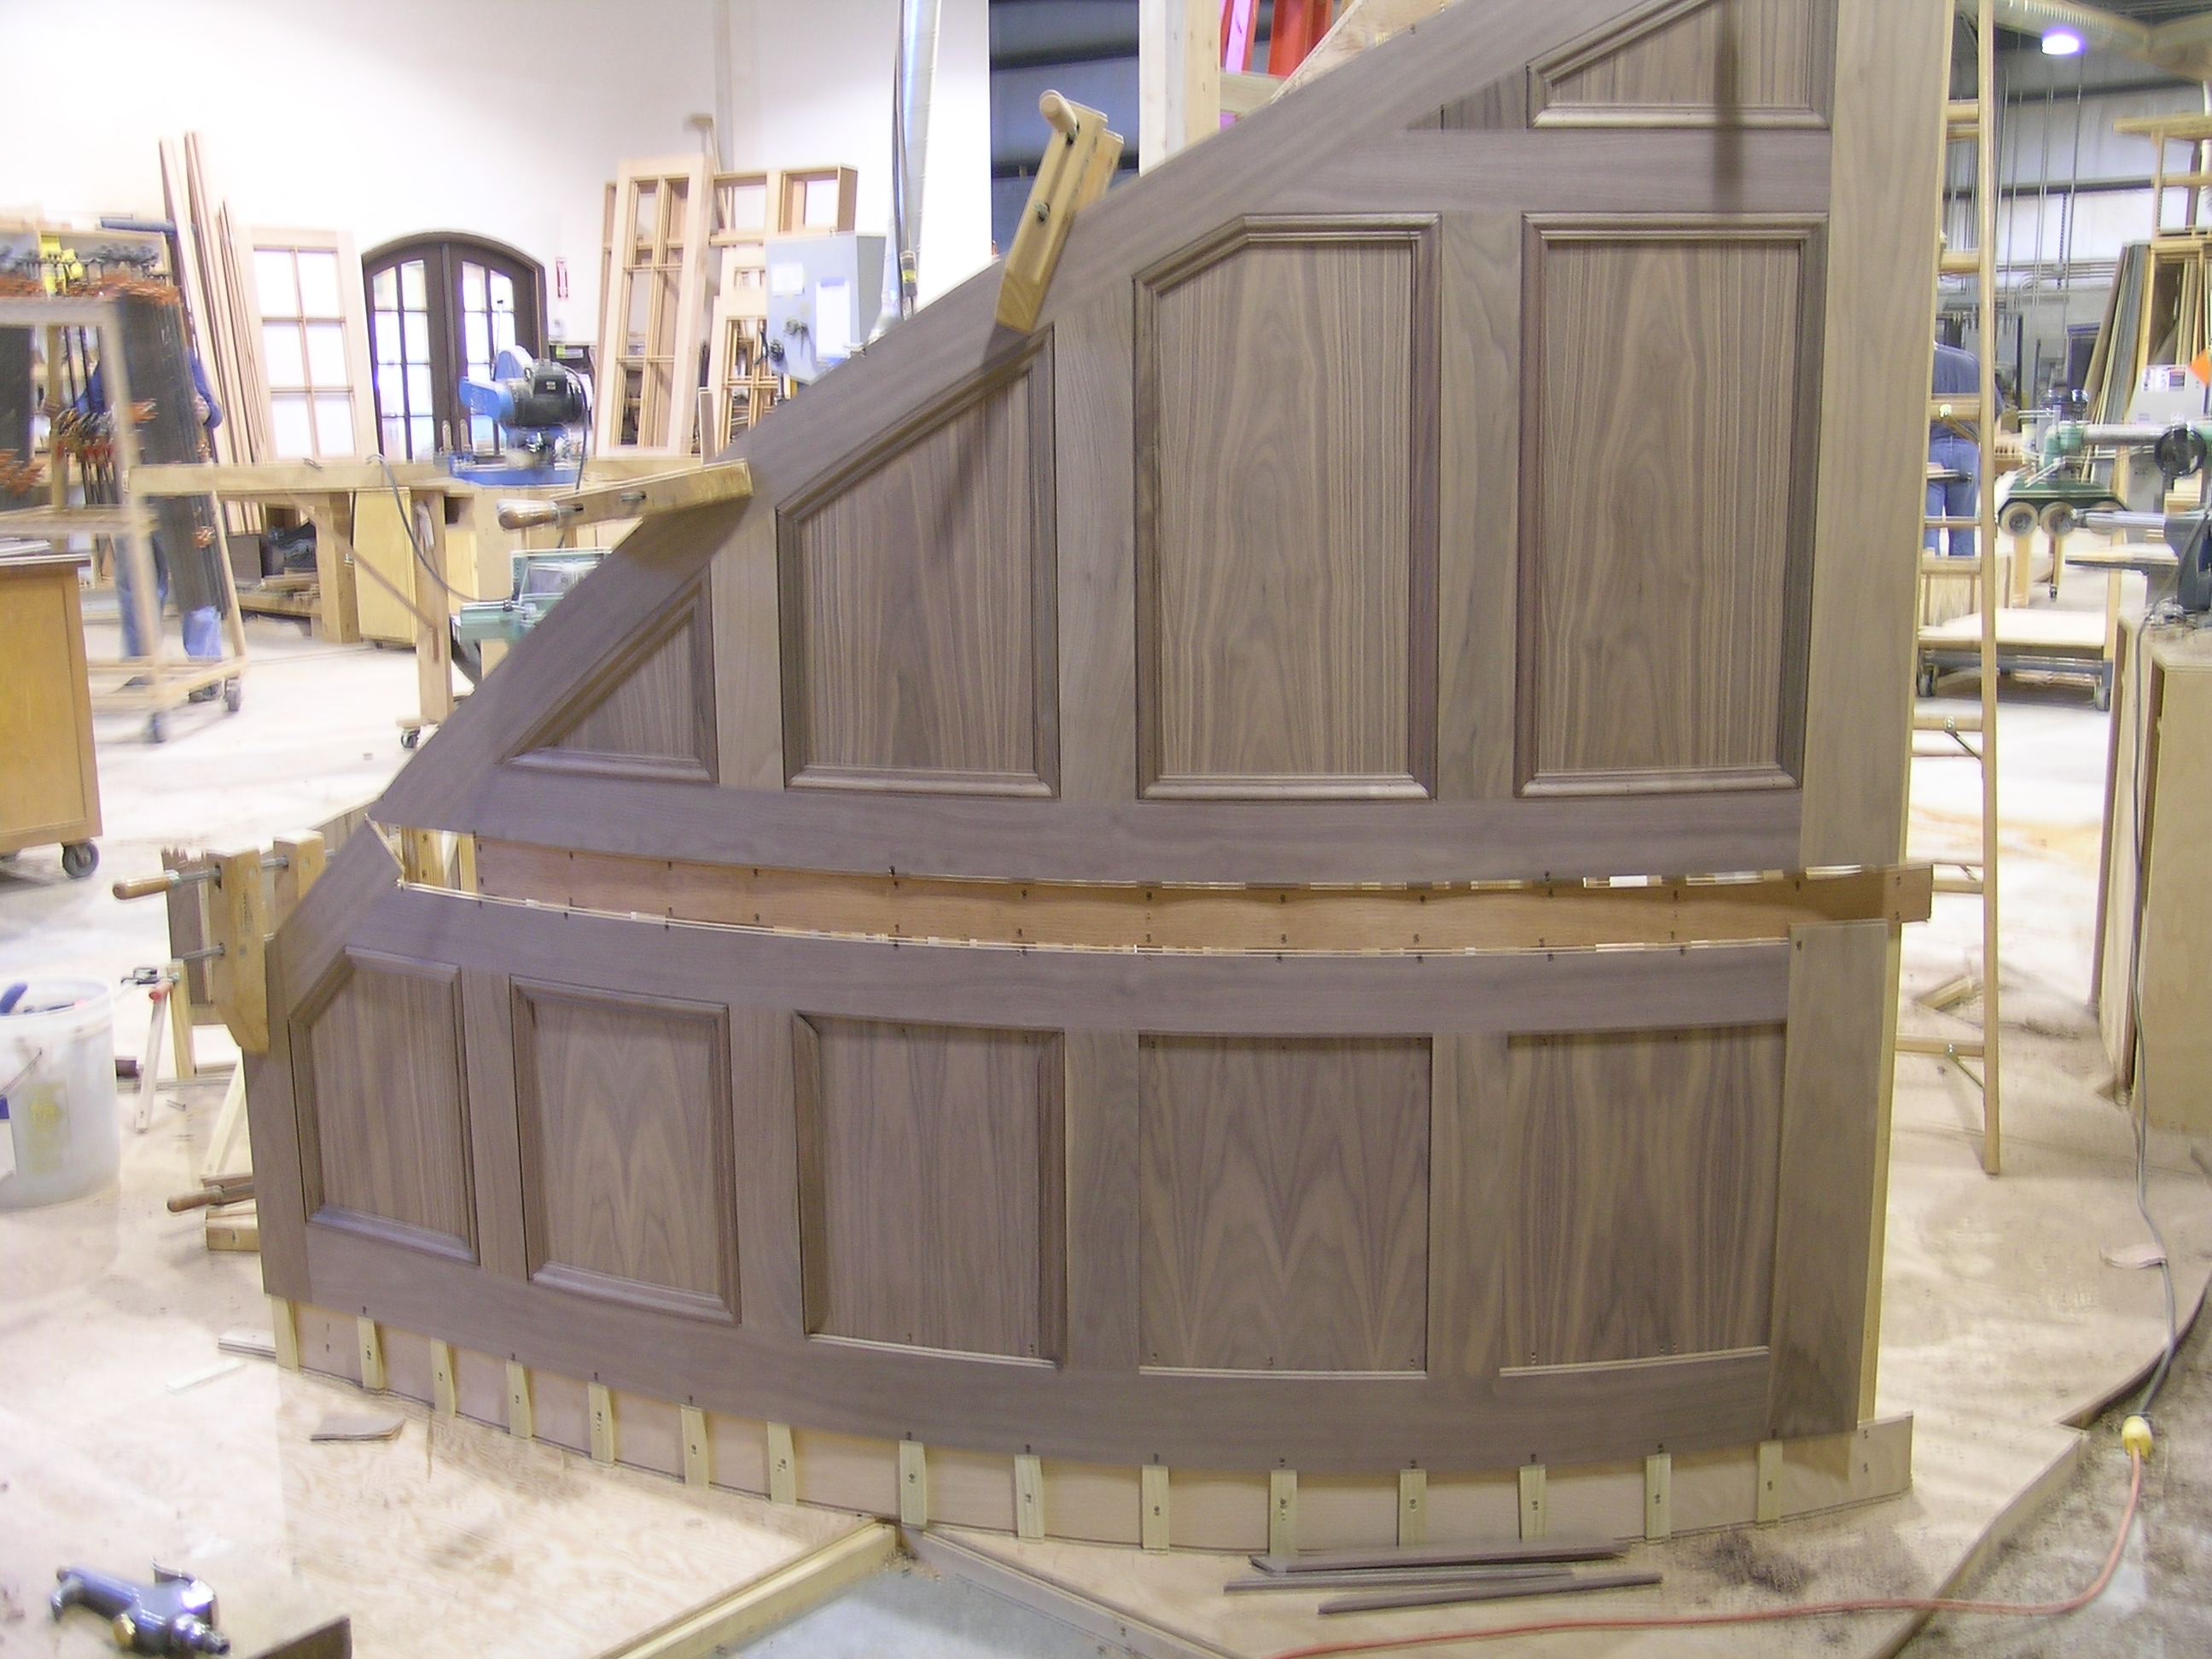
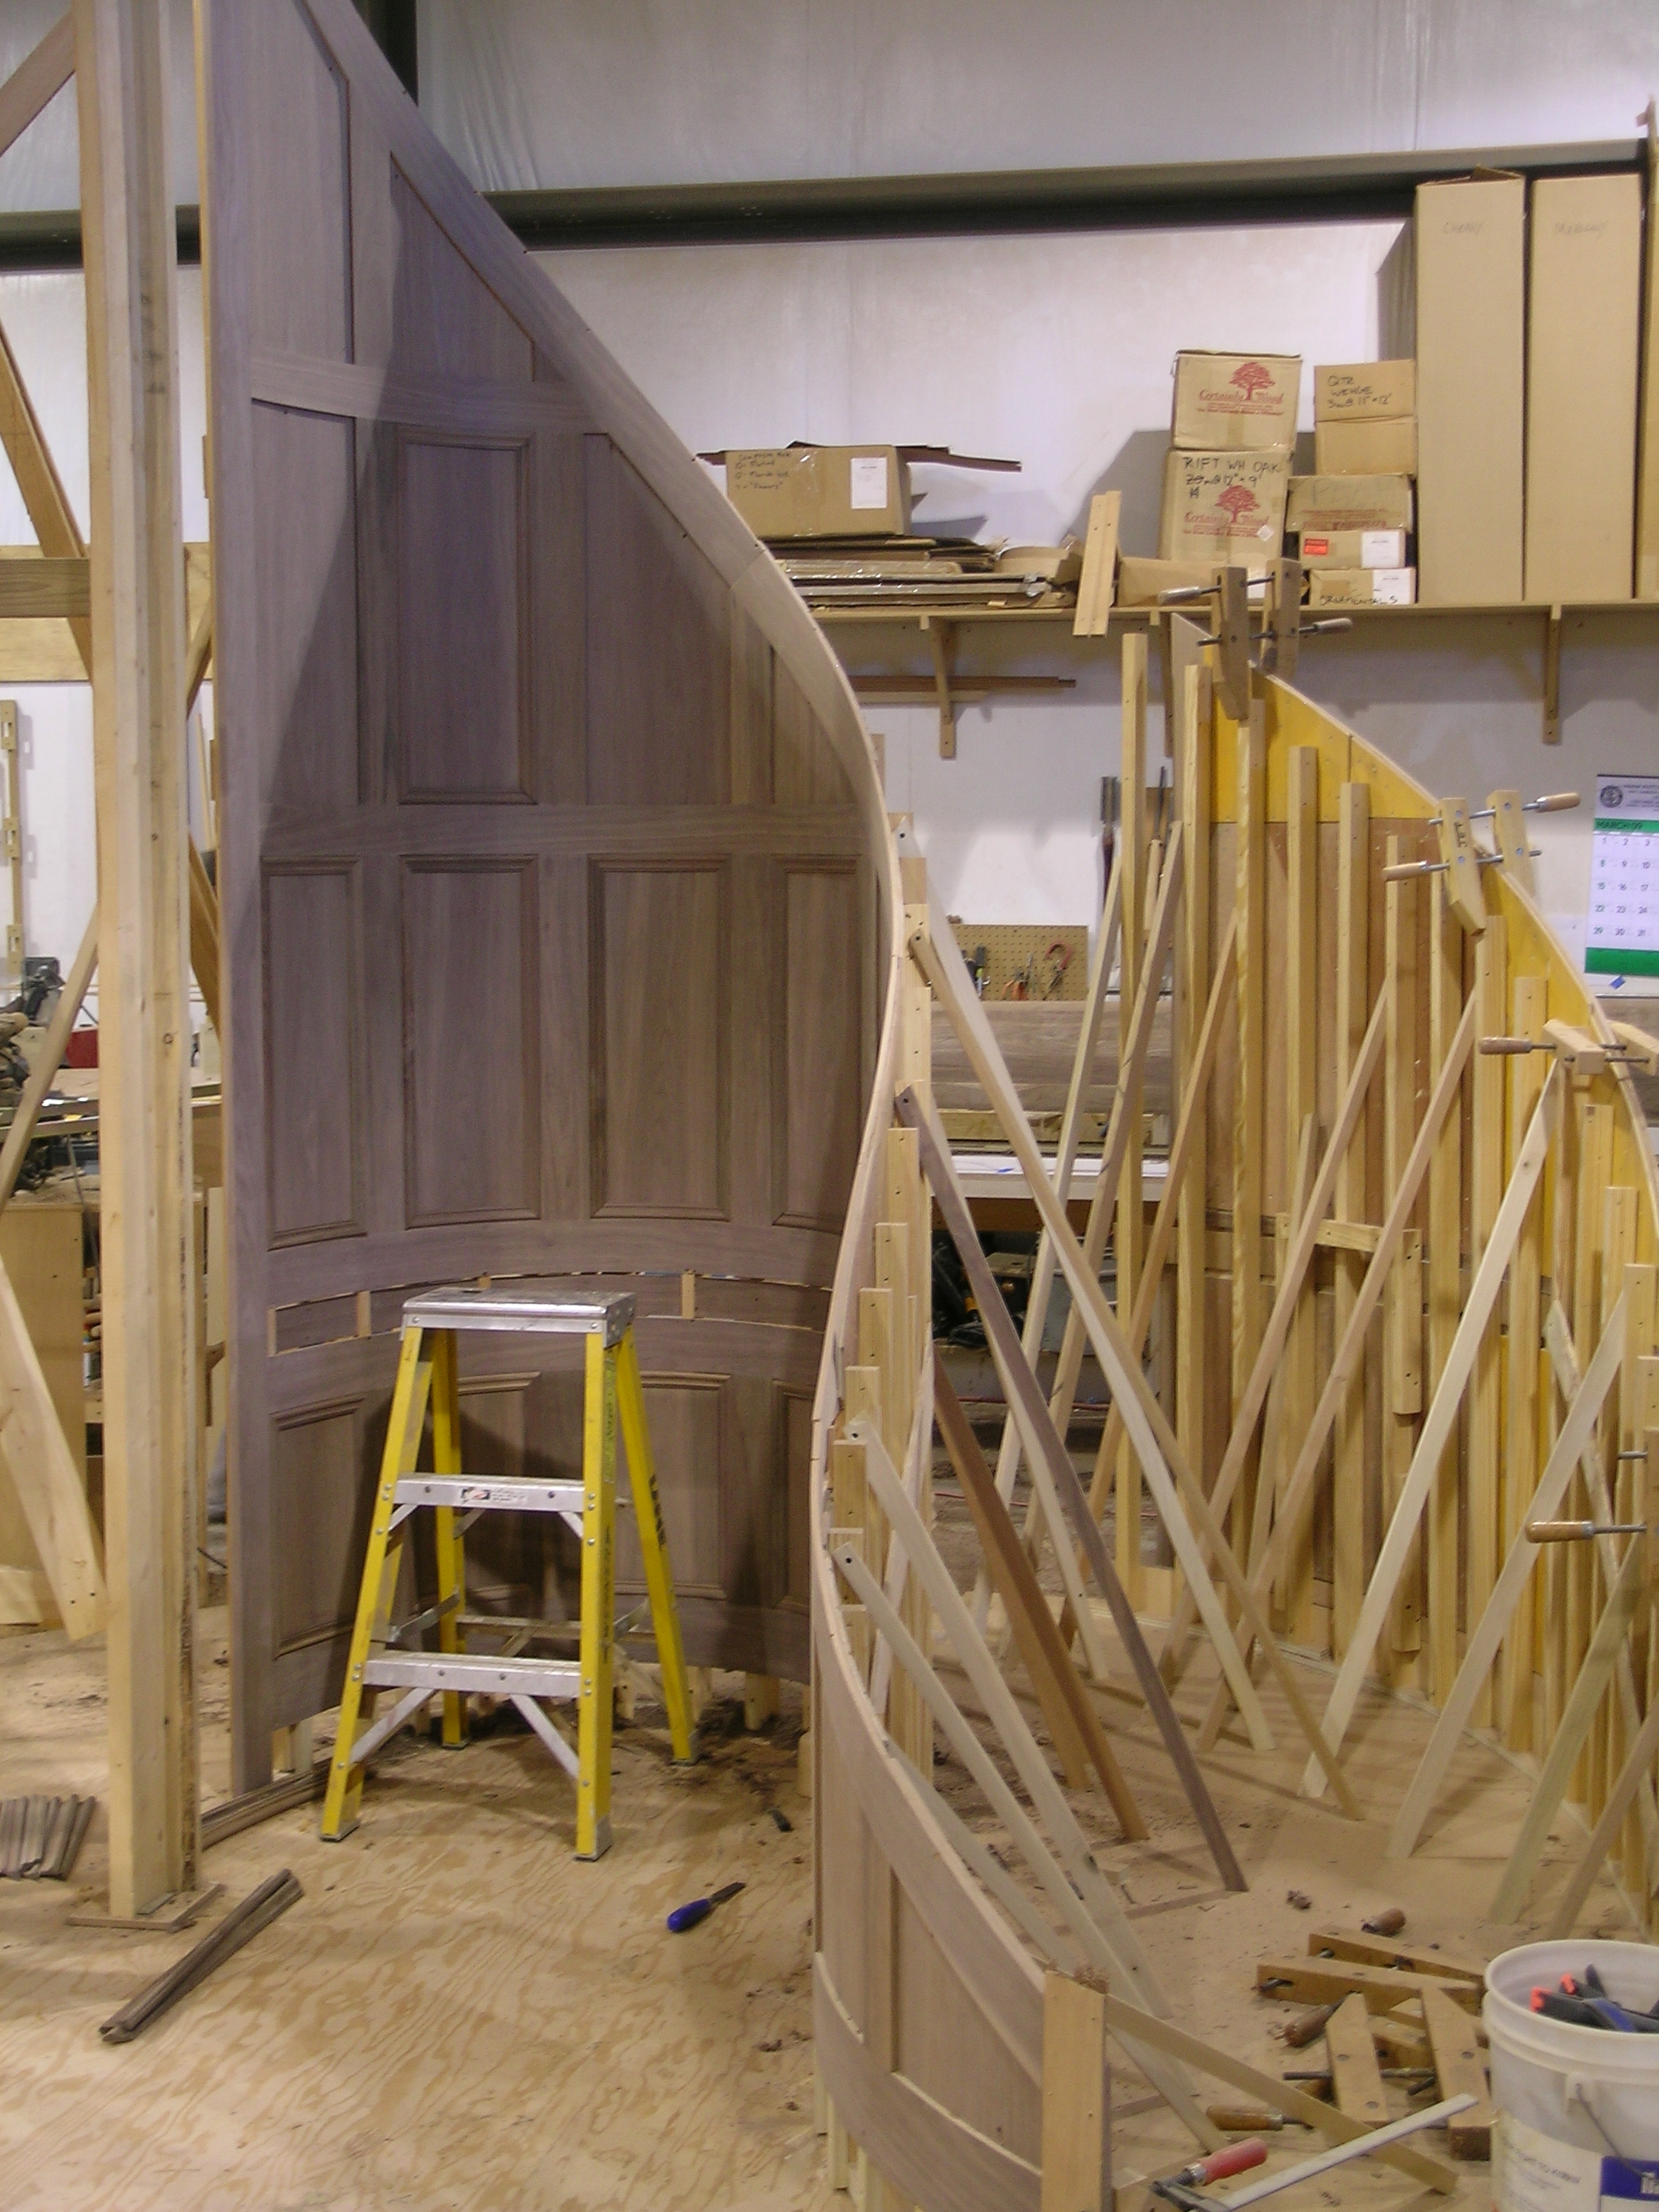
There are ways to do this - "thrive on a challenge" - but you almost have to figger it out on your own - too much to try to do here. Here is a photo to get you started. The upper panel moldings are twisted on the rake, while the horizontal moldings are merely curved.
From contributor Mi
Thanks guys!
That picture is absolutley awesome bud! Is there any way I can call u to get some further guidence? Phone? Or email it to me. Thx!
From contributor Mi
Heres one pic

From contributor Mi
One more
From contributor Ke
Help us here. Are you talking about the left wall only,as you walk up the stairs?
Define picture mold as you see it. One kind goes around a room about 2' below a high ceiling, with a bead along its top edge, where a hook with wires can hang a picture without nailing into plaster.
Or are you just thinking of a trapezoid, of some trim, with mitered corners, or a frame and panel arrangement like David posted?
From contributor Ke
Oops, I meant parallelogram instead of trapezoid in the last paragraph.
Also, if we instruct you on how to glue up the stock, how do you intend to shape it? What type of equipment do you have to turn it into trim?
From contributor Mi
Keith, I would LOVE to do what he pictured, but I would also like the idea of say a 2" molding in a trapizoid shape with mitered corners, essentially making picture boxes like wainscotting.
From contributor Mi
Powermatic 66 saw with 52" fence, 18" band saw, performax 22/44 drum surface sander, smaller planer, lathe, spindle sander and all the typ tools, belt sanders, routers, jig saws, etc. it may be worth buying a molder, but I havent quite looked into what a decent to good to one that will give me room to grow cost. I'm assuming I will need a molder or have to take it to someone to have it run?
And yes, parallelgram, not trapizoid
Thanks!
From contributor Mi
Oh yea, and 12" compound mitersaw and a kapex
From contributor Da
I assume the walls are drywall or plaster, and as such will not accept molding like a flat wall would. There is nothing to securely fasten to. Even flat work is not recommended to attach to drywall except in severe economy/disposable mode.
So...the first task is to cover or replace the walls with 1/2" min. hardwood plywood, while working out all the other trim details.
Then you make a cold bent lamination of multiple plies to the plan radius of the wall, with the grain running horizontal to the plan. Then you lay out the rake - the angle - of the rise of the stair on the laminated blank and bandsaw molding blanks from this. Then you figger out how to profile the blanks - routers, shapers, etc., and do so without losing any fingers or useful body parts. Stop, have lunch, and then make the straights after lunch.
I see this is for a mother-in-law. Good luck, I hope you guys have a good relationship..... Paneled walls like the photo can approximately double the cost of the stair.
From contributor Mi
David, that is absolutely awesome!
You should be very proud of yourself!
So wouldn't I use 3/8" bending ply or is 1/4" good enough?
Is there any way u and I could chat on the phone so i may be able to get more details from you?
From contributor Ji
Producing compound-curved (helical ) moldings and trim is what separates the stair guys from the real guys. You figure it out and there will be plenty of guys eager to hear all about it.
No matter what you may have read or heard, steam bending (and epoxy) is a boat-builders' remedy but a desperate and last choice among stair builders.
In short, wood strips are laminated around cylinder forms and then shaped to profile. A variation of this is a molding which has been reduced to bendable strips. Another approach is to just cut and shape the required moldings from solid wood planks. This requires a substantial apprenticeship like all the rest.
This unavoidable fact is what sells flextrim.
From contributor Mi
I greatly appreciate your honest opinion and I did propose the idea to my inlaws and without hesitation, they both said no. It is for the inlaws. :-). Better to "practice on their house than screw up on a real clients house
From contributor An
How many hours did that take you to do? I am not a stair builder at all I am just curious the amount of time that paneling has in it. Thanks
From contributor Ke
MR. David R. Sochar & Mr. Jim Baldwin;
"...with the grain running horizontal to the plan."
I understand plywood is more likely to bend more readily in one grain direction. Say a sheet of plywood could be cut on the diagonal for stair stringers or cut lengthwise for best material use. Is there an advantage of one apposed to the other if I'm willing to fight the twist ?
I have a lot to learn; I'm more inclined to twist the laminations along the rake angle, much like bending a laminated rail.
Should I re-think this?
From contributor Da
Wall panels are different from stringers, of course. So there will be different grain orientations depending upon the use of the materials.
Stringers should have structural gain mostly along the length. Wall panels are not structural, so grain can run aesthetically. Moldings should have grain runing the length.
I misspoke when I said "running horizontally" - the grain should follow the rake on helical or twisted moldings.
The stock for the molding should be formed along a cylindrical form, at the required radius and rake. Then accurately sized and profiled in some way.
From contributor Ji
Grain stands parallel with the bend whenever possible and usually worth the added expense. As in wiggle wood plywood, all cross-grain layers have been eliminated and the wood compresses and bends easily (wiggle wood is actually to wiggly for most stair work).
Bending and applying plywood which has been ripped with the grain, can be problematic since a typical, helical bend requires the plywood to bend and twist in at least two directions. The only reason we get away with this at all, is that the bends are usually large radius curves.
Of course exposed facings or veneers are bent or applied as required.
A good rule of thumb is that if any intended 'bend" is going to seriously fight back, find another way. Life's to short to pit yourself against the might of the mighty oak and her sisters.
From contributor Ji
Dave's' answer is most complete and with no arguments from me. I work from a small shop and usually alone so my methods and thinking are all geared towards this.
Large shops on the other hand, use other ways and means. I've seen a half-dozen guys along with a forklift, struggle to bend an enormous bundle around a form and live to brag about it. Working alone, I've been boomeranged off a balcony while fighting something small. My approach now is to bend as little as possible, while others insist on bending every stick.
It's all challenging and fun and sometimes profitable.
From contributor Ad
David,
Excellent execution of a challenging project. It is unfortunate that the guy who drew that S-bend made double your money sitting behind his degree and had nothing to lose. I hope the customer appreciated your part.
You are a true craftsman. I always enjoy seeing your pics.
Cheers,
Adam
From contributor Da
Adam - Actually the guy that drew that S curve was....me. No double the money, and everything on the line. I doubt any architect or draftsman would know enough to be able to do that. These skills are getting extremely limited.
While I really, really prefer to work with design professionals for any number of reasons, we have a certain percentage of noveau riche people that equate hiring a designer with burning money. The above stair and related work was a car dealer that firmly believed we had a 40% margin. Nice people, but they squeaked every inch.
I can't tell you how many times I wanted to I wanted to say "What's it going to take to put you int staircase today?" or " I need to talk to my manager first - I'll be right back".