Setup Tips for a Small Moulder
Tips on depth of cut, and on supporting the open side of the moulder to reduce chatter. September 30, 2010
Question
I received and finished setting up my Williams & Hussey model 206. I'll run some 2 3/4" crown through it in a couple of days. I ordered the knives made based upon some molding I had in stock. The thickest point is 9/16". The dealer told me the deeper the cut and the faster I run it, the sharper the cutters will stay, although he emphasized he'd never actually run moldings himself.
I'm looking for recommendations from you folks with experience. What thickness would you recommend planing down to? I ordered the backcutters in addition to the crown profile and will cut the back first.
Forum Responses
(Cabinetmaking Forum)
From contributor M:
When we have run molding on a smaller moulder such as yours, we pre-planed and prepared the stock by taking it down in size so that the molding knives were removing a minimum amount of wood. Usually this material was oversized by 1/16", so the molding knives were only removing 1/16" of wood, at the closest points, and more where the shape was deeper. When using a 2 or 3 hp motor, we did not like overloading it by removing too much wood. Never heard that deep, fast cuts would keep the knives sharper longer. The focus should be the quality of the finished molding, not preserving the knife edge, even though both are important to one another. As a rule, we found the slower the feed speed, the better the result. Slower feed speeds allow more cuts per inch and better results. Experiment and find what works best for your machine, your wood type and the particular profile you are running. Be sure to cut off any dirty board ends before running. It is a real bummer to chip new sharp knives with grains of sand embedded in the ends of your wood stock.
From contributor L:
Yes, 1/16" oversize is usually about right. If you have the variable speed feed, go as slow as you want. I usually set mine at about 30% on most of the moldings I run. Makes for easy sanding and a smooth cut.
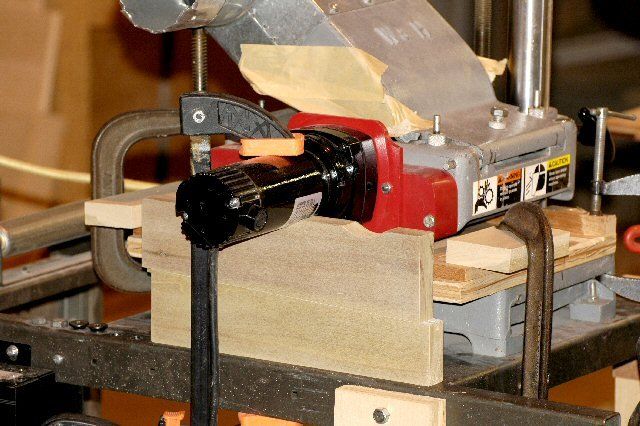
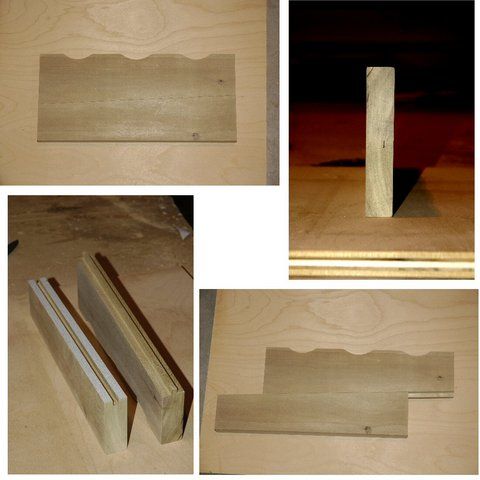
Another thing you want to make is a support for the open side. This will eliminate any bounce in the machine and make your cuts that much smoother. I made this and it makes a big difference.

Click here for higher quality, full size image

Click here for higher quality, full size image
Images provided by Leo R Graywacz Jr
From the original questioner:
Thanks. I'll do a little experimenting on some scrap. So if the thickest point of my crown is 9/16", I'll plane to about 5/8" and see how it goes. I'll make a support like you suggest, contributor L.
From contributor L:
Makes a world of difference. Especially on larger moldings.
From contributor K:
I'll ditto what the other guys said. I don't have the variable speed, but will get it someday. I take the whole cut minus 1/16 and then the last 1/16 for a finish cut. On some moulding, depending on the profile, you may need to hog out some of that wood on the table saw using a dado head.
From contributor J:
I don't have the adjustable speed on mine, but I find that the multi-pass kit is worth every penny. It allows both feed rollers to drop further and seemingly take a lot more vibration out of the cuts even with just one pass. However, I do plane to almost final thickness in both soft and hardwoods and use usually only more than one pass in hardwoods with fresh knives.
I also made a fence set up along the lines of the new fence system from W&H, only with wider guides it makes setup much quicker than C clamps.
From contributor C:
Contributor L, I like that setup! Have you always had the variable speed on yours, or did you add it? I don't have variable speed on mine at this time, but am thinking of building a support like yours anyway. This has to help the vibrations.
I just ran a job with a deep profile in some hard maple, a large cove, and I lost probably 35 percent of my boards from bad tear out. I wonder if contributor L's simple device would have reduced my loss.
From contributor L:
No, I didn't always have the variable speed. But I started to do a lot of moldings in the 5"+ range in harder woods, so it was necessary. I have found that some cutters, no matter how you run them, will have chip out. Hard maple, sapele and birch have a good tendency to chip out. I have noticed a pretty good improvement by locking down the open side of the molder, even on smaller moldings. I spent a lot of time trying to get less chatter in my moldings and then one day it hit me like a ton of bricks - duh! - the open side is bouncing.

