Question
I recently bought an Excalibur slider which is supposed to make cross-cutting much easier. I've never used a slider before and want a little more instruction than what came with the unit. Through trial and error I am able to set up, but am looking for easier ways. I currently am using a straight edge against my miter to true the fence. This is a pain and takes awhile. Also, the scale only shows 90 degrees with the fence in the front of the slider. Any help would be appreciated.
Forum Responses
(Cabinetmaking Forum)
From contributor B:
This worked for me: I set my Biesemeyer fence over the blade and used a large layout square against the fence and the slider fence to get it *real* close. Then put a brad nail into a 1 X 2 X 3" board. I clamped the board to the slider's fence where the brad just grazed the front of the blade, then slid the fence back and checked it with the rear of the blade. Mine only required a very fine adjustment. I then bolted the Excalibur legs to angle iron and bolted that to the TS. Then rechecked fence for square. Then of course, slid the scale to dead center zero and was set. I checked mine against my SSC panel saw and saw that the panel saw was almost 1/32 out of square in 24". Mine is square now. How perfect I don't know, but according to my tape, folding rule and square, it's so close I can't tell. Great addition to the saw!
Here's what you will need:
A nice flat panel of between 26-30" square. You want something over the widest crosscut you commonly make; for me that is 25". It won't and doesn't need to actually be square at this point. I like to use my standard back material, which is 1/4" thick melamine with an MDF core. It's flat, fairly cheap, produces a clean edge, and I always have scrap panels of back material of a suitable size in the shop. You can use any flat panel that will give you similar results. The panel will be reduced in size as the squaring process progresses, so if you use a smaller panel, realize that your accuracy will be only to that length. In other words, if you want to know how square you are over a length of 24", it's best to use a test panel that will finish out at 24" or greater.
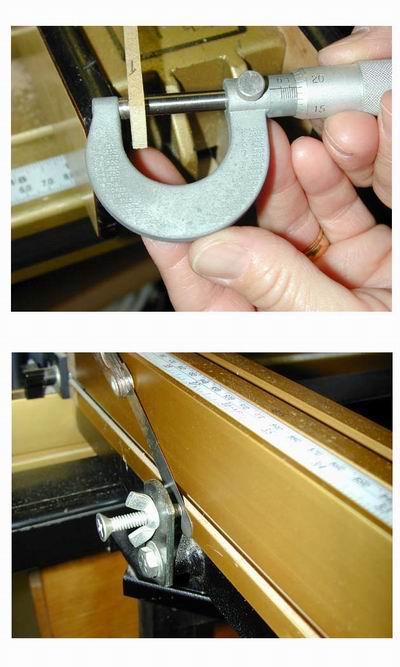
You'll need a set of dial calipers or a micrometer for accurate test measurements. I prefer a micrometer but you can use whichever you have or feel is most accurate. A framing square is useful to get you close, before the fine-tuning begins.
The tuning process assumes that your sliding top is level with your saw top throughout it full travel, or at least through the travel up to and past the rear of the saw blade, and your saw blade must be perfectly square to the top surface of your saw in order to produce square edges on your panel material.
Rip your panel so that you have two clean, strait, and parallel edges.
Mount your fence and back off on the fence adjusting stop screw to give you some room to move the fence. Start out by using your framing square to set your fence 90 degrees to the full length of your saw blade. The square should get you close. Set the fence adjusting stop screw against the fence and lock it into place. Make sure the fence itself is locked firmly into place.
As you go through this test process, recognize that consistent results depend on consistent procedures. Make sure your panel edges are clean and that you move your fence (and panel) through the blade in a consistent manner, including the placement of your hands on the fence and the pressure and speed that you apply as you move the fence forward, through the cutting process. As with any manually operated saw, including the industrial grade sliders, accurately dimensioned panels depend (to some extent) upon proper and consistent operator procedures.
Set your sliding fence stop so that you allow about 1/4" of material to fall off the panel each time you make a cut. You'll have to adjust your sliding fence stop as you go along, in order to do this. Lay one of the previously ripped edges against the fence and crosscut one end of your panel. Mark that end. I use an "X" placed about 3 inches inside the edge. That is cut number one. You are going to make five cuts before you test for square.
Rotate the panel clockwise to place the "X" marked side against the fence. Make the second cut and continue to rotate the panel clockwise and make cuts until you are in position to make a final (fifth) cut on the end where you placed the "X". Make this cut and save the off-cut, being careful to leave it in the same orientation as it came off the blade. Mark the top end of this narrow piece for reference purposes.
If you have followed my suggestion of having about 1/4" off-cut on each pass, you will have a narrow piece, roughly 1/4" wide to measure. With your calipers, measure the front width, write the results down and then measure and note the width measurement of the rear of the piece. Subtract the difference between the two measurements. This is the reading of how square your panel is over the length of the test piece you just measured.
I'm sure there is a mathematical formula that you can use to make adjustment to your fence, but I just move the fence stop screw an estimated distance in a direction to get me closer to square and run another test series of cuts. This (estimating) might seem difficult but you will be able to get very close after you have done this testing procedure a few times. I don't stop until I'm under .004" square over 25". Typically, this level of accuracy will take 3 or less test cycles, and itís not unusual for me to get a reading of .001 inches or less on my final test.
How well will it hold that tolerance? Depends on the consistency of your working procedures and processes and of how carefully you remove, store, and mount your fence, etc. Barring some accidental bump, my fence will remain within a couple thousandths (of my test results) over a full kitchen jobís worth of panels. I periodically make checks during the cutting process by flipping two like-sized panels to a mirror image of each other and feel for any variance along all corner edges. If I feel a variance that I canít live with (which doesnít take much), I will check a few more and if I notice the same results, Iíll troubleshoot the cause and if necessary, will readjust the fence using the 5-cut method described above.
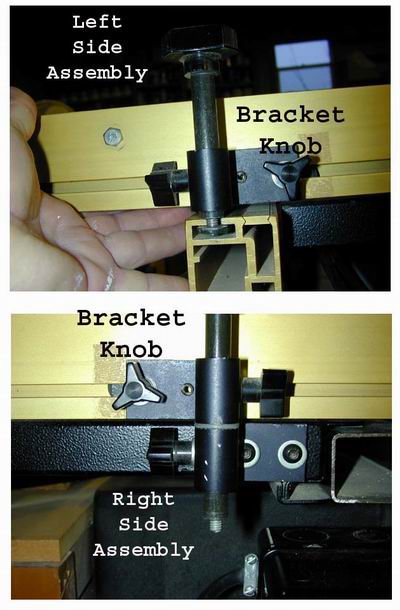
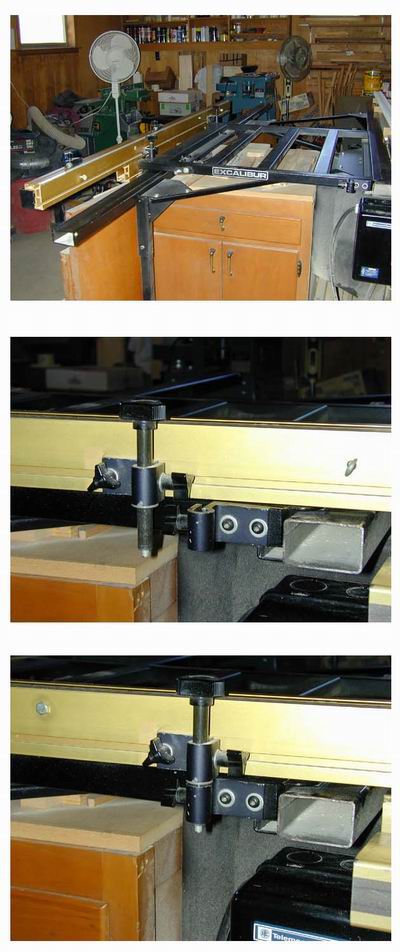
When I first installed my Excalibur fence, I wanted to make it so that I would have easy access to the fence and also so that it would be quick and easy to mount and dismount. I like the idea of putting a pair of L brackets to the inside of the outer support legs to store the fence on, but I simply store my fence on the left side as can be seen in the first image below. It's a little more vulnerable here but I (knock on wood) haven't knocked it off in the over 5 years that I've been placing it there.
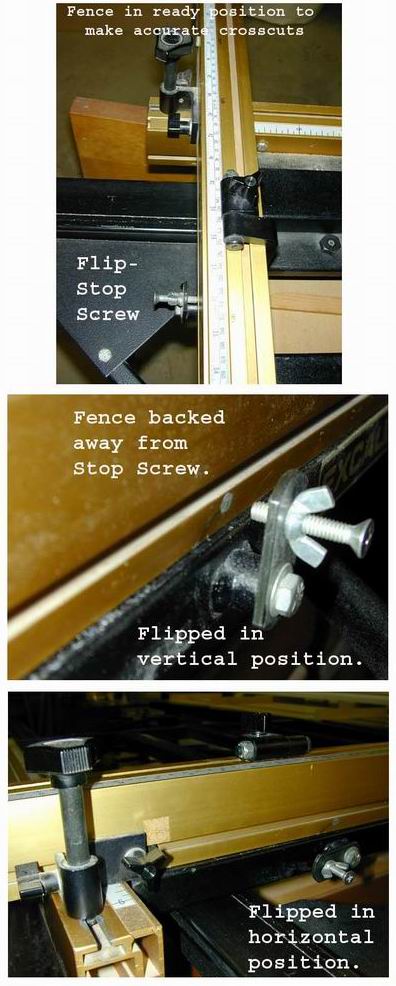
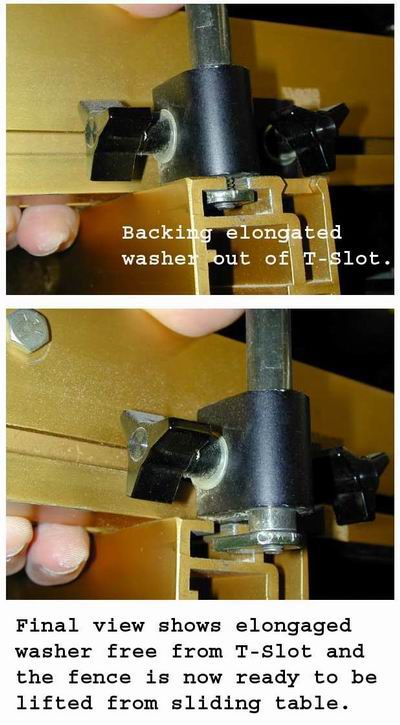
The second image shows that I have removed the bottom screw knob from the right-side post so that I can more quickly remove and replace the fence. This was the first thing I did when I installed the fence and I don't even know where that knob is today. The final image shows the right-side stud mounted in its place. To remove the fence from its carriage, I simply loosen the left-side stud top knob, move the left end of the fence slightly forward (to move it away from the end of the flip down fence stop screw), rotate the flip down fence bracket to clear it and then I pull the left end of the fence back out of its position and reach to the right end of the fence with my right hand to raise the right-side post up and out of its position and finally, I lean over and move the fence to its storage place on top of the fence. Takes less than 3 seconds to dismount and maybe 10 seconds to remount. It takes me longer to remount because I take it a little slower lowering the right-side stud into its place so as not to leverage the fence bracket out of whack, which is fairly easy to do if you become aggressive or impatient with this procedure.
For what it's worth, I have only used the front fence position once. Right after I installed the fence, I tried it out and found that it was a hassle, and worse, it tended to cause inaccuracy problems moving the fence back and forth between front and rear positions. I haven't used the front fence since and I don't really have a need to crosscut wider panels than the 36-38" inches that the fence mounted in the standard rear position (panel in front of the fence) allows me. Truth is, I don't remember the last year I've needed to crosscut a panel over 26" wide.
Cutting mitered panels is quick and I don't lose the accuracy when I do miter panels. The flip down stop screw remains where itís set. The left side top knob is loosened, as is the bracket that holds that post. This bracket is now loose to the fence and the fence can be maneuvered to the desired position for the miter cut Ė remember in my case, the right side post is always loose in its sleeve. The left side bracket and top knob are then locked down and the miter cut is made. Reverse the procedure and bring the fence back to the flip down stop screw and lock it back in position and it should be right where it was, in perfect adjustment again. Always take care to be precise but gentle when placing the fence against the stop screw of the flip down assembly. Itís critical that this assembly remain tight and consistent in its operation. Never turn the flip down with the screw resting against the fence Ė the screw is steel and the fence is aluminum so if you do so, the screw will cut into the fence. This is not an Altendorf, folks, and so it should go without saying that appropriate and reasonable care should be exercised (i.e. donít slam things around or force things into position) and you should have as repeatable accuracy and good service from this fence as Iíve come to trust. By the same token, I do know that even with the much more industrial panel saws, precise adjustments are exercised in tuning fences and operators take gentle care with regard to positioning panels against fences in order to keep those adjustments.
As I said earlier, I do not use the fence in the forward position. If you must use that fence position, you will have to loosen both bracket assemblies to do so and then you will have to return them to their original position when you bring the fence back to the rear position. Then you must readjust your fence so that its tape measure reads accurately with the length of cut that is produced. Since you still have your Flip-Stop Screw tuned for a 90 degree cut, you will not lose that adjustment.
I take care to have my Excalibur fence adjusted so that I get the exact same length cut from both measures on the saw; the rip fence tape and the crosscut tape. For these reasons, I would recommend that you avoid having to use the fence in the forward position, if at all possible. If you must, then scribe a thin line on the back of the fence where the edge of the right side bracket meets the fence and you can return the bracket to that line when you have to move it between forward and rear positions. Once that (Right Side Bracket) is locked back into position, you can place the Left-Side Assembly in position and lock that bracket into place and you should be set once again for accurate crosscuts.
PS Ė Iíve included one more series of images in the next post that you may find useful in helping you understand what Iíve tried to convey in writing.
