by Professor Gene Wengert
Editors note: The following article is an excerpt from the book "The Wood Doctor's Rx," by Gene Wengert, Professor and Extension Specialist in Wood Processing, Department of Forestry, University of Wisconsin-Madison.
Machining wood involves two basic cutting processes: peripheral and orthogonal. We define peripheral cutting as "the intermittent engagement of knives carried on the periphery of a rotating cutterhead or saw." Circular saws, rotary planes, molders, and routers are peripheral cutters -- that is, they cut by engaging the knives on the edge, or periphery, of their spinning, or rotating, circular edge, or cutterhead. We may define orthogonal cutting as the intermittent engagement of knives carried on the straight edge of a cutterhead or saw at a right angle with the edge of the material being machined (from the Greek orthos, right; and gonia, angle). A band saw and hand plane are examples of orthogonal cutters.
How Wood Cuts
Neither type of cutting actually "cuts" wood. Rather, they apply force and cause a structural failure in the wood. This failure, naturally, is affected by the strength properties of the wood, which in turn are affected by differing grain directions relative to the direction of cutting (tangential, radial, and longitudinal), the moisture content, and the species of the wood. Perhaps it is easy, then, to understand why the quality of wood machining can vary: a lot of variables interact to produce the "cut." And although many defects in wood machining may look the same, they are all caused or aggravated by one or more of these factors.
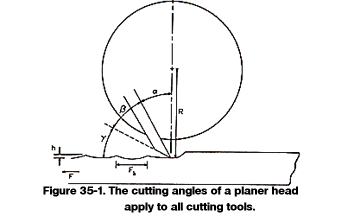
The sketch of the cross-section of a planer head in Figure 35-1 illustrates the basic terminology. The rake angle is the angle made by the edge of the cutting tool and a plane perpendicular to the surface that is being machined. (It is sometimes called the cutting angle or hook.)
Sharpness is a measure of how fast the razor sharp edge tapers into a more substantial piece of metal -- knives with small angles are thinner and razor-like. Clearance is a measure of the room that the back of the knife has so it won't hit the wood.
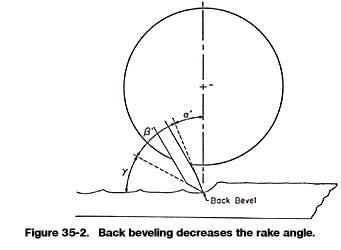
Note in Figure 35-1 that the sum of the rake angle, sharpness angle, and clearance angle totals 90 degrees. In Figure 35-2 note that, because the rake angle is occasionally fixed by the cutterhead itself, it is necessary to back bevel the knife to obtain a smaller rake angle.
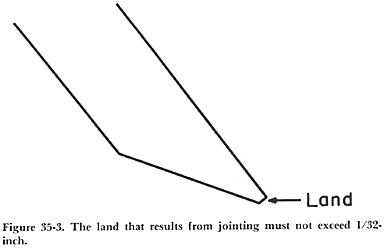
In a cutterhead with more than one knife, it is necessary that all the knives are on the same cutting circle (or have the same depth of cut) or else one knife will do most of the work and a bumpy surface is likely. To assure all knives are equal, the knives are honed with an abrasive in a process called jointing while the cutterhead turns. This creates a slight flat spot or land (Figure 35-3) on the knives. As the width of the jointed face increases, the land begins to pound the work; generally, the width of the land should not exceed 1/32- in. before resharpening.
When the knives move opposite or counter to the wood's movement (as in most planers) it is termed up-milling; if the knives move in the same direction it is termed down-milling.
Failure Types
It was stated earlier that wood cuts by mechanical failure. (In this discussion, a failure is not necessarily a defect.) As might be expected, the types of failure (in general) have been categorized by their chip characteristics.
Type I
The failure runs ahead of the knife along the grain. The knife is acting almost like a wedge. When the grain is sloped downward, this type of failure will appear on a machined surface as torn grain or splinters. This type of failure results in chips that are called Type I, often appearing splinterlike.
Contributing factors related to this type of failure are: low cleavage strength of wood (perhaps caused by nature when the tree was growing or by man through improper handling of the logs or lumber); deep cuts; large rake angles (over 25 degrees or so); low MC of wood; or steeply sloped grain.
Type II
The wood ahead of the knife is compressed and fails in shear. The chips, called Type II, often will be a thin spiral.
This is the optimum surface and is enhanced by: rake angles below 30 degrees; flat grain; thin chips (or small Fk); intermediate MC; or adequate clearance angle.
Type III
The failure in this case is quite complex, representing shear and compression failures. Often the surface will appear to be fuzzy as the knives do not sever the wood fibers cleanly.
The failure is enhanced by: wet wood; low rake angle; dull knives; too wide a jointed face or land; or aspen and cottonwood use.
Factors Affecting Quality
The data in this section (Tables 35-1 through -4) are selected from Machining and Related Characteristics of United States Hardwoods by E. M. Davis, U.S.D.A. Technical Bulletin No. 1267 and are based on planing. Be aware that in these tests various adjustments could have been made to optimize cutting; the effort was to indicate trends and effects.
Notice several important characteristics in these tables. First, in Table 35-1 the importance of low MC's is clearly shown. High MC's result in more fuzzing.
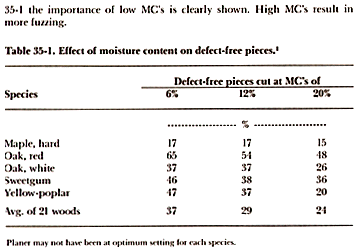
Table 35-1. Effect of moisture content on defect-free pieces.1
1Planer may not have been at optimum setting for each species.
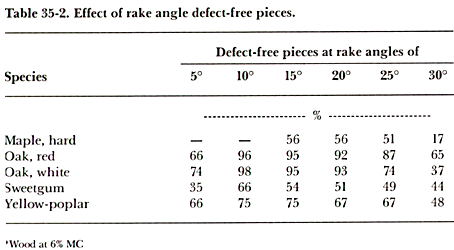
In Table 35-2 the importance of smaller rake angles is shown. Note that at 5 degrees rake angle, all woods cut much more poorly than at 10 degrees to 25 degrees; the quality peaks at 10 degrees then drops slowly as the rake increases to 25 degrees. At 30 degrees rake the quality drops sharply again.
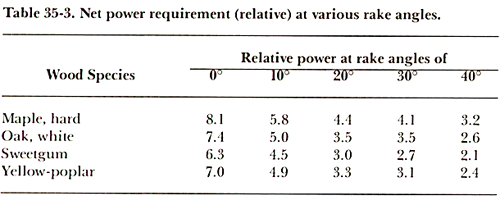
An additional effect of varying the rake angle is the power requirement. Keeping the rake as high as possible reduces energy consumption and reduces the dulling rate of the knives (Table 35-3).
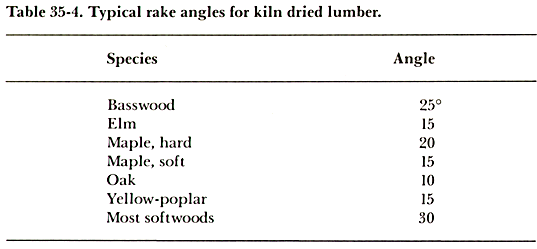
Generally, as a compromise, when a variety of species are machined, a 20 degree rake is used for hardwoods, and up to 30 degrees for softwoods and softer hardwoods. The optimum rake for several kiln dried species is given in Table 35-4.
One of the problems of running at high power requirements (that is, optimum low rake angles) is that the cutterhead's rpm may drop (for example, if the machine power is insufficient or with small rake angles) and then the knives may overheat, burn the wood, and dull rapidly. And this dulling, in turn, leads to further power demands and further quality losses.
In Table 35-5, the importance of small depths of cuts is shown, although cuts less than 0.01 in. may result in poor cuts and rubbing.
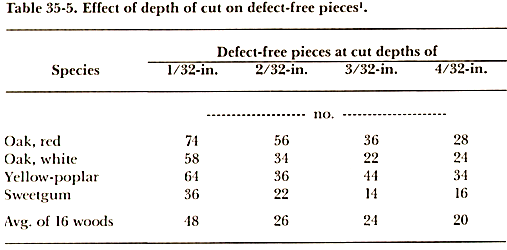
1 - At 30 degree rake angle, 6% MC
Actual Machining Defects
There are quite a few machining defects that may show up from time to time: knife burn, dip, chip out, torn grain breakout, fuzzy grain, raised grain, loosened grain, shelling, edge splits and slivers chip marks, and planer splits. Other defects that show up after machining -- such as skip dress, natural ring shake (separation parallel to rings especially near the center of the tree), checks, and warp -- may really have their cause elsewhere. When diagnosing machining defects in a plant, frequently there are several contributing factors that when they occur alone are not serious, but together are a problem.
Knife Burn
This defect appears as a darkened scorched area where the wood was overheated. It is often caused by a pause in the feed rate of the wood piece so that the knives rubbed on the wood. It also could be caused by dull knives being forced into the work piece. Excessive land or insufficient clearance angle could also be the cause. Usually burning will result in premature dulling and lead to additional burning.
Dip or Snipe
This usually occurs at the end of a board when feeding into or out of the planer. Usually there is a problem with the hold-down mechanism.
Chip Out, Chipped Grain, Torn Grain, Breakout
Fuzzy Grain
This defect is characterized by groups of wood fibers not cutting cleanly at the surface and instead standing up above the surface. It is common in hardwoods such as aspen, basswood, cottonwood, and willow, with cells called gelatinous fibers in abnormal wood called tension wood. Apparently these cells are not strong enough to stand up while being cut, so they bend over and are not cut. (This problem is especially troublesome with sanding. A size coat before final sanding is one solution.) Control is obtained by using low moisture contents and sharp knives. Possibly a larger rake angle will also help. However, when this fuzzy grain problem occurs, be aware of the associated problem of tension wood that causes severe warp, especially bow and crook, when the MC changes.
Raised Grain
This is a problem most often found in woods that have large differences in density within an annual ring. The surface appears as a corrugated or washboard surface rather than smooth with the bumpiness associated with the annual rings (not randomly). (This surface could also be caused by changes in MC and differential shrinkage of quartersawn or edge-grain lumber.) Raised grain is caused when the knives push the hard, dense wood (summerwood) into the softer wood cells (springwood). Usually the softer cells will be crushed. However, when these cells pick up moisture after machining, they will expand or spring back to their original shape creating the washboard surface. (I would expect we would see more of this with the advent of water based finishes!)
There are four machining factors that contribute to raised grain: dull knives (a major factor), too much land, insufficient clearance angle, and excessive pressure from feed rolls. Additionally, excessive (20% or so) MC of the stock will aggravate the problem. Grain raising can also be quite a problem some time after machining and finishing, as the grain may raise at this point and break the finish film.
Loosened Grain
This is a loosening of the tips and edges of annual rings on flatsawn lumber. It results because of a weakening and failure of the soft springwood cells due to the pounding action of the knives. (I believe that a bacterial infection in the tree, sometimes called bacterial wetwood, is also a contributing factor.) If the failure has darker or different colored wood in the failed zone, the failure may have existed in the tree. This loosened grain is often slight enough to pass inspection until the slivers catch on the tack cloths. The basic causes of loosened grain are the same as raised grain: dull knives, too much land angle, insufficient clearance angle, and excessive feed roll pressure. Excessive embossing can also lead to loosened grain.
Edge Split and Slivers
This defect occurs as the splitting or formation of slivers on sharp edges. It is caused most often by excessive feed roll or knife pressure causing a failure parallel to the annual rings at or near the edge of the piece. It is a form of loosened grain. It occurs commonly in a molder when a heavy cut is taken or when, to feed the piece and to prevent chattering, heavy feed pressure is used. If the piece chatters, the pounding can also cause failure. This problem is accentuated with carbide knives.
It is also often accentuated with small pieces, as the feed roll pressure per square inch of material is higher than with wider pieces. In general, a slower feed rate and associated pressure roll adjustments will help.
Planer Split
This defect is most common when rough-planing cupped, wide lumber (see Chapter 36). The feed rolls and/or knives try to push the lumber flat, but if there is too much cup, the board will split, often several feet up one end or, in extreme cases, the full length. Reports indicate that residual drying stresses (also called casehardening) can aggravate the problem. When feeding thick and thin rough lumber through a planer, the pressure is often excessive on the thick boards. Further, thick and thin lumber will cup more than lumber of uniform thickness. If the splits only occur with wide boards, a "busting" or rip saw in front of the planer should cure the problem.
Chip marks
This defect is a shallow dent or depression in the surface caused when a chip sticks to the knife rather than going up the exhaust system. The chip is then forced into the surface, slightly compressing the cells. With an increase in moisture, the depressed area will almost fully recover. (Consider, however, what happens if chip marks are sanded smooth before recovery. The cells are still compressed; when a water base finish is applied, the compressed cells swell, and little pimples or raised spots appear!) Usually an inadequate blower system is the basic cause.
Machining End Grain
End grain machining has many of the same problems as mentioned previously but to a greater extent, especially tear out. Sharp knives and slow cutting (small Fk) should help, but the problem seems to be extreme with the softer species.
A second problem with end grain is the splitting out of a small piece just before the cut is complete. The force of the knife cleaves the wood perpendicular to the surface (along the grain). Back pressure on the work piece's edge will prevent this failure.
Professor Gene Wengert is Extension Specialist in Wood Processing at the Department of Forestry, University of Wisconsin-Madison