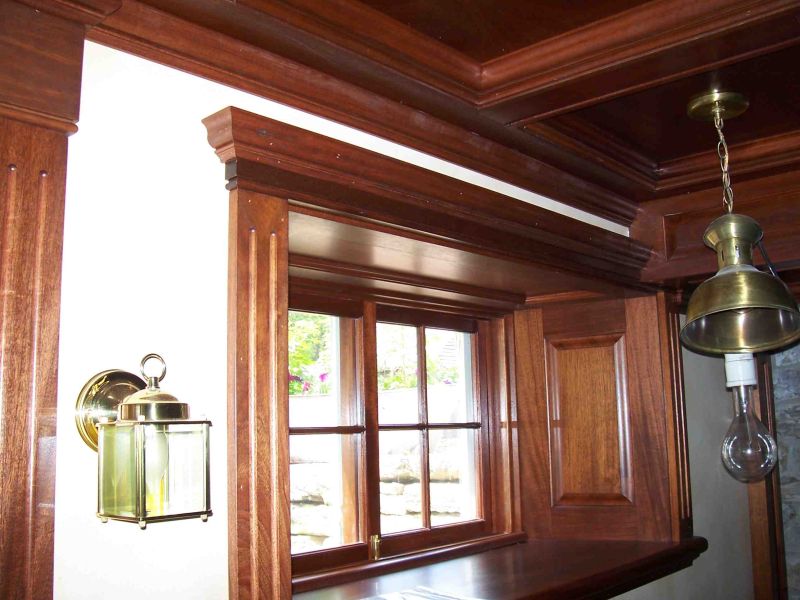
Raised Panel Finish Trim Around Replacement Windows
Undersized replacement windows in the fat wall of an older house create an opportunity for a creative, custom raised-panel window surround. May 21, 2007
Question
I am doing a restoration job that required new replacement windows be put in. The windows are in place and the finish work needs to be done. The replacement windows are smaller than the originals (time/cost factor) and leave a gap around the interior of the opening. In other words, the exterior window opening is smaller than the interior wall framing. I intend to make up raised panel sides and install them at an angle to cover the gap at the sides. Anyone have any practical experience with this? I am looking for ideas to help the gray-matter start flowing!
Forum Responses
(Architectural Woodworking Forum)
From contributor J:
I think a picture or drawing of what you're trying to do would help. From your description it sounds like the homeowner is going to spend twice as much having raised panels made as they saved buying the wrong sized windows in the first place. Can you not just make jamb extensions out of poplar? I'm not sure if I'm understanding.
From contributor R:
I can't give you a picture, but I did some restoration of an old mansion that had something similar. It had internal raised panel shutters, and they folded back and were stored behind the casing, between the window and the casing. It looked like there was a raised panel jamb extension, but it was actually one of the shutter panels. It was very cool! The walls of the house were very thick. I don't know how many courses of bricks made up those walls, but it was going to last another couple hundred years.
From contributor D:
Go to the library and look at books on the architecture in Williamsburg or other 200 year old houses. Many had thick brick walls, and the door and window openings were all paneled with nice frame and panel jamb extensions to the inside of the windows. These would typically reflect the vertical window layout on the whole. Often, these recesses would also hold hinged interior shutter panels that would also bifold back to the paneled extensions for a nice neat package. The whole effect is one of efficient functionality, attractive appearance and design of an extremely high caliber.
From contributor U:
I did this a couple times a few years ago when I worked with a crew. You use a regular window undersized as a replacement. On one, the homeowner was trying to save money and had us use round edge casing cut down and scribed to fit to cover the gap. On the other, the homeowner loved the look of her raised panel shutters even though they were inactive. We came off the window straight with raised panel extensions that we had made by a local cabinetmaker. The stile that butted the window was oversized to allow for scribing. We stripped out the existing jamb extensions, leveling the strips as we went, and installed the raised panels over the strips. We kept the panels short of the inside edge of the jamb extension to create a stepped reveal and returned and scribed them back into the existing extension.
If there is enough of a gap coming off straight, you could try pocket screws to attach the panels with a bit extension on the driver and then shimming the front before fastening. The angle seems like more trouble than it's worth, as scribing it to fit old, off plumb and out of square jamb extensions would be a nightmare. I also think the angle would look kind of goofy, as everything I've ever seen like this has been square. Maybe I'm missing something.
From contributor B:
I found in a 1908 textbook pictures and text of the interior raised panel shutter idea you are asking about. It seems like it would work for your situation, as the example shows the shutter folding forward of the space normally reserved for the weights and pulley of double hung windows.
From contributor A:
I did these for a basement remodel in a stone house. I think I remember the width of the sides at 17". I made them all a little wide, put them in place against the window, and marked them flush with the plaster. Then disassemble, cut to the lines, 90 degrees at the top and bottom and whatever the angle was for the sides so the casing will lay on correctly.

Click here for higher quality, full size image
From the original questioner:
Yes! Yes! This is almost exactly what I am needing to do! Thanks so much for the picture. Did you use solid panels or ply? I am still debating.
From contributor A:
I used a solid frame and raised panel for the sides, a solid frame with a flat veneered panel for the top and a solid 7/8 x 18" wide board for the bottom with a glued-on nosing. I know the solid 18" bottom panel will raise concerns about movement, cupping, checking, etc., but the Honduran mahogany grain was incredible and couldn't be passed up. So I let the end grain soak up as much stain as it would take, finished it with varnish on all surfaces, dadoed it into the side panels and connected with confirmat screws at the narrow end of the box only (near where it contacts the window). This allows the panel to expand as needed. Looks great after a couple of years. I hope it will look as good in a hundred.
