Cutting "Edge-Installed" Crown
Other Versions
Spanish
This "stand up" crown requires some adaptations to "normal" installation procedures. February 8, 2005
Question
I am going to use a different type of crown than I normally do on my current job. It has a flat section on the bottom that allows it to be attached to the top of the cabinets instead of to the frames. It comes from Berg and is almost 30 bucks a stick. That said, how do you cut it? I normally put the crown upside down and cut it that way, but I don't think that will work. I don't want to experiment too much, with the cost. How do you do it?
Forum Responses
(Cabinet and Millwork Installation Forum)
From contributor G:
We use this type of crown 95% of the time. There are two ways to approach it.
The first is to set the flat on that saw table facing the same way it will when installed. Set your miter at the angle desired and make your cut. Only problem with this method is knowing where your mark is.
The second method is easier for finding your mark, however it will take a little experimentation to find the correct miter and bevel. To cut the crown flat, set it on your saw table with the back edge of the flat and the back edge of the top of the crown on the table so that the piece forms an upside down V. This will allow you to easily see the mark to cut and you will probably only need two cuts to get your finish. Also, this really only works on a sliding miter saw like the Hitachi C10FS.
From contributor B:
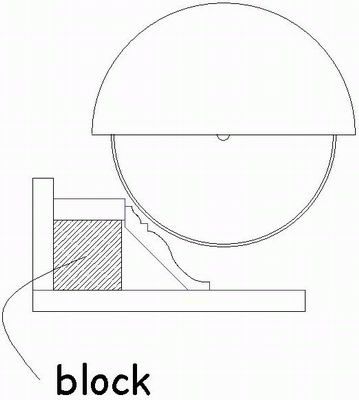
Why not upside down and backwards, resting on a block of wood which is sized tall enough to raise the top of the crown above the table?
From the original questioner:
The flat spot is not in the normal place to be able to cut it like standard crown, upside down and backwards, since the flat spot is on the bottom and not on the back. The crown is designed to sit on top of the cabinets. I have to assume the best way to do it is to cut it flat.
From contributor B:
This is what I am trying to say. Would this work?

From the original questioner:
Nice drawing. I will try it. Thanks.
From contributor D:
I've cut miles of pre-finished crown just like this. The easiest way for me is to make the reference pencil mark on the back of the flat attachment block. (It would seem difficult to get the blade to hit the pencil mark, but I have a foolproof way to do that, as well.) The pencil mark is determined by the setback on either the front or side of a cabinet. I always add 3/4" more reveal in the front of a frameless cab to hang out over the door. I find that I have less tearout when cutting this way, using a 12" slider. Clamp it, too!
From contributor K:
I've always found that when I have to do a job with some new kind of crown, or a molding I haven't worked with in a while, I order two or three extra pieces. Sometimes I spend $100, but it's money well spent. This way, I can experiment with the stuff to my heart's content, without feeling pressured or anxious. I'm a believer in the theory that if you're enjoying your work, you'll do better, and if you're enjoying doing better work, you'll do faster work better, which ultimately means that if you're enjoying your work, you'll make more money.
So why order your crown right down to the lineal foot and then sweat over the job? There are some moldings that I cut on the flat upside down. A lot of polyurethane stuff is that way - good side down. But if it were me, I'd make some kind of jig, too, so I could cut the stuff upside down in position against the fence so the bottom of the molding is in your face and you can see your measurement marks. That's heaven.
From contributor K:
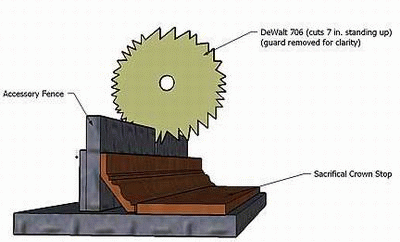
Actually, you shouldn't need any special kind of jig for this profile. I use a crown stop whenever I cut crown, and the same thing should work well for this stuff. I cut a sacrificial board long enough to reach across my saw, and I clamp or screw it to my extension wings. For that crown, it should look something like this...

From contributor B:
Contributor G, I think you have the wrong type of crown in your image for this thread. Cool picture, though.
From contributor M:
Contributor G, your crown stop idea is the way most crowns have been cut for many years. Some of your better sliding compounds have preset stops for laying crown flat to obtain both bevel and mitre.

