Question
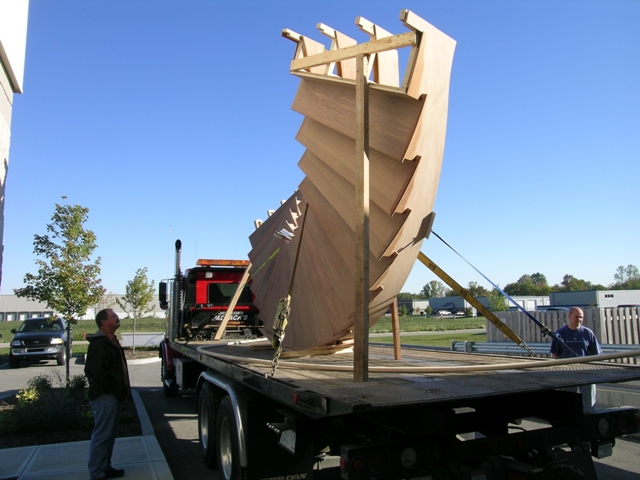
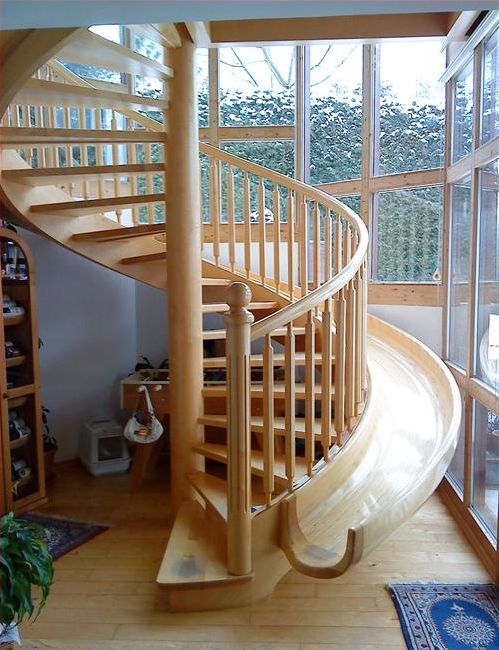
I have an inquiry from a builder friend as to how to lay up this rather interesting slide that wraps around a circular stairway. Any suggestions? The best that came to my mind was to just add laminations to the outside stringer - first tall ones, then shorter ones for the bottom, then taller ones for the outside, and finally come back with a rasp wheel on a 4 1/2 inch right angle grinder and grind out the profile.
For the moment, let us not discuss the code/liability/child safety issues.
Forum Responses
(Architectural Woodworking Forum)
From contributor M:
Sure hope my granddaughters don't start cruising WOODWEB...
The photo you show looks to me like it was made as a strip canoe would be - staves. The vertical ones and bottom are simple, but the ones at transition from vertical to bottom of the U would have to be sawn curved.
Cost?
However, as I said, I'm not sure about appearance. Perhaps the individual U components could be machined to accept a twisting 1/4" thick layer of wide inserted veneer, so to speak, which could be added after assembly of the individual U sections.
Or maybe this U construction assembly could act as a frame and narrow thin strips could be laminated lengthwise to give a top to bottom running grain appearance (preferable, I would think).
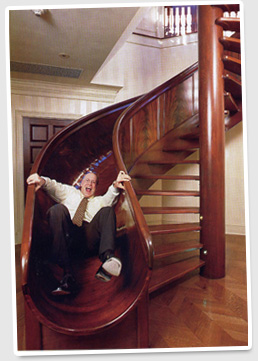
If anyone could find out more about contributor D outstanding example, that would be great. I'd love to see how that was made.
The better way is as the original questioner suggested, and as the stair in his post shows: strip laminations. Perhaps 3/8" x stringer width (height), decreasing to 2-1/2" or so tall across the bottom, and then increasing width up the outer side. The form would have to be female U-shapes that fanned out and provided clamping surface for the plies. Boatbuilding techniques. Then a grinder or some way to level the tops and bottoms of all the strips. Or maybe a large router riding on a jig that rides the rails to blend the strips - the inside being more challenging than the outside.
Now that I know how to do it, who would like one?
The first wood layer would be set diagonally over the form with subsequent cross-lamination layers (typical cold-molded process). The trimmed edges of the completed slide would then be capped along with solid end pieces, as in the picture.
This kind of a construction method will produce a uniformly thick cross-section as well as a much lighter, stronger and molded monolithic structure. (No rasp wheel grinding required). Since the construction methods are the same, the polished inside surface of the slide should look like the inside of a traditional wood canoe (without the ribs). I think the first layer should be pointing inwards as you slide down?
After you've finished with this project, keep the form intact since you're now set up to do another. Of course eventually you will need both a left and right hand form. (The Old Town Canoe Company has been using their same forms for a generation or more.) Sounds like fun to me... and maybe a unique business venture.
I presume there is a code for children's playground equipment, but I haven't looked to see if it applies indoors and in private (as opposed to a public slide).
I am sure that some clever bugger might file a lawsuit if his kid breaks an arm, but I am not sure there is a safety code that prohibits this. We live in an age where we expect to see a government regulation for everything, but maybe we could still build a slide for a kid without being blocked by red tape?
If there is someone out there who actually knows of a building code section that applies, please cite it.
The high-sided slide picture looks much safer.
We have supplied non-conforming stairs to projects and had no code problems as long as there is a code conforming stair in the house. The mahogany slide/stair was one of three stairs in the house (to the same level), and the other two were code conforming and very conventional.
Anyone that builds stairs will agree that stair code interpretation and enforcement varies widely from not only jurisdiction to jurisdiction, but also inspector to inspector. The house with the mahogany slide annually contributes about 400k in property tax to the local authorities, so they were all there at the open house, awaiting their turn to go down the slide, and being very accommodating.
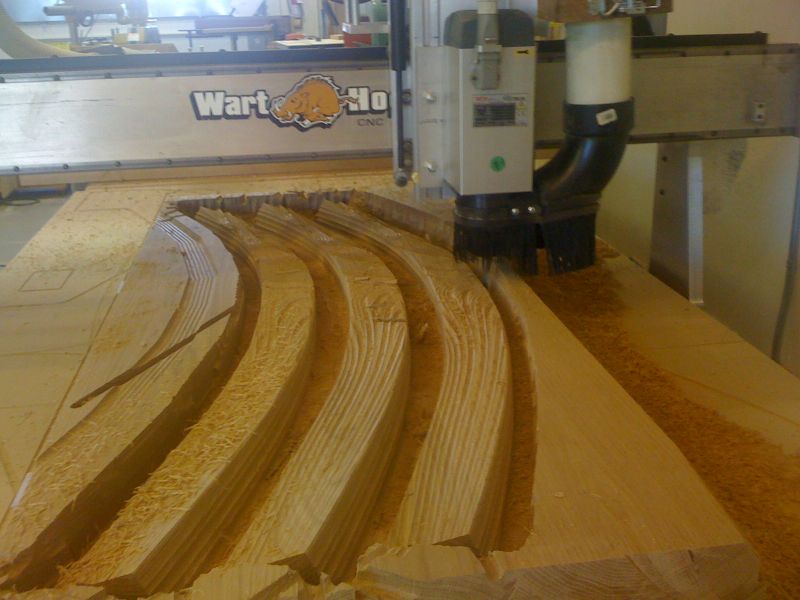
We have developed the ability to fabricate helical glue lam-beam stringers. So I would use that method for the sides of the slide. You would have 2 different solutions for the GLB stringers, but it is very doable. Here is a photo of some rectangular handrail pieces being worked on our CNC.
Here is a picture of a stairway with a structural glue lam stringer. I think it would work for the sides of the slide. Having said all of that, it is still going to be expensive.
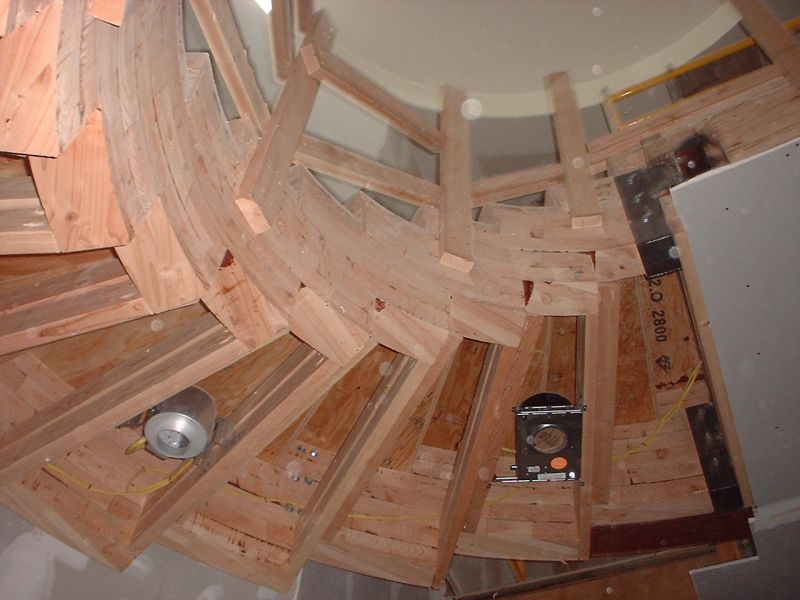
Did you get that stringer structurally certified by an engineer? I would think a building inspector would require that.
On the CNC, are you using a full rounded ball nose bit for the undercut side of the spiral rail, or are you planing it parallel to the right hand side after it comes off the CNC? Or is there some other method you are using to get the undercut side machined?
Thanks for posting this. I find this work very impressive.
For the handrails, we turn the piece over and machine the other side on the CNC. Typically we leave some wood in the cut so that the two sides do not connect and, most importantly, the piece is still held in place. We have also left tabs to hold the piece in place, although sizing and placing the tabs requires more luck and thought because the piece can flex when using tabs. For our handrail pieces that also have a profile (they all do), we have one more process/machine that we use to cut that profile on a helix.
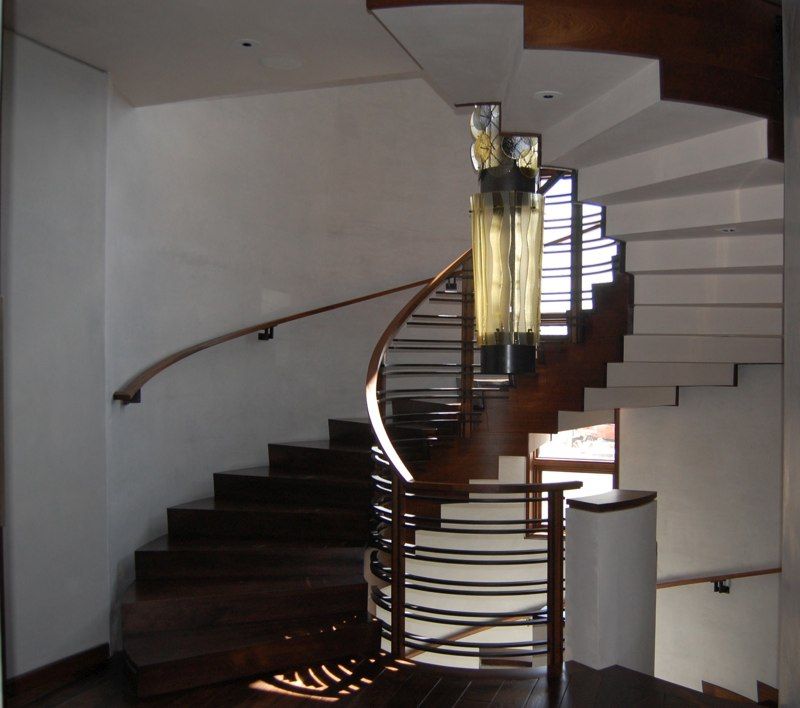
What software are you using to generate the spiral handrail? I can see doing it with Enroute and the 3D revolve tool.
Also, a little more on your "other" machine for profiling the spiral handrail. Share that with me and I might even share our "Tilt-O-Hussey" design with you.
Tilt-o-Hussey, eh? No, don't think I can go there. I will tell you that we can profile pretty much any shape handrail, level turn, helical or fittings (upeasing, etc).
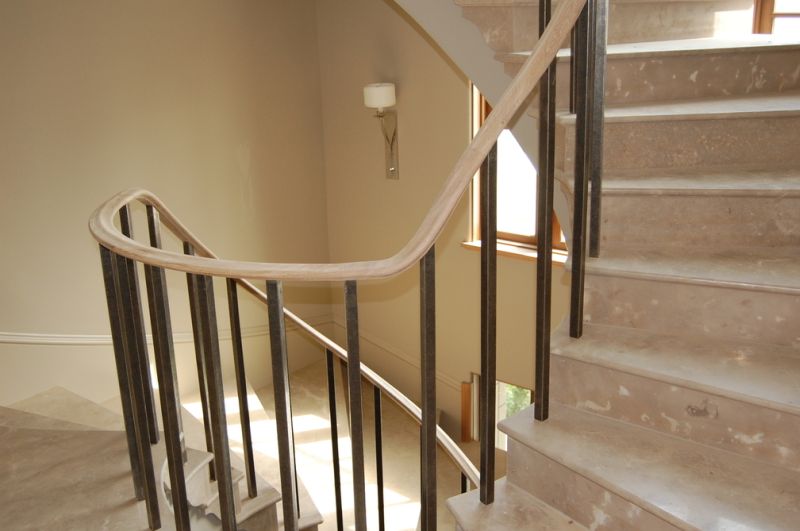
Those pieces are not simple curves. They twist while they curve. The curve and the twist are not organic. They can be defined mathematically. And for our purposes there is only one correct solution. We define solution as the combination of curve coupled with the twist. The twist happens on all faces. Top and bottom as well as the 2 sides.
Cutting that shape out on a band saw and having the correct solution is a daunting task. Just drawing it on a slab of wood works my little brain. We used to do exactly that. Bandsaw and carve the billets by hand. It was extremely time consuming. Doubly bad is that it also took a journeyman to do it correctly. So we would have myself and my senior shop guy completely immersed in carving the billets. Really it is about the client and their willingness to pay for that labor.
To carve these shapes on a CNC still requires the effort of myself and my CNC operator, but in such a different manner that there is just no comparison. And while the CNC is carving, its costs are minimal (electricity and cutters and depreciation). While the CNC is carving, everyone in the shop is working on something else - call it simultaneous fabrication. It may take 3-4 hours to carve 3 billets from a blank of wood. It would take us far more time to do it manually. And at the end of the day we would not be near as accurate as the CNC. Finally, the hours on the CNC are not equal to the hours it cost to pay a senior craftsman.
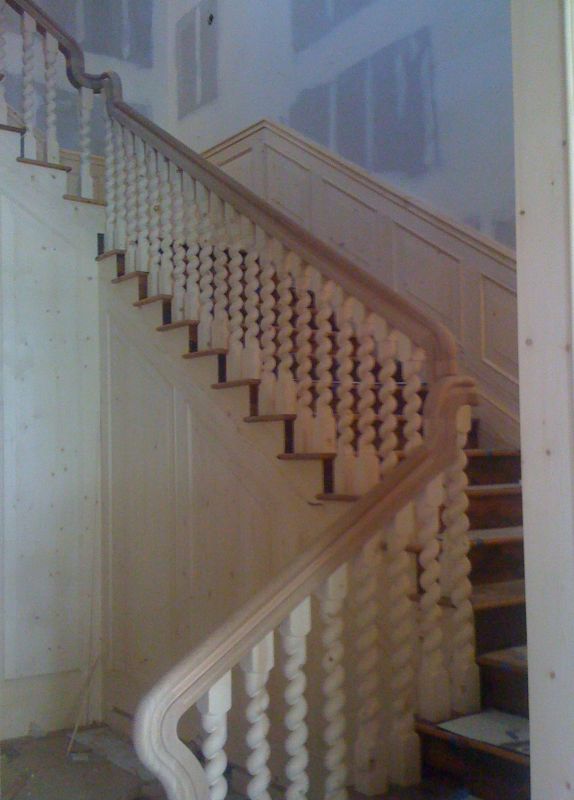
Here is another project where we used this approach to craft a handrail for a client. This photo was indeed taken in progress.
So this is my opinion, based on nearly 4 decades of being a carpenter, of building by hand and then building using the very best technology that I can afford. The technology wins every time.
The very best of my efforts and the efforts of my crew, using manual techniques, can not come even close to competing with me and my crew utilizing appropriate digital techniques. It works for us, and I know it does not work for everyone, but here you have it.
I think our total manufacturing times may actually be comparable, but you're right. I am the only person in the shop that can do this.
Your stair with the twist balusters is very pretty but I think it would have been a bit nicer with wreathed turns at the corners (not so much jumping up and down) What do you think?
Your methods are uniquely your own in that you utilize CNC to square the stock but not shape it. Unless you're prepared to elaborate on this process, you might just mention that there's already fully integrated CNC machines and system-software available for this kind of work (and let it go at that).
After reviewing your pictures and methods, I would say you're definitely bullish on big chunks of material both for your stairs and handrail. Materials, though, are cheap compared to labor, so whatever works for you.
The methods we use are completely homegrown. I am using a medium duty 3 axis CNC router (Warthog) without a tool changer, coupled with a 3D modeling program from Delcam, called Designer. The part is then exported to another Delcam program called Featurecam. Both of those are really developed for metal working. I am actively exploring Rhino 3D as a replacement for Designer.
As far as a canned solution to our handrail and stair building needs, I just do not know. We fabricate a lot of different things. Even our handrails are all over the map. The designs, configurations of our projects are typically a collaboration. Architects, homeowners, metal fabricators all contribute. The stairways are almost never just simply circular in shape. The profiles, species, balusters, and connection methods all vary widely. And every project has a strict budget.
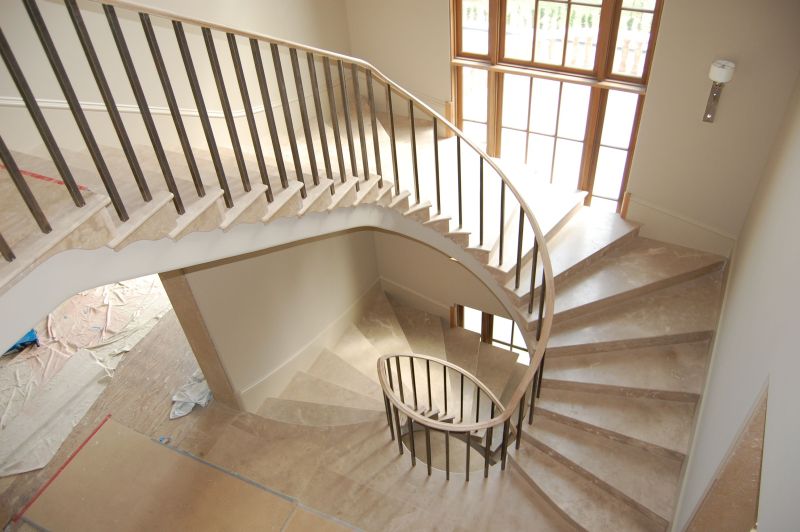
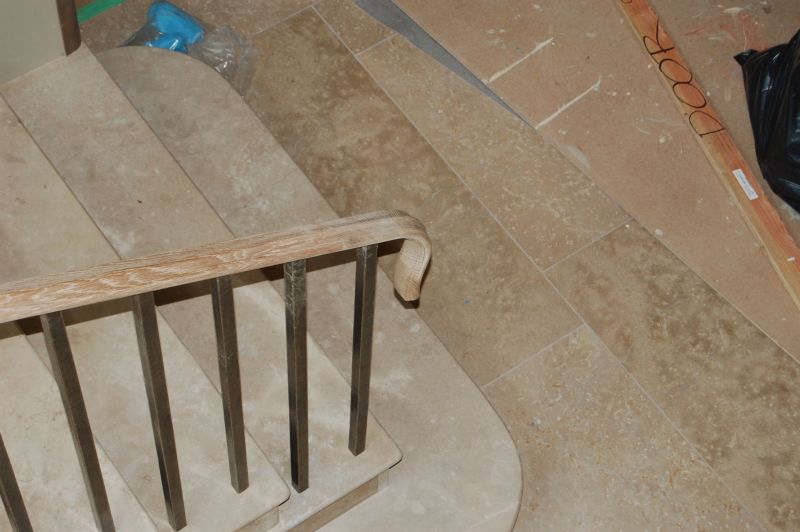
The stairway with the twisted balusters was made of white oak grip rail and reclaimed spruce balusters. The stairway with the limestone treads handrail was made of white oak grip rail and 1 1/8" square solid bronze balusters. The dark stairway with the killer chandelier was made of walnut treads and risers, sapele skirts and grip rail and forged steel balustrade.
Every one of these examples took weeks to collaborate on the design. Size of every part is questioned and modified, shapes of all transitions are looked at. Somehow I just do not see a canned solution working all that great. I will say that a 6 axis machine with tool changer would be way cool. But as it now stands, all of my machines are paid for and I do not worry too much if something is setting idle. The peace of mind is worth something.
Contributor B, what math are you using to arrive at your solutions? Are you profiling the handrail on a shaper?
One of the challenges that we have experienced is that the site conditions are not what they are supposed to be. For example, a circular stair is not really circular. Or the rise of a stairway varies. To address that problem, we purchased a digital measuring device called a "proliner." It is capable of measuring pretty much anything in 3D. It produces a DXF drawing/point cloud while you are measuring. Accurate to .015" over 40 feet.
So for the handrail for the stairway in the picture below, the process went something like this. The project was 800 miles or so from my shop, so I flew out, taking the proliner with me, to gather field measurements. I spent around 6 hours on site measuring and a few hours in the hotel looking at the drawings to ensure they looked good and that I got good field measurements.
I flew back home. It took the client about 6 weeks to finalize the design and cut us a deposit check. During that time I did not look at the job or the drawings at all. Once we got the deposit, of course the client wanted the handrail as soon as possible. So we fabricated all of the pieces in our shop. Level turns, straight rail, transition pieces, helical pieces and a lamb's tongue to terminate the rail. The rail started in the basement, up one flight of circular stairs to the main floor, traversed that floor with a level turn, went up another circular stair that transitioned into a section of straight rail, continued up the straight stairs and transitioned into a 2nd floor guard rail that was straight for a ways then had 3 level turns of differing radii. Whew!
One of my journeyman carpenters and I drove to the job site and installed the rail and the 1 1/8" square bronze balusters in one run. We did our end zone dance and drove home. I just could not have done that job without the digital fabrication methods I have described. The clients were happy and so am I.
Here is a final picture of that handrail where it starts in the basement, with a lambs tongue.
Most of the work being done today (including mine) is plain and repetitive compared to the highly stylized, handmade woodwork of the past. Most of our work is but a poor or cheap impersonation of these classical period pieces.
One of the companies I am currently associated with is working hard to develop robotic manufacturing systems to produce stair and handrail components. Their move is now away from simple CNC to fully automated robotic HOA.
This is rocket science that will undoubtedly blast off and leave me far, far behind. Me and my hammer will become a dinosaur display. This is another slippery slide that we're all working on today. I ain't so proud.
There is no value judgment in any of this; it simply is how it is. If you are producing work that is of good quality and you are supporting yourself and your loved ones, you have every right to take some pride in that. And if we can have some fun and friendships along the way, we are living the dream.
