Building Coffered Ceilings
Quick tips on coffered ceilings, and leads to more info. September 5, 2006
Question
I am quoting the trim work for a large house that is calling for five rooms to have coffered or beams with corbels and rosettes on the ceiling. Where can I find a good article or reference on layout and the easiest construction methods? Each room is at least 20' x 30'.
Forum Responses
(Architectural Woodworking Forum)
From contributor A:
Search this web site for coffered ceilings. Also, Gary Katz's Book – “Finishing Carpentry” - has a chapter on exactly what you’re interested in.
From contributor B:
I do these ceilings every day. If you’re not familiar with bidding on manufactured architectural millwork like what you mentioned, keep in mind it’s not the same as bidding on casework. It will probably take you a little longer to install since you’re not used to it, so be sure to factor that in. As far as your beam joinery goes, you could miter your corners with plenty of glue, or if its paint grade, just do butt joints and then castle mortise from the inside. You get a really strong beam that way and like anything else in our profession, layout is critical.
From Gary Katz, technical advisor, Architectural Woodworking Forum:
Here’s an article titled "Quicker Coffered Ceilings", from JLC. Related article:
Quicker Coffered Ceilings
From contributor D:
We also do lots of coffered ceilings and though we do it a bit differently than Gary, he's correct that good layout is critical and that working on the bench is easier than working on the ceiling. We glue and screw 6" (or any width) rips of 1" plywood across the joists first. Then we glue and crossnail the perpendicular rips, scabbing with plywood glue and screws at the intersections. We build the boxes on the bench (using edgebanded VC ply) and use a laser to install them, screwing into the edge of the 1" plywood. We nail a 1" x 3/4" rail around the outside of the box (what will be the inside of the beam) 7/8" off the bottom. This is a ledger for the bottom of the beam.
We like to apply lengths of foam insulation tape around the perimeter of the back of the 1/4" panel, in line with where the top of the crown makes contact with the front. Suspend the panels in the openings with blocking pinned to the beams, being careful that it doesn’t interfere with the back of the crown. The foam tape allows some play when pushing the crown to the ceiling.
From contributor E:
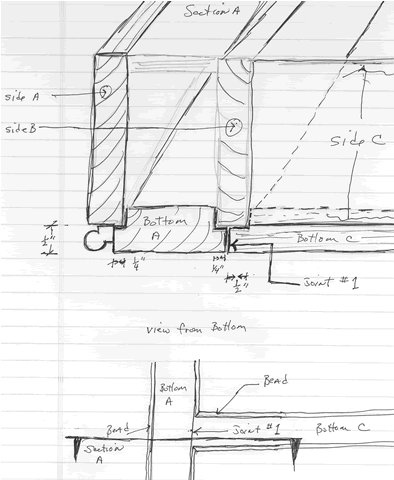
Depending on the beam bottom detail, you might find this method faster and more accurate than using separate ledgers. The added cost of 5/4 over 4/4 is more than made up for by the time savings. Though I cut the rebate with shaper, a hand held router would be pretty fast as well.

