Beaded Face Frame and Scribing Stick Trick
Here's a trick for detailing beaded face frame stiles, that makes scribing ends easier. February 6, 2007
Question
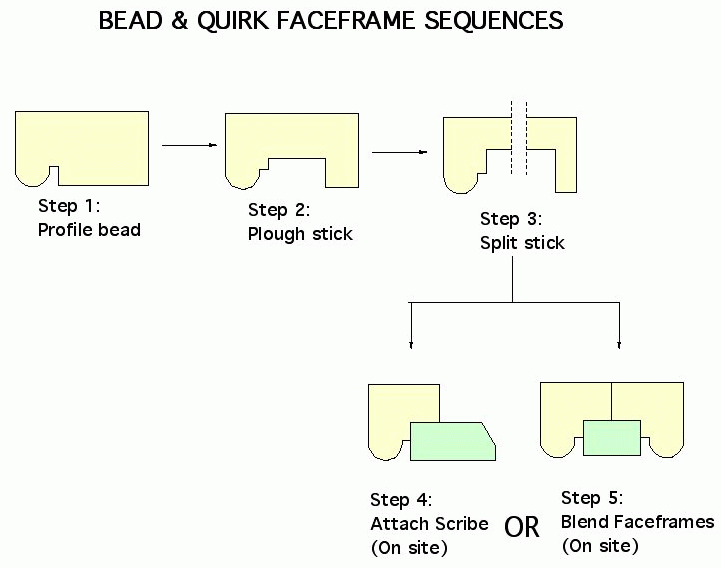
A recent thread talked about the various ways to haunch a stick for bead and quirk face frames. Here's a trick that will help you during install, no matter which way you produce the haunch itself. This process makes it easy to join one cabinet to another or scribe a cabinet that recesses into an alcove or niche. The procedures are pretty self-explanatory.

Click here for higher quality, full size image
Forum Responses
(Cabinetmaking Forum)
From contributor R:
Brilliant!
From contributor A:
I've been doing beaded face frames and casing for over 10 years. That is one trick I've never seen.
From contributor M:
Just for my education, do you guys put the bead on the edges of your face frames in addition to the bead on the inside edge? I've never built a kitchen with beaded inset face frames, though I have one coming up and this information is very helpful.
From contributor O:
Am I just stupid or are we talking about two different things? This picture looks like a clever way of hiding the joint between two frames. The haunched frames discussed below use the method of joining the individual frame parts.
From contributor S:
Where does the 3/4" end panel go? Would you still use the 9mm inset face frame hinge?
From contributor B:
Very clever! Almost makes me want to build beaded face frames!
From contributor N:
Thanks for the tip, as I'm starting to offer beaded frames. How do you attach the filler/stile to the face frame? You don't seem like a nail kind of guy to me.
From contributor U:
Maybe I don't get it, but if this is so brilliant, what does this joint look like where the rails intersect the stiles? When we build beaded face frames, the bead runs around the edge of the door and drawer openings, not top to bottom on the edge of the face frame as this seems to indicate...
From contributor V:
Yes, you might be misinterpreting the drawings. The posted drawings are end views of a typical stile. The author is showing a good way to seamlessly join adjacent cabinet stiles on site. If this joint is glued and clamped, it will seem like it is all one face frame except for the fact that the stile runs to the top and bottom of the frame unlike an interior stile. If I needed to use this method, I would have the filler piece pre-glued to one half of the joint in the shop and glue the second half on site.
I see no point in doing that millwork for a wall scribe, though (unless for a tight wall to wall scribe). I would just make a normal stile and rabbet the back of the scribe edge to get it thinner, if I wanted it thinner for scribing purposes. I don't use an angled cut like the scribe drawing section, but that could be machined on a normal stile as well.
Contributor M, the quirked bead detail is only run on the inside edges of door and drawer openings.
