Question
I recently installed a wall to wall bookcase. The customer has decided they would like the lower portion of the walls to have the appearance of a raised panel, using 1/4" maple and a maple moulding applied over this. All these materials would be pre-finished with a dark red stain. What should I do with the seams? 1/4" seems to thin. Should I use 1/2" ply and rabbet the joined edges, which would give me a glue edge? Should I run the panels vertically or horizontally to eliminate more seams?
Forum Responses
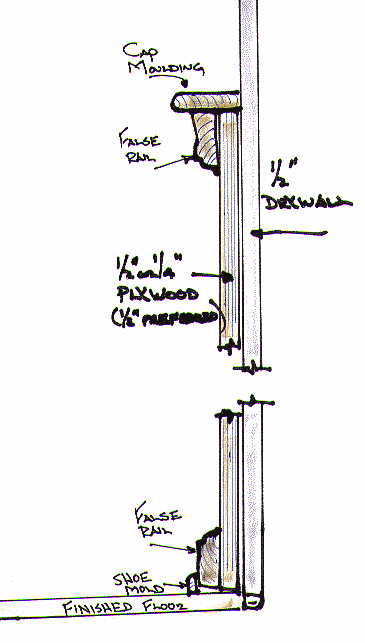
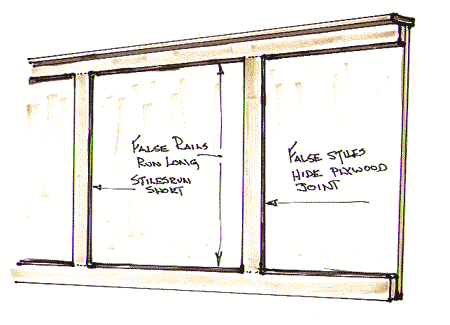
Generally, you have vertical pieces (between the base molding or bottom rail) and the chair rail or top rail. You can apply your 1/4" molding to the wall with panel adhesive, grain vertical, and joints every 4 feet or less (space evenly on wall). You can nail into the wall at the edges, which will later be covered by top and bottom rails. Then run your bottom rail across in the longest lengths possible, overlapping the bottoms of the panels. Say this bottom rail is 3/4" thick. Run your top rail/chair rail across the top, longest lengths possible. Use a spacer so it is an even distance above the top of the bottom rail. Again, top rail should overlap panels. Say this top rail is also 3/4" thick. Then run your vertical pieces in between the top and bottom rails. They should be 1/4" to 1/2" thick, so they sit back from the faces of the bottom and top rails. Back from any molded detail you put on the edges of the bottom and top rails. These vertical pieces cover the seams on the 1/4" and also cover the nails you used to nail to wall.
You can also put base molding over the bottom rail if you wish and another piece of molding over the top rail. If no molding over the top rail, remember to rabbet the bottom of it to lap over the tops of the panels and yet the top of it still hits the wall.
Another option is to cope and stick the rails and verticals, but that gets a little touchier.
I think the "worthiness" of the entire approach is subjective. It certainly isn't a substitute for true raised paneled wainscoting, but on the other hand, if the workmanship is good, it's a lower budget approach that can work in the right environment. The more embellishments that get added to this technique, the better it starts to look - but at some point, the additional work will push it into the higher cost bracket.


It goes against the grain of a northeastern raised woodworker trained by a boat carpenter to do this stuff, but it does have merit. You have to look at it as something that can be put up on site with a minimum investment of tools and moderately priced, consistent panel products.
I've employed the 1/4" plywood technique described with fake 1/4" x 2-1/2" stiles and rails on a 1/4" background surrounded with panel mould, base and chair rail. I had to match the existing in a house. It cost me about $100 in materials for an entire room (several sheets of 1/4" birch ply and pine mouldings) and I charged as much as real wainscot. The client was as pleased as punch.
I agree - 8' pieces of ply are not the best for rails and really are no cheaper than going with solid. If my panel mould is rabbeted, I will miter and glue the mould into frames then turn them over and glue and nail the ply to the panel mould. A small bead of panel adhesive around the perimeter and some in the field, I then push the unit into place and nail discriminately through the mould into the rails. This makes for tight miters, ply tight to the moulding and the rabbet tight to the rails. Once the panel adhesive cures it makes a solid connection to the wall, and 1/4" ply is sufficient. This does not allow you to nail the ply to the wall first, which I refuse to do anyway, and apply the stile and rails after. It sounds involved but is actually quicker than trying to fit miters in place to walls that are not flat.